Deployments
Deployments is one of the most interesting apps in Meteor Next. Gives you the ability to execute SQL queries (including logic) massively, in a controlled and safe way, to multiple servers.
In a nutshell:
- 🚀 Fast: Executions make use of parallelism + cross-region to balance the workload to different servers and to maximize the throughput without affecting the current performance.
- 💪 Resilient: Executions have the capacity to recover quickly from difficulties (network and query errors).
- 🐍 Python: Add Python logic to deployments for complex executions.
- ✨ Transform: Perform searches and data transformation with the execution results.
- ✉️ Share: Share a deployment results with other users.
- 🕒 Schedule: Decide when a deployment should start.
- 🔎 Inspect: Search and filter every deployment done in the past.
- 🔔 Alerts: Receive a notification whenever a deployment finishes (in-app notifications & Slack integration).

Deployments - List

Deployments - Execution

Deployments - Results
Architecture
How Meteor Next works under the hood to achieve fast and secured deployments?
There are two factors to take into account:
- 🚀 Parallelism: The deployment is performed at the same time in multiple database servers.
- 🌎 Cross-Region: The deployment is executed in each Region using SSH Tunnel, reducing drastically the delay between queries.
To put a little of context before going further, remember that a Region is a resource that is assigned to one or more servers and is identified by a name and with the option to enable SSH Tunnel.
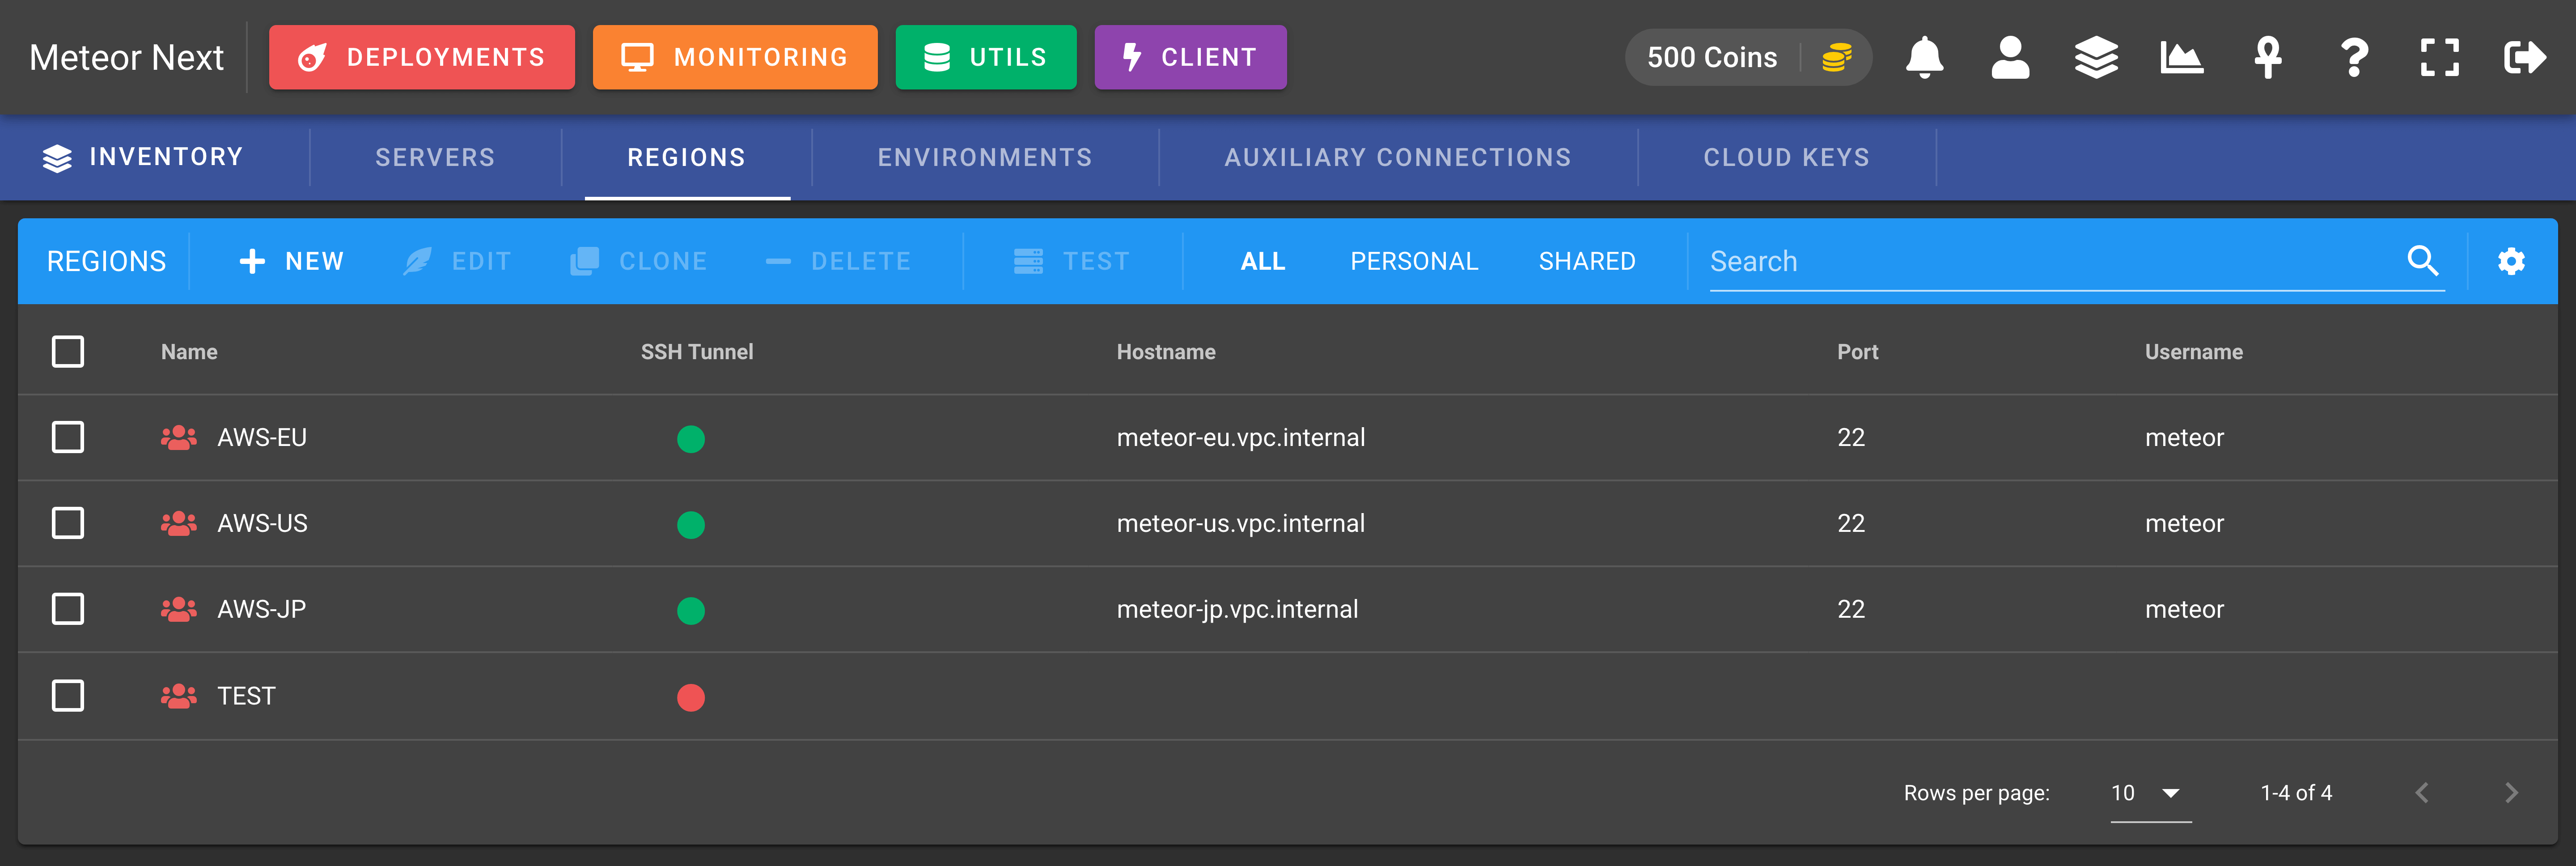
List of regions
So when we're talking to Regions that have the SSH Tunnel enabled (Cross-Region) think about Linux machines that Meteor uses to balance the deployment workload and therefore to speed up the execution.
Here's an example of a deployment being executed in four different regions: North America (NA), South America (SA), Africa (AF), Asia (AS).
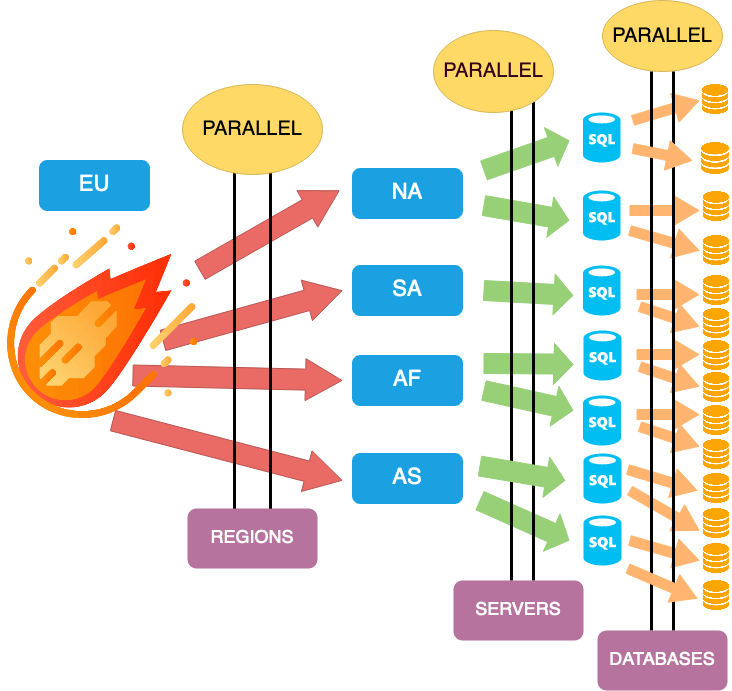
As we can see, Meteor Next uses a 3-Level of parallelism. Firstly, the parallelization is performed at region level. Subsequently, for each region a new depth level of concurrency is started for each server, and finally a new level of parallelism is performed for databases.
To better understand how all this works, let's make two possible scenarios:
Not using Cross Region
To start a deployment, is required to choose an Environment. Remember that an environment is a resource that contains servers (nothing more, nothing less). It's a way to organize servers.
Let's say that we choose the environment Production that contains 7 servers:
| Server Name | Region Name | Region SSH Tunnel |
|---|---|---|
| Server 01 | NA | ❌ |
| Server 02 | NA | ❌ |
| Server 03 | SA | ❌ |
| Server 04 | AF | ❌ |
| Server 05 | AF | ❌ |
| Server 06 | AS | ❌ |
| Server 07 | AS | ❌ |
As we can see there's a total of four regions and each region contains two servers except SA (South America) which contains only one.
Here's an image representing this example:
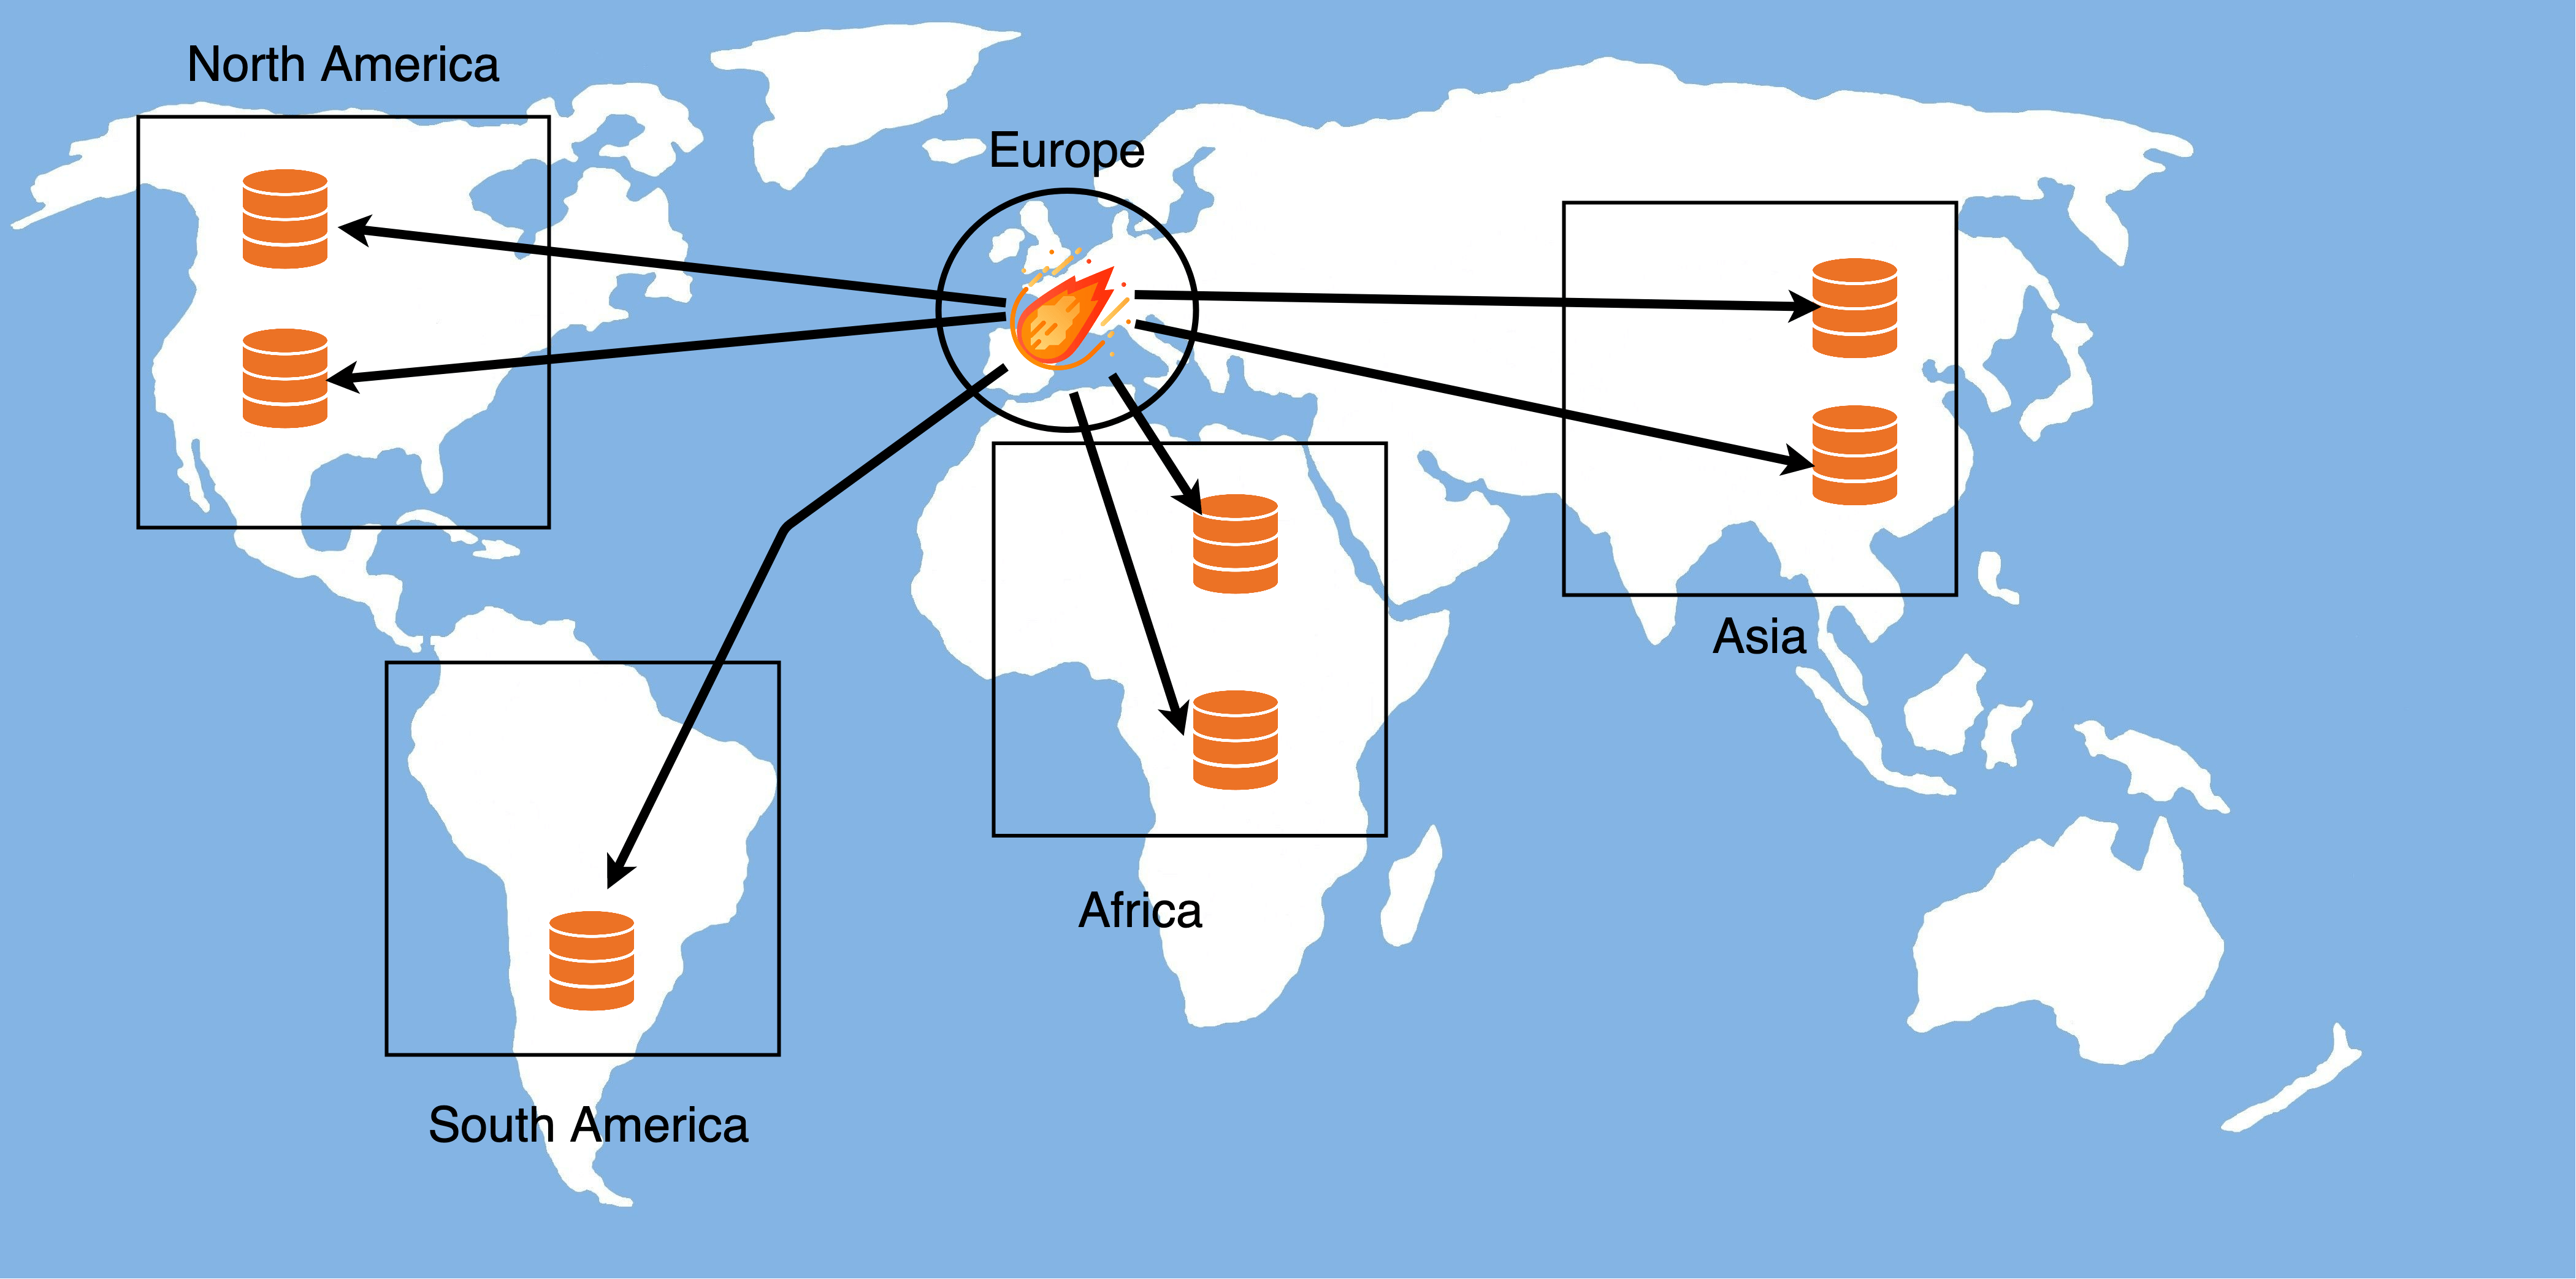
Without Cross Region
All the SQL queries will be executed from the Docker container meteornext (located in Europe) to all seven servers.
By using this scenario, the execution will be affected by high latency, since all servers are located in different geographical regions than the meteornext container.
Using Cross Region
We should start using Cross Region when we have several servers in different geographical regions (e.g., Europe, North America, Asia).
Imagine that we have Meteor Next installed in a machine located in Europe. What would happen if we would like to execute SQL queries to a server located in another region? Well, we will have to face a lot of delay, since we would have to execute queries from a long distance (e.g., Europe, Asia).
By using Cross Region, all the executions are done in each region. In this way the latency is reduced drastically and furthermore all the computing workload is balanced in different machines.
Here's an example of a Cross-Region deployment:
| Server Name | Region Name | Region SSH Tunnel |
|---|---|---|
| Server 01 | NA | ✅ |
| Server 02 | NA | ✅ |
| Server 03 | SA | ✅ |
| Server 04 | AF | ✅ |
| Server 05 | AF | ✅ |
| Server 06 | AS | ✅ |
| Server 07 | AS | ✅ |
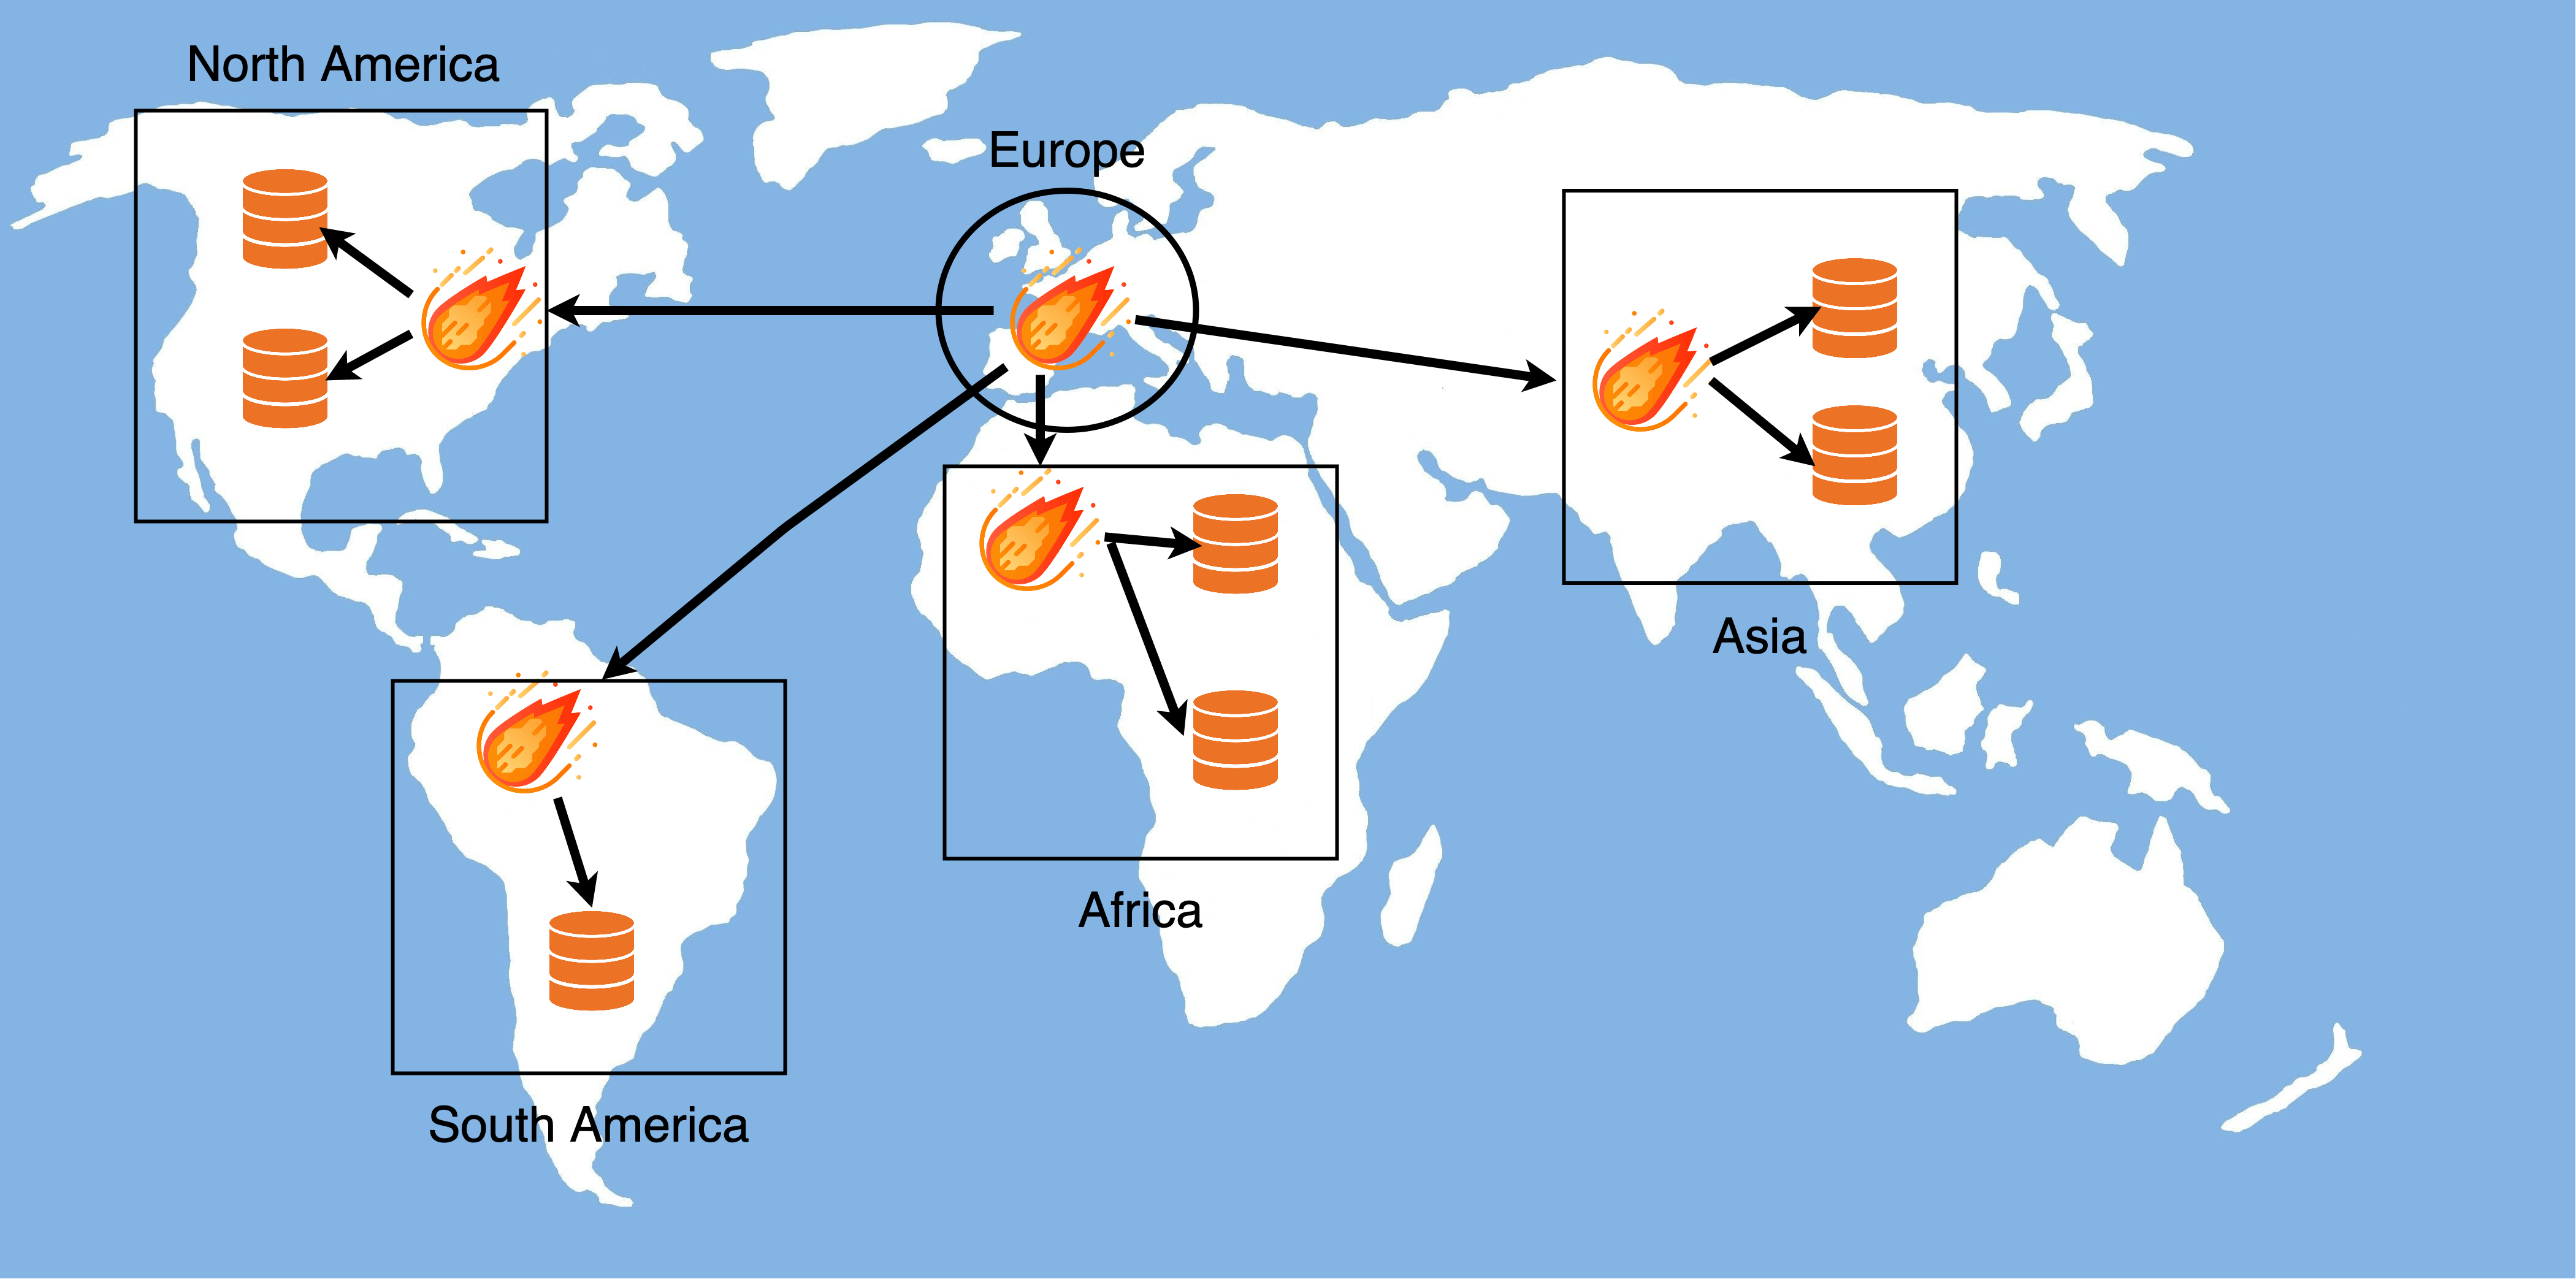
Using Cross Region
By using Cross-Regions (SSH Tunnel enabled), Meteor Next goes a step further. Aside from providing a tunnel to connect to a server using an intermediary machine, Meteor also deploys a binary to each SSH Tunnel machine (in ~/.meteornext).
This binary is in charge of executing the deployment for the servers that are located in their region. When the execution finishes, all the execution details are sent to the Docker container where Meteor Next resides.
After that, Meteor merges all the logs from the different regions and leaves it ready for the user to be viewed.
In this scenario, the execution goes much faster to finish. There is no longer latency between SQL queries and the computing process is balanced between different regions.
TIP
It's recommended to use Cross-Region deployments when you have different servers that are located in different geographic regions.
Releases
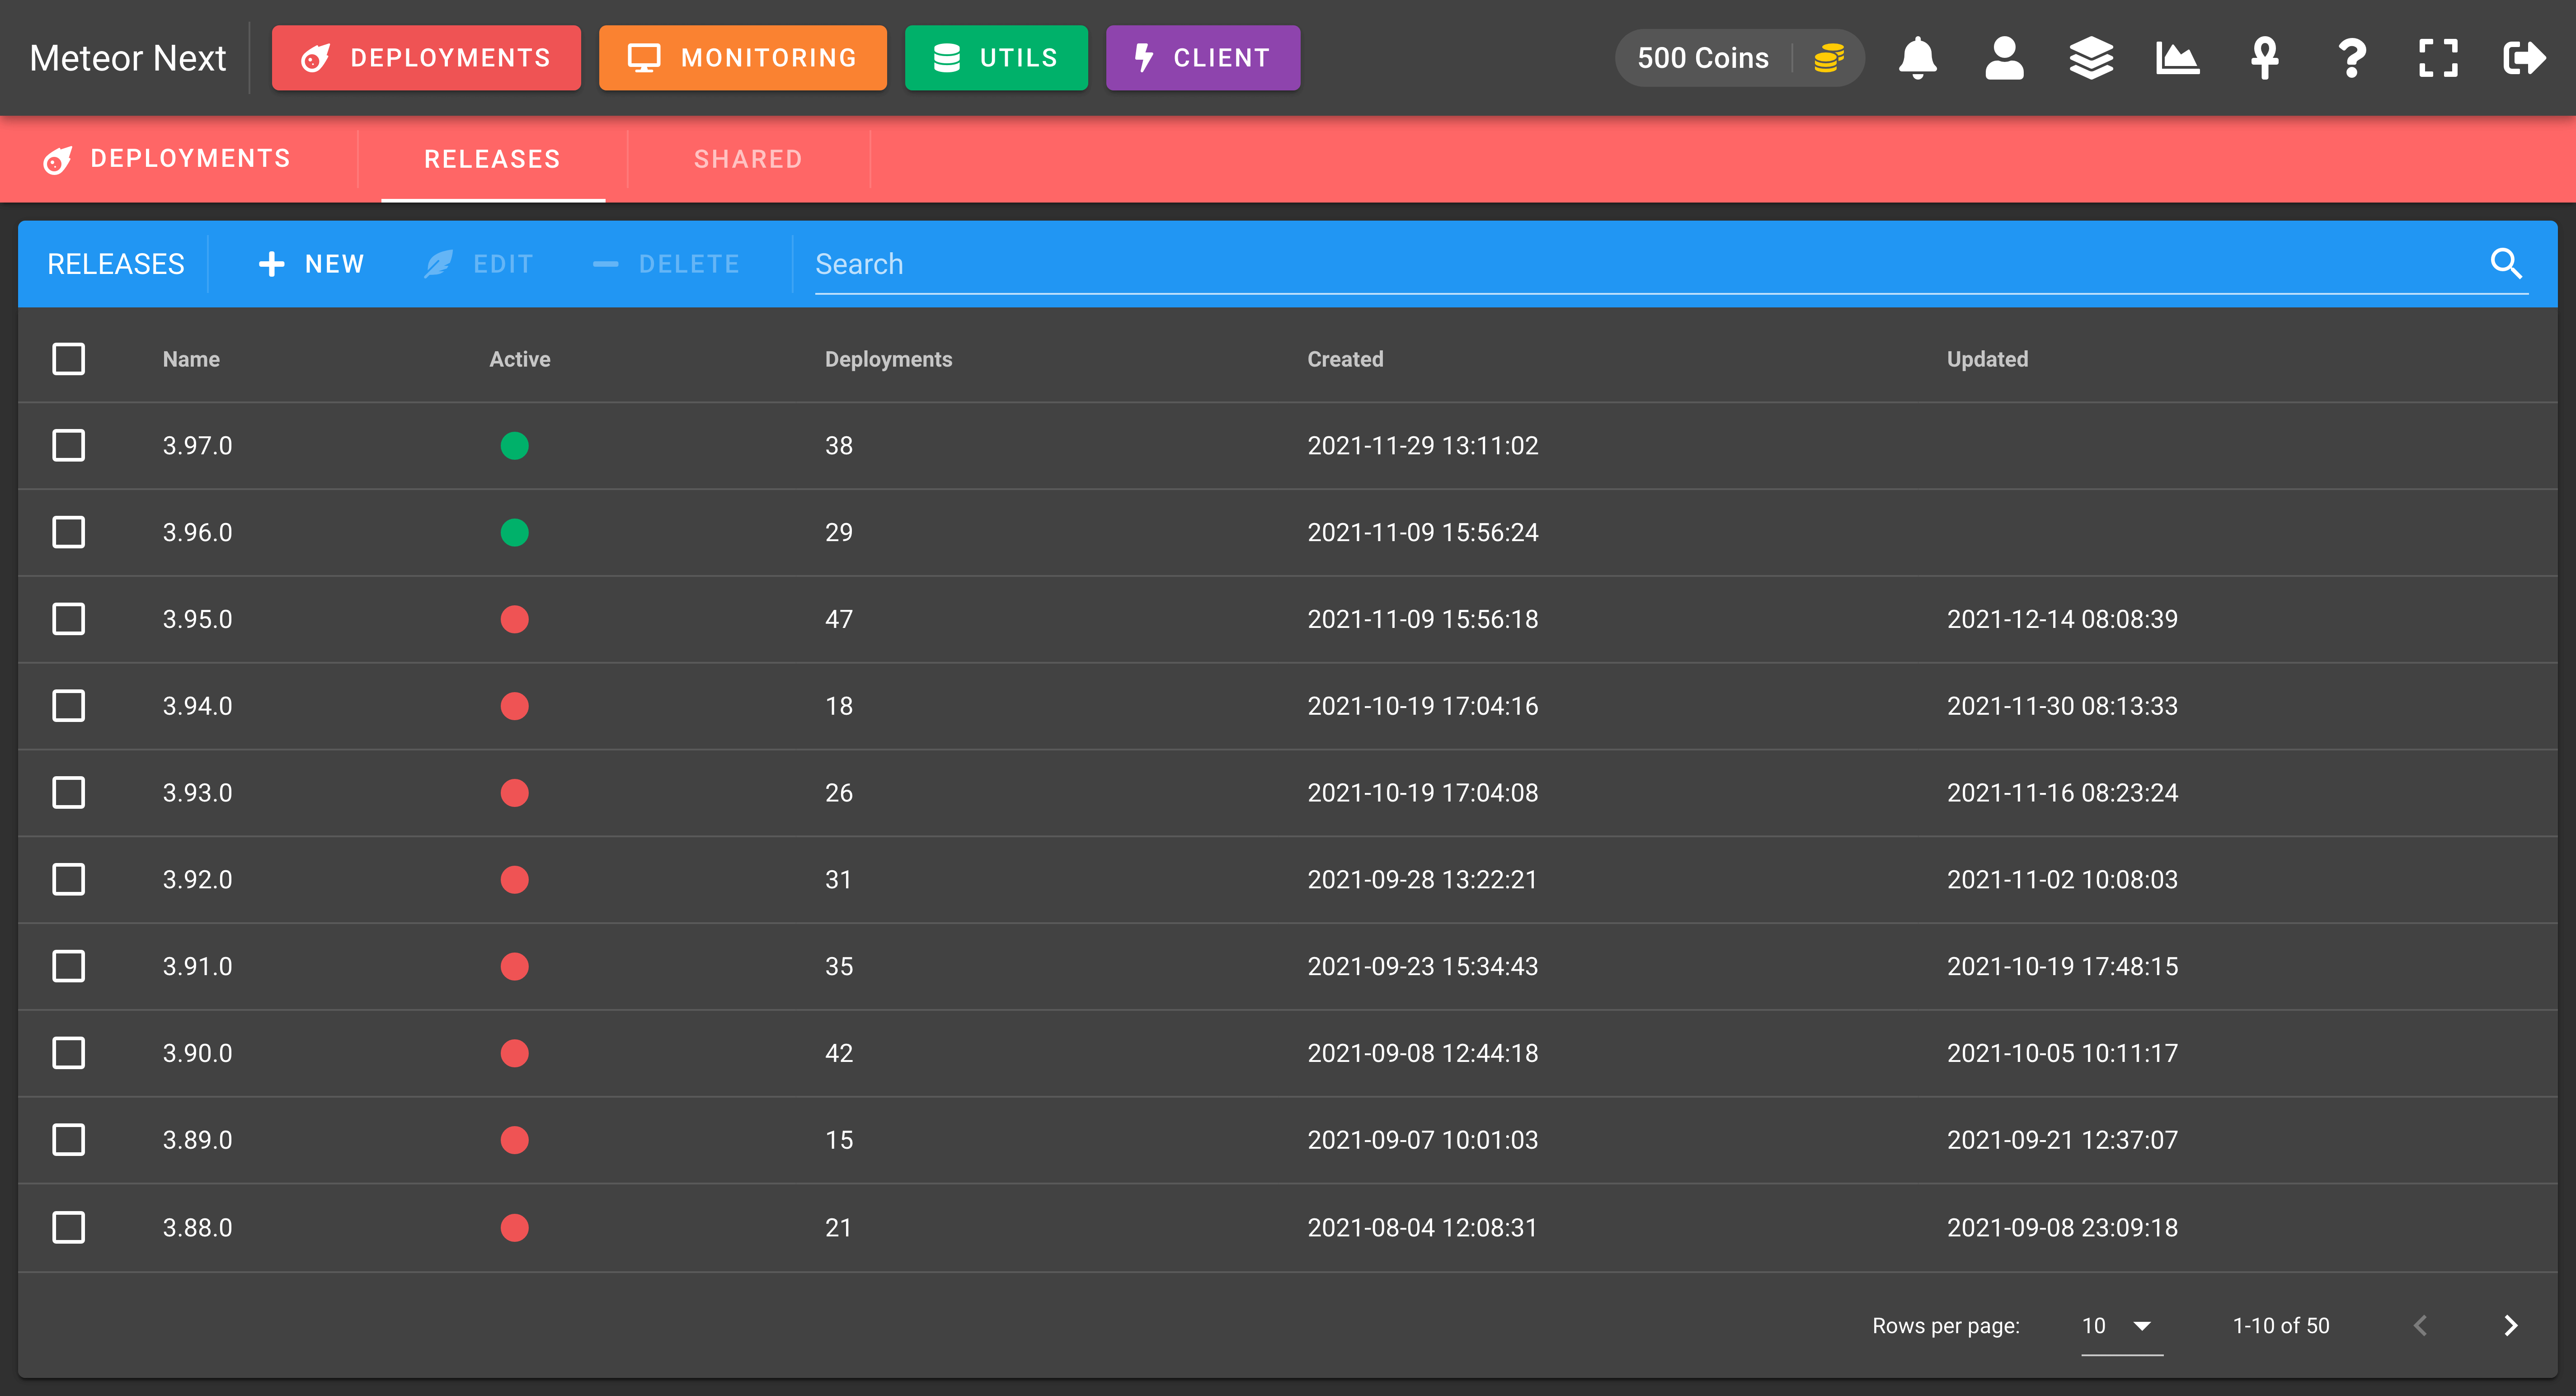
A release is a resource that helps us to organize deployments. It's like a folder that contains deployments.
Releases - List
A Release is identified by a name and a flag called Active that can be either enabled or disabled.
A release marked as active means that all their deployments will be visible (in the Deployments section). Accordingly, a release marked as non-active means that all their deployments will be hidden (in the Deployments section).
Why is this Active flag needed?
Imagine that we are Database Engineers, and we are in charge to make database deployments for daily needs (bug fixes, new features or data retrieval).
Every month, the company releases a new version of their product. We have a Release created "3.1.0" with several deployments already done.
Today the company releases in Production the 3.1.0 Release for all their customers, containing all the deployments we made.
At this point, we are not still interested of seeing all the past deployments. We just want to have a new release to contain all the future deployments for the next monthly company's release.
What we do is to create a new active Release with the name "3.2.0" and update the previous one (3.1.0) setting the active flag disabled.
Basic
Basic deployments are used to execute SQL queries through several servers.

Basic Deployment
These are the fields needed to be filled before starting an execution:
Name
The desired name to identify the current deployment (can be changed afterwards).
Release
The release to be associated (can be changed afterwards). Only the active Releases will appear.
Environment
The environment to be applied.
Databases
The target databases to apply the execution (accepts a list of databases separated by commas and the wildcards "%", "_").
Some examples:
- One database
mydatabase1
- Some databases
mydatabase1, mydatabase2, mydatabase3
- All databases that its name starts with 'mydatabase'
mydatabase%
Queries
The list of SQL queries to be executed.
Method
The deployment method to be used:
Validate: Tests all server connections (no queries are executed). This method just checks that Meteor Next can reach all the servers with the credentials configured in the Inventory.
Test: A simulation is performed (only SELECTs and SHOWs are executed). For other sentences (apart from selects and shows) the deployment just checks if these sentences would either work or fail if they were executed.
Deploy: All queries are executed.
Note that both TEST and DEPLOY options also performs the VALIDATE method under the hood.
Scheduled
Turn on this option to schedule the execution.
Start execution
Turn on this option to start the execution just after creating the deployment. If you want to create the deployment but to execute it later, do not toggle this checkbox.
Pro
Pro deployments are used to execute SQL queries with logic through several servers.

Pro Deployment
These are the fields needed to be filled before starting an execution:
Name
The desired name to identify the current deployment (can be changed afterwards).
Release
The release to be associated (can be changed afterwards). Only the active Releases will appear.
Environment
The environment to be applied.
Code
A Python template to write the deployment.
############################################################
# Usage: https://docs.meteornext.io/guides/deployments#pro #
############################################################
import json

class blueprint:
    def __init__(self):
        self.queries = {
            # '1': "<query>"
        }

    #######################################################
    # Executed once per Server before all main executions #
    #######################################################
    def before(self, meteor, environment, region, server):
        pass

    ##############################
    # Executed once per Database #
    ##############################
    def main(self, meteor, environment, region, server, database):
        pass

    ######################################################
    # Executed once per Server after all main executions #
    ######################################################
    def after(self, meteor, environment, region, server):
        pass

    ########################
    # User Defined Methods #
    ########################
    def search(self, items, key, value):
        # Search a key value in a list of dictionaries
        return [i for i in items if i[key] == value]

    def str2dict(self, data):
        # Convert a string representation of a dictionary to a dictionary
        return json.loads(data)

    def dict2str(self, data):
        # Convert a dictionary to a string
        return json.dumps(data, separators=(',', ':'))
Method
The deployment method to be used:
Validate: Tests all server connections (no queries are executed). This method just checks that Meteor Next can reach all the servers with the credentials configured in the Inventory.
Test: A simulation is performed (only SELECTs and SHOWs are executed). For other sentences (apart from selects and shows) the deployment just checks if these sentences would either work or fail if they were executed.
Deploy: All queries are executed.
Note that both TEST and DEPLOY options also performs the VALIDATE method under the hood.
Scheduled
Turn on this option to schedule the execution.
Start execution
Turn on this option to start the execution just after creating the deployment. If you want to create the deployment but to execute it later, do not toggle this checkbox.
Mastering Pro Deployments
Pro Deployments are extremely useful if you want to add some application logic in your execution.
Before showing some examples to better understand how this all works, let's start explaining the parts of the blueprint:
CORE COMPONENTS
The following components are needed to be filled in order to perform a deployment.
self.queries: This variable stores all the queries to be executed.
def __init__(self):
    self.queries = {
        # '1': "<query>"
    }
main(...) This method is executed once per database. Inside this method is where the app's logic will be written.
def main(self, meteor, environment, region, server, database):
    pass
meteor.execute(...) This method is used to execute SQL queries.
meteor.execute(query=self.queries['1'], args=None, database=None, auxiliary=None, alias=None, output=True)
Arguments:
- query (Required): The query to be executed.
- args (Optional): Parameters used with query (tuple, list, dict).
- database (Optional): The database name.
- auxiliary (Optional): To use an auxiliary connection.
- alias (Optional): To add a query alias.
- output (Optional): To suppress the execution output from a query.
Returns:
If the query executed is an INSERT, UPDATE or DELETE it returns the number of rows affected (an integer value).
The rest of queries returns a list of dictionaries.
# Example: Executing a SELECT
[{"row1_col1": "val11", "row1_col2": "val12"}, {"row2_col1": "val21", "row2_col2": "val22"}]
ADDITIONAL COMPONENTS
Here are some additional components that may be useful in some deployments.
before(...): This method is executed once per Server before all main() executions.
def before(self, meteor, environment, region, server):
    pass
after(...): This method is executed once per Server after all main() executions.
def after(self, meteor, environment, region, server):
    pass
meteor.begin() This method is used to start a transaction.
meteor.begin()
meteor.commit() This method is used to commit a transaction.
meteor.commit()
meteor.rollback() This method is used to roll back a transaction.
meteor.rollback()
meteor.is_error() This method is used to check if a query in the current transaction has either succeed or failed. It returns a bool data type (true | false).
meteor.is_error()
meteor.lastrowid() This method is used to retrieve the AUTO_INCREMENT id of the last row that has been inserted or updated in a table. It returns an integer data type.
meteor.lastrowid()
USER DEFINED METHODS
In the last part of the blueprint, there are some methods that may be used in some deployments. Here, if you wish, you could add more methods:
search(...): This method searches a key value in a list of dictionaries.
def search(self, items, key, value):
    return [i for i in items if i[key] == value]
str2dict(...): This method converts a string representation of a dictionary to a dictionary.
def str2dict(self, data):
    return json.loads(data)
dict2str(...): This method converts a dictionary to a string.
def dict2str(self, data):
    return json.dumps(data, separators=(',', ':'))
Let's see some examples to better understand how all of this works together.
Example 1: Execute a query to a database
DESCRIPTION
This example shows how to execute a query to the "emp" database.
BLUEPRINT
def __init__(self):
    self.queries = {
        '1': "SELECT * FROM employees"
    }

def main(self, meteor, environment, region, server, database):
    if database == 'emp':
        meteor.execute(query=self.queries['1'], database=database)
Example 2: Working with parameters
DESCRIPTION
This example shows how to pass escaped parameters to a query using two different methods.
BLUEPRINT
def __init__(self):
    self.queries = {
        '1': "INSERT INTO employees (name, salary) VALUES (%s, %s)",
        '2': "INSERT INTO employees (name, salary) VALUES (%(name)s, %(salary)s)"
    }

def main(self, meteor, environment, region, server, database):
    if database == 'emp':
        meteor.execute(query=self.queries['1'], args=('John', 1200), database=database)
        meteor.execute(query=self.queries['2'], args={"name":'Jeanna',"salary":1500}, database=database)
TIP
If you want to execute a query that contains an argument, and you also want to add the character % in some part of the query, since Python detects the % value as another parameter, to prevent this behaviour add two % instead of one.
The following example is getting all the employees with a salary of 1000 that their name starts with the letter "a".
def __init__(self):
    self.queries = {
        '1': "SELECT * FROM employees WHERE salary = %s AND name LIKE 'a%%'",
    }

def main(self, meteor, environment, region, server, database):
    if database == 'emp':
        meteor.execute(query=self.queries['1'], args=(1000), database=database)
Note that we doubled the character % in LIKE 'a%%'.
In case you are not passing any arguments to the query, then it's not needed to double the character %. Here's an example:
def __init__(self):
    self.queries = {
        '1': "SELECT * FROM employees WHERE name LIKE 'a%'",
    }

def main(self, meteor, environment, region, server, database):
    if database == 'emp':
        meteor.execute(query=self.queries['1'], database=database)
In this case, since we're not passing any arguments to the query, it's not necessary to double the % character. This query will retrieve all employees that their name starts with the letter "a".
Example 3: Handling query results
DESCRIPTION
This example shows how to get the result of an executed query and how to insert it into another table.
BLUEPRINT
def __init__(self):
    self.queries = {
        '1': "SELECT id, name, salary FROM employees LIMIT 2",
        '2': "INSERT INTO employees_test VALUES (id, name) (%s, %s)"
    }

def main(self, meteor, environment, region, server, database):
    if database == 'emp':
        result = meteor.execute(query=self.queries['1'], database=database)
        # result = [{"id": 1, "name": "John", "salary": 1200},{"id": 2, "name": "Jeanna, "salary": 1500}]
        for i in result:
            meteor.execute(query=self.queries['2'], args=(i['id'], i['name']), database=database)
As you may think, all this use case could have been reduced by executing a single query:
INSERT INTO employees_test (id, name)
SELECT id, name
FROM employees
LIMIT 2
Mind that the goal of these examples is to familiarize yourself working with this template.
Example 4: Working with JSONs
DESCRIPTION
This example shows how to handle JSON values stored in a string (e.g., VARCHAR) field type.
USE CASE
Update the city of the employee with "id = 1". Change their city to "Paris" if their city is "Barcelona".
BLUEPRINT
def __init__(self):
    self.queries = {
        '1': "SELECT extra_info FROM employees WHERE id = 1",
        '2': "UPDATE employees SET extra_info = %s WHERE id = 1"
    }

def main(self, meteor, environment, region, server, database):
    if database == 'emp':
        result = meteor.execute(query=self.queries['1'], database=database)
        # result = [{"extra_info": '{"city": "Barcelona", "department": "A10"}'}]
        # 1. Convert the JSON string to a true JSON.
        parsed_json = self.str2dict(result[0]['extra_info'])
        # parsed_json = {"city": "Barcelona", "department": "A10"}
        # 2. Update the city value to Paris if city = 'Barcelona'
        if parsed_json['city'] == 'Barcelona':
            # 3. Update the city value to Paris
            parsed_json['city'] = 'Paris'
            # 4. Convert the JSON to a JSON string to insert it again in the table
            value = self.dict2str(parsed_json)
            # value = '{"city": "Paris", "department": "A10"}'
            # 4. Insert the value to the database
            meteor.execute(query=self.queries['2'], args=(value), database=database)
Example 5: Working with Auxiliary Connections
DESCRIPTION
An auxiliary connection is a server that is used in Pro Deployments. It's used when we want to execute a query to a server that is not included in the selected environment.

Inventory - Auxiliary Connections
USE CASE
Get all languages that our company support. Iterate all databases that their name ends with '_logs' in all the servers that are included in the selected environment. For all these databases, insert the languages retrieved to the 'customer_languages' table.
BLUEPRINT
def __init__(self):
    self.queries = {
        '1': "SELECT id, name FROM languages",
        '2': "INSERT INTO customer_languages (id, name) VALUES (%s, %s)"
    }

def before(self, meteor, environment, region, server):
    # By executing this query inside this method, all databases into the main() method will be able to access this variable. Doing it this way we avoid that this query is executed by each database.
    self.languages = meteor.execute(query=self.queries['1'], database='core', auxiliary='core01-prod')
    # self.languages = [{"id": 1, "name": 'english'},{"id": 2, "inc": 'spanish'}]

def main(self, meteor, environment, region, server, database):
    if database.endswith('_logs'):
        for l in self.languages:
            meteor.execute(query=self.queries['2'], args=(l['id'], l['name']) database=database)
Example 6: Debugging variables
DESCRIPTION
This example shows how to retrieve variable values.
BLUEPRINT
def main(self, meteor, environment, region, server, database):
    # Example 1: Debugging a string (this example works for all kind of variables).
    data = 'hello world'
    meteor.execute(query="SELECT %s AS 'data'", args=str(data), database=database, alias='DEBUG1')
    # Example 2: Debugging a dictionary.
    data = {'a': 1, 'b': 2}
    meteor.execute(query="SELECT %s AS 'data'", args=str(data), database=database, alias='DEBUG2')
    # Example 3: Debugging a dictionary (+ extending its values in the Transformation section).
    data = {'a': 1, 'b': 2}
    meteor.execute(query="SELECT " + ','.join([f"%s AS '{k}'" for k in data.keys()]), args=list(data.values()), database=database, alias='DEBUG3')
    # Example 4: Debugging a list of dictionaries (+ extending its values in the Transformation section).
    data = [{'a': 1, 'b': 2}, {'a': 3, 'b': 4}]
    for i in data:
        meteor.execute(query="SELECT " + ','.join([f"%s AS '{k}'" for k in i.keys()]), args=list(i.values()), database=database, alias='DEBUG4')
The following screenshot shows the result by executing the above code.
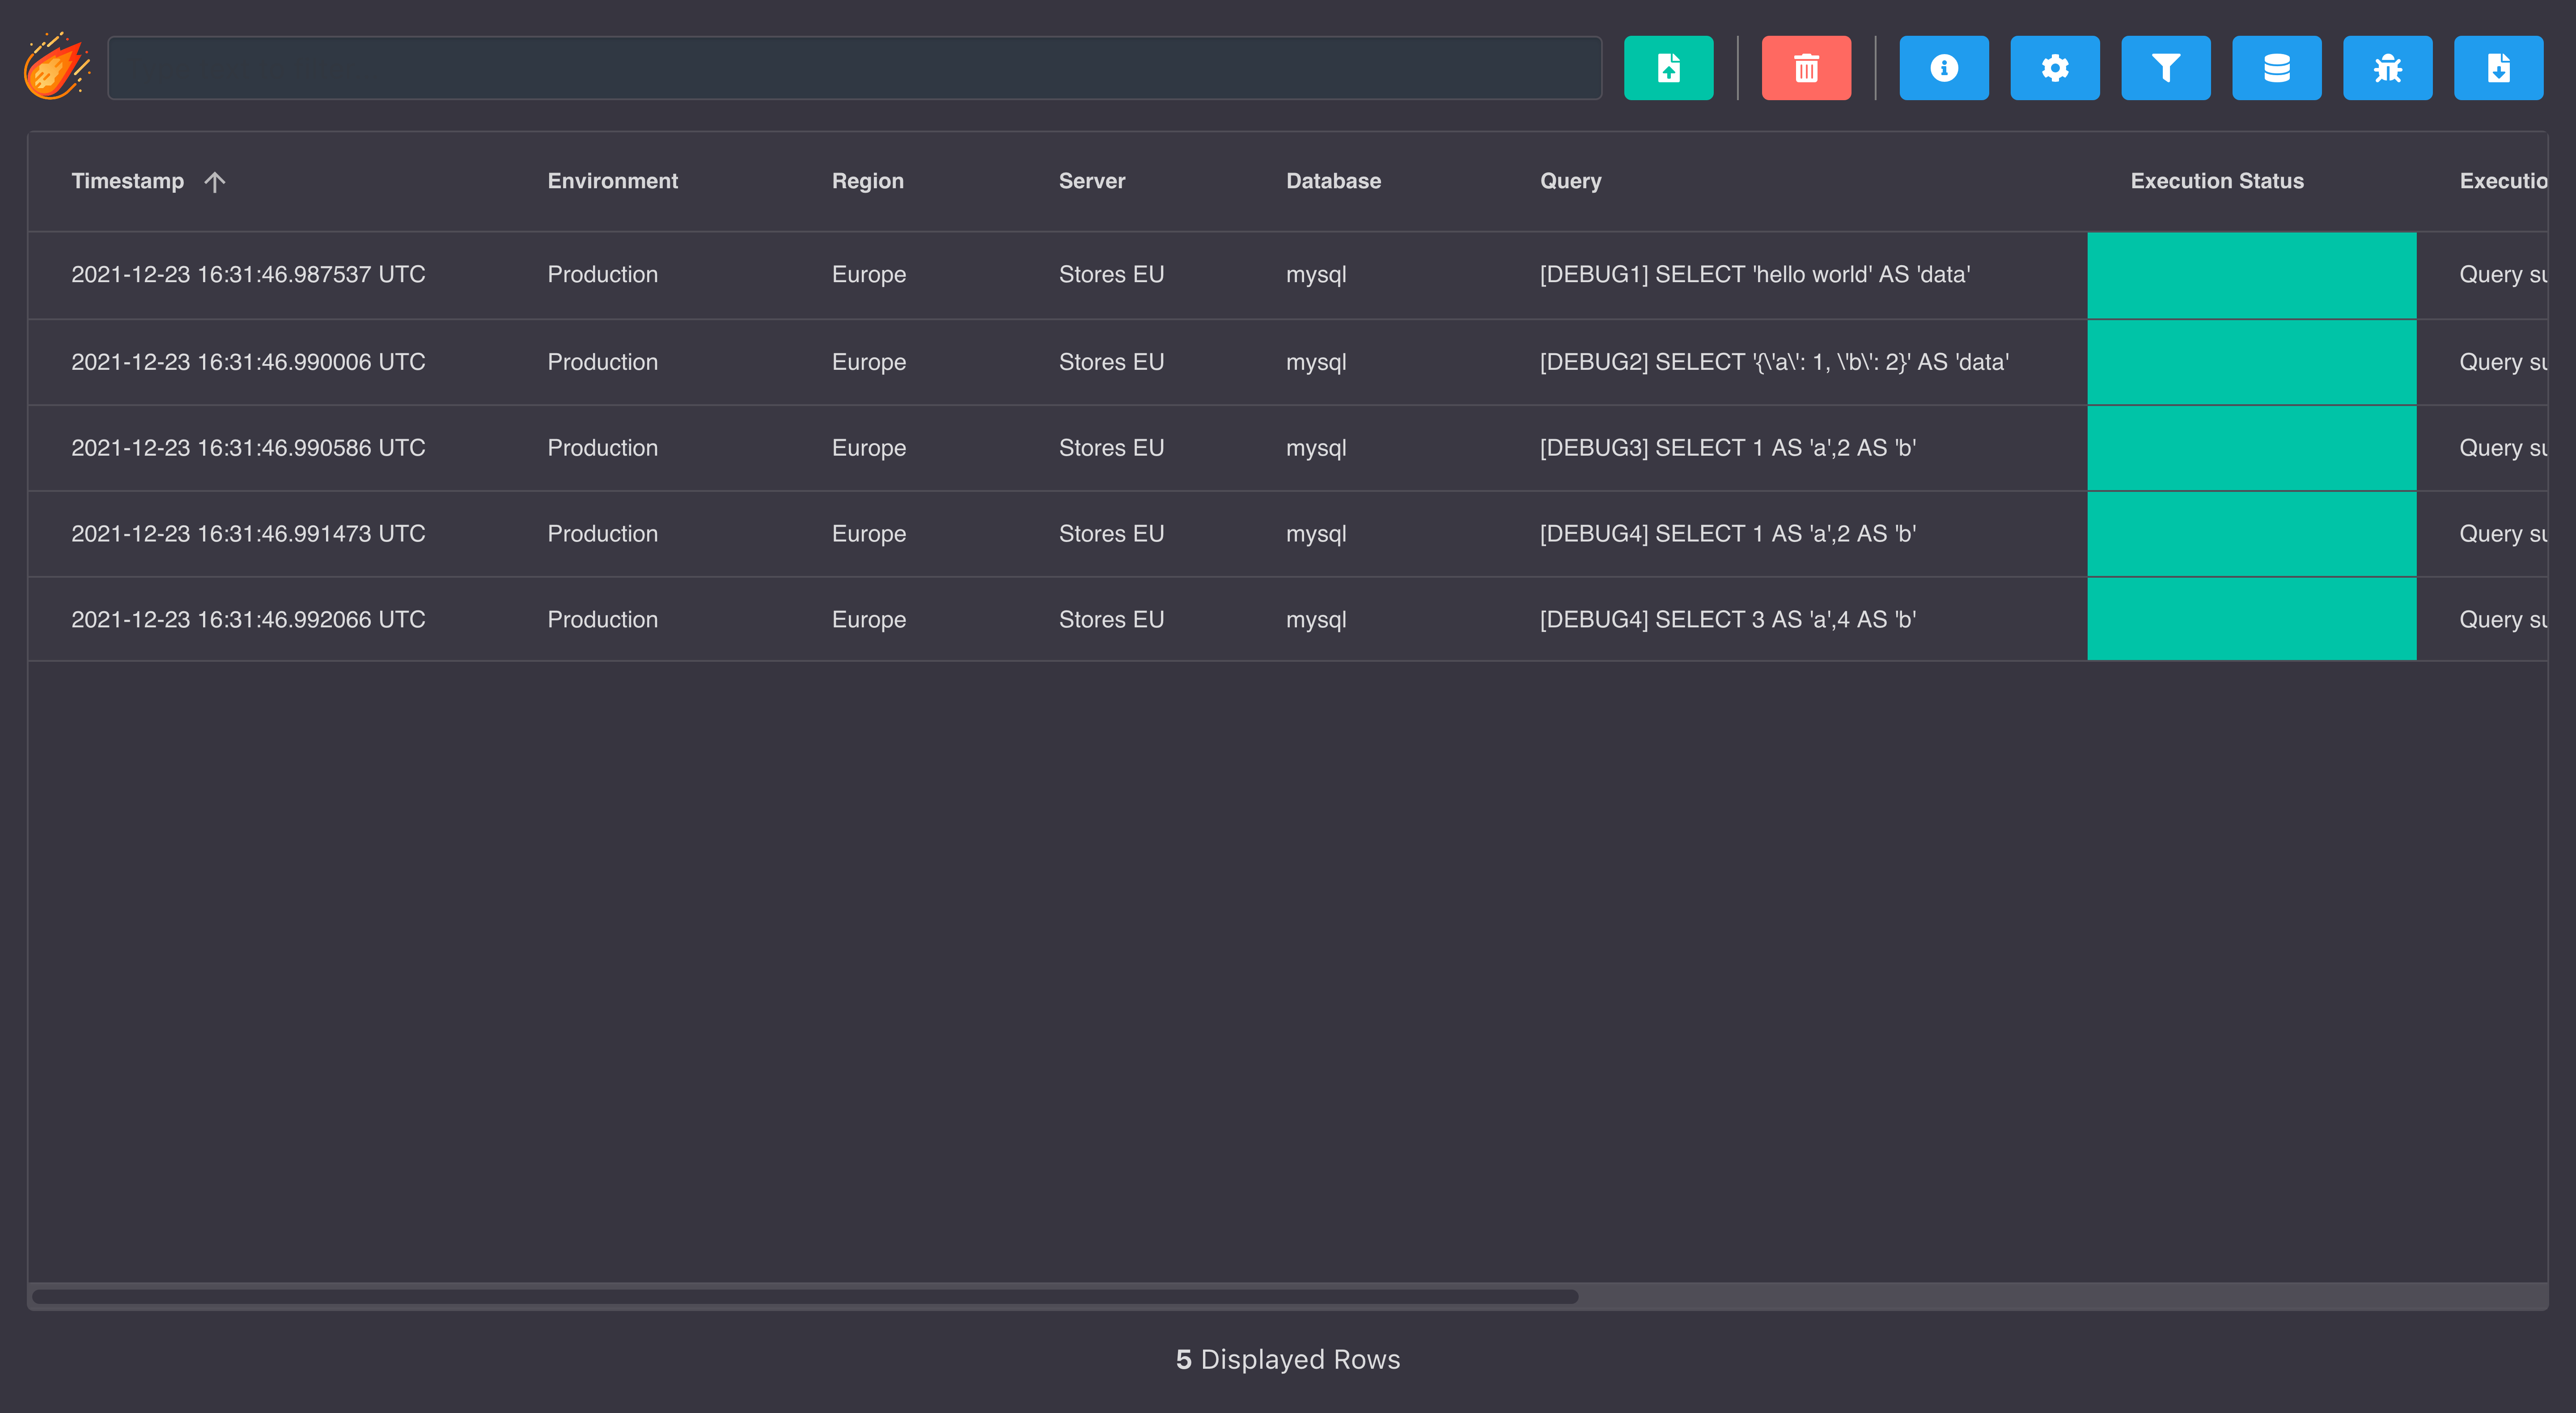
To better see its values, click the Transformation icon and choose the query to display.
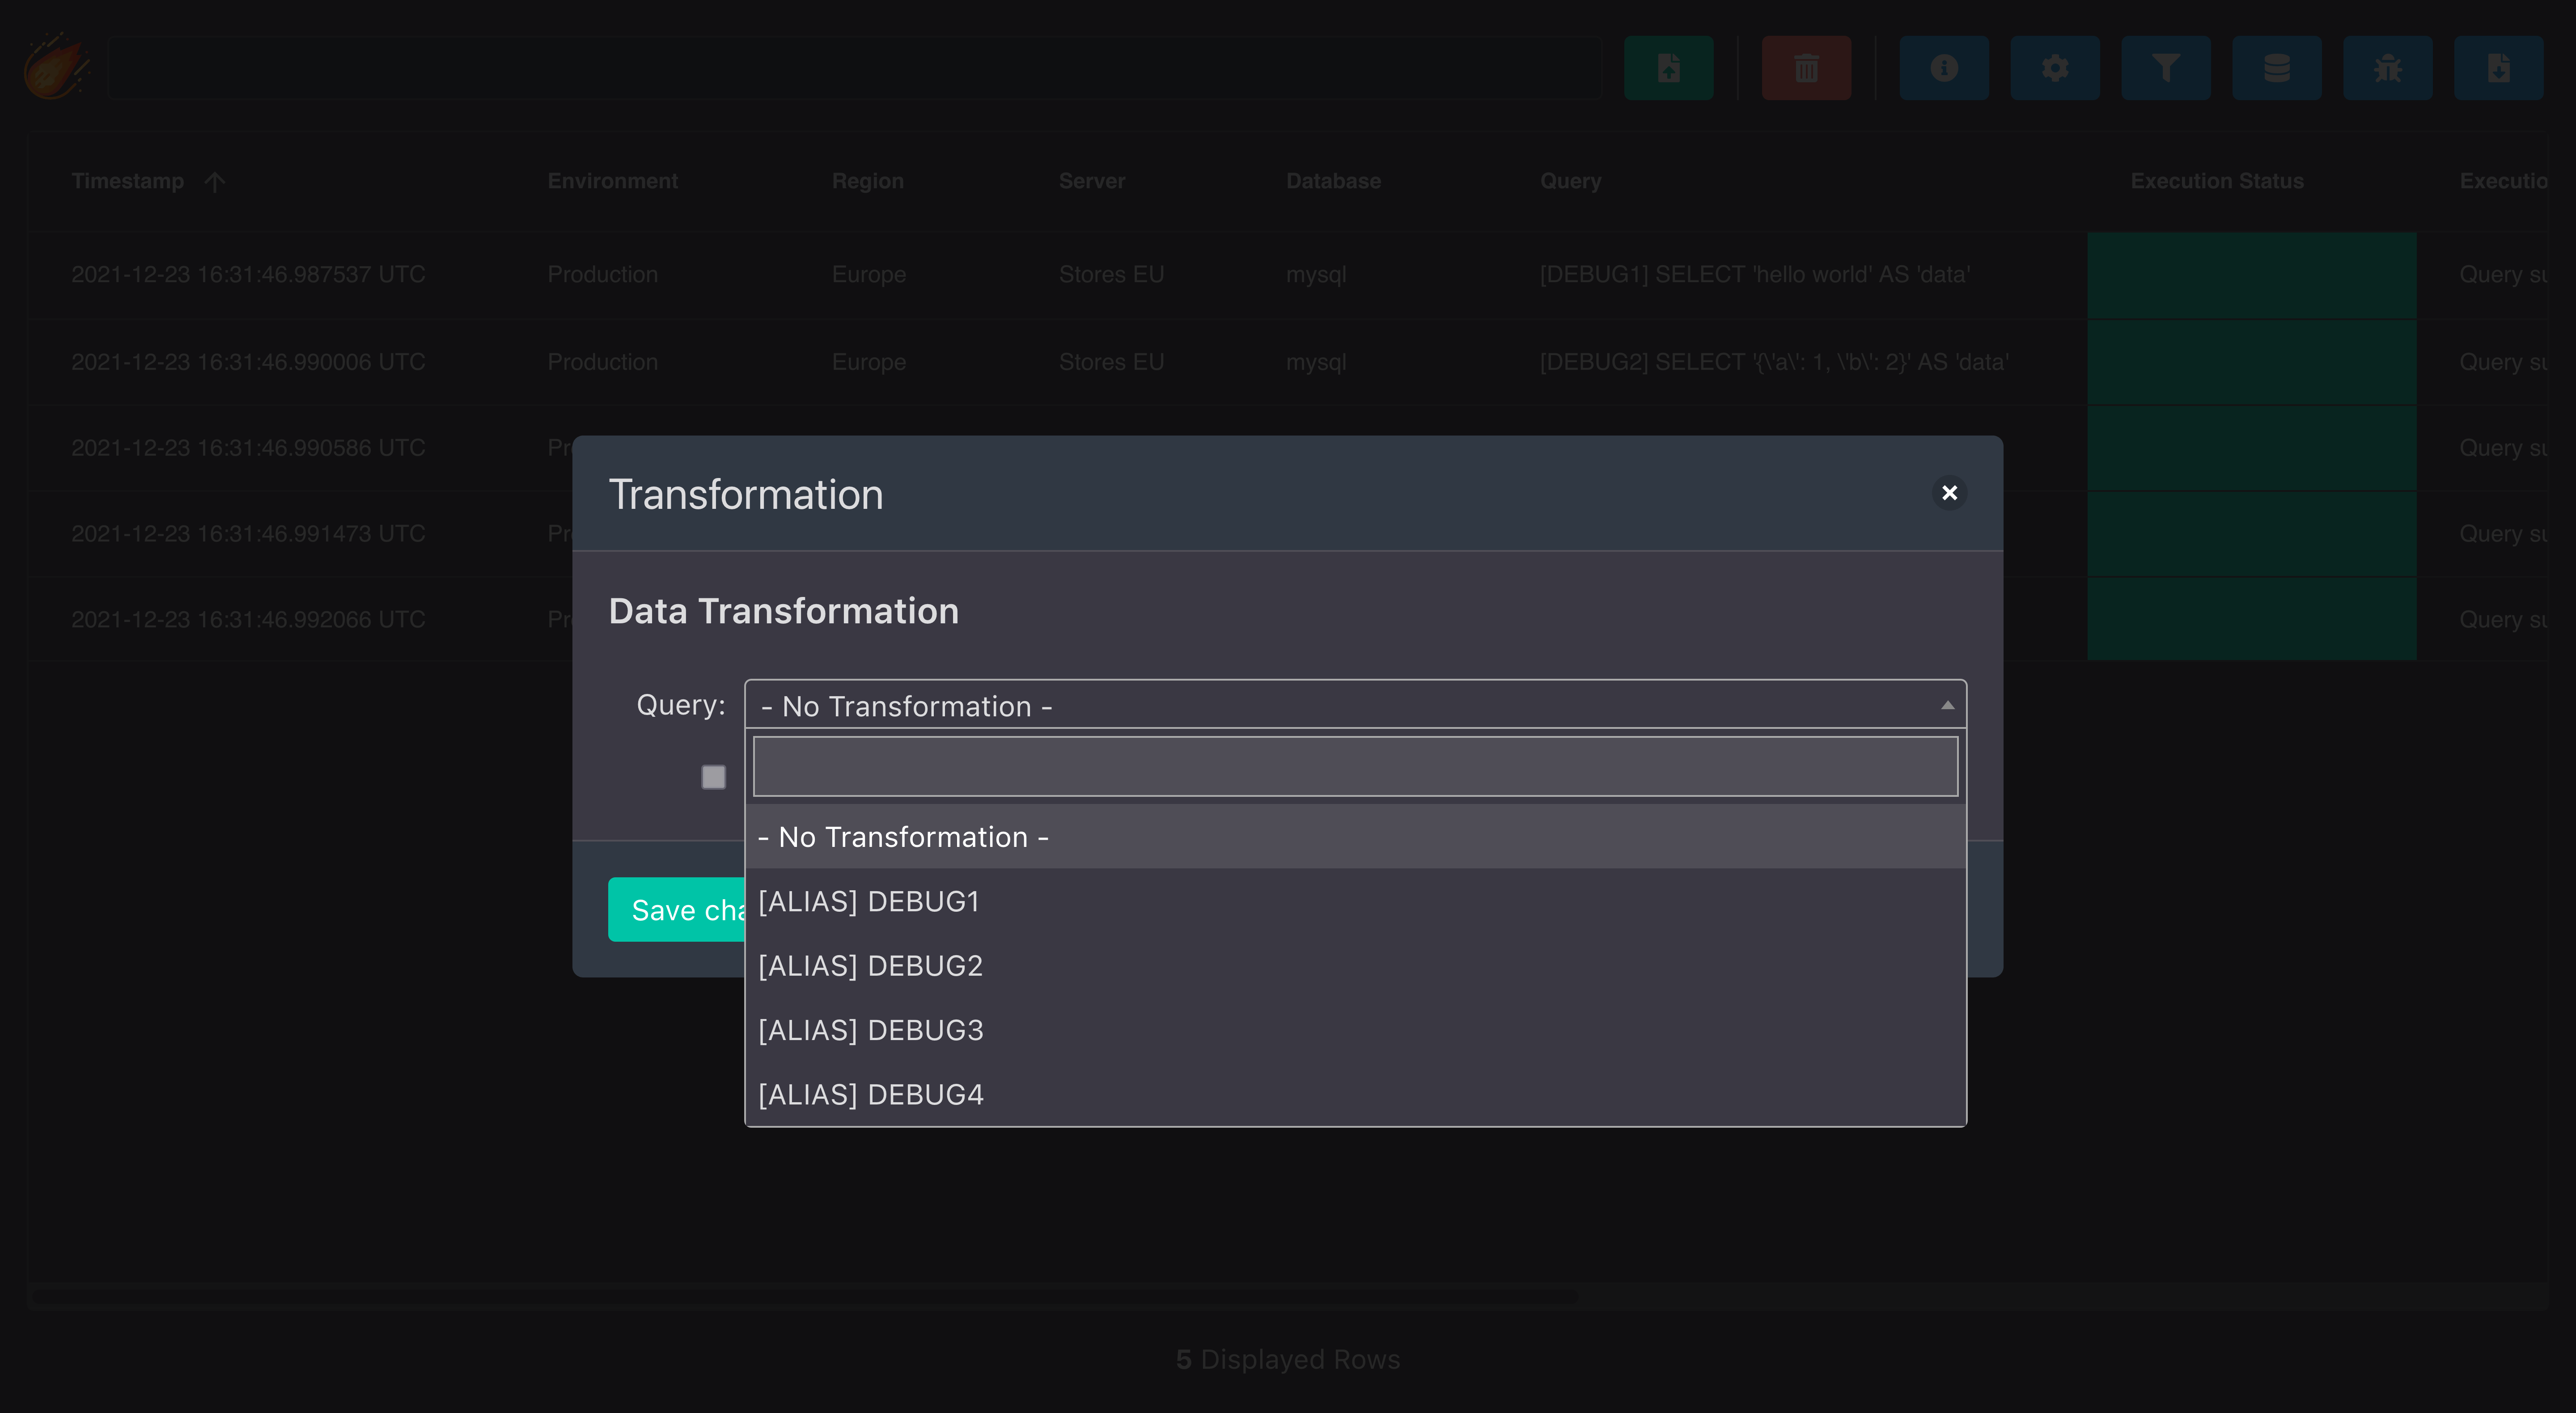
Here's the transformation of the first query named 'DEBUG1'.

Here's the transformation of the second query named 'DEBUG2'.

Here's the transformation of the third query named 'DEBUG3'.

Here's the transformation of the fourth query named 'DEBUG4'.

Example 7: Using alias
DESCRIPTION
This example shows how to assign alias to a query.
BLUEPRINT
def __init__(self):
    self.queries = {
        '1': "SELECT * FROM tbl WHERE db_name = %s",
    }

def main(self, meteor, environment, region, server, database):
    meteor.execute(query=self.queries['1'], args=(database), database=database, alias='myalias')
Which is the purpose of adding alias to queries?
Alias are used to group several queries. It's a way of telling the Meteor that some queries are the same and that they should be treated together as one.
Let's make an example to understand it better.
Imagine that we selected the TEST environment and this one contains two servers: SERVER1 and SERVER2. The SERVER1 contains two databases (hello1, hello2) and the SERVER2 contains just one database (hello3).
- SERVER1: hello1, hello2
- SERVER2: hello3
Following the above blueprint, when we start the deployment, these are the queries that will be executed (once per database).
SERVER1
- SELECT * FROM tbl WHERE db_name = 'hello1';
- SELECT * FROM tbl WHERE db_name = 'hello2';
SERVER2
- SELECT * FROM tbl WHERE db_name = 'hello3';
Despite we've written just one query, as we added a parameter to the query, it has caused that in the end we have three different queries.
By adding an alias to the query, we tell Meteor to treat all these queries as one. What will happen is that when the Deployment finishes, we will see all these queries results together. We won't have to select each query one by one to get the results.
So, query alias will mostly be needed when executing queries that have arguments that their value can differ.
Example 8: Using transactions
DESCRIPTION
This example shows how to create transactions and how to commit/rollback them.
BLUEPRINT
def main(self, meteor, environment, region, server, database):
    # Start a transaction
    meteor.begin()
    # Execute a DML query
    meteor.execute(query="INSERT INTO tbl VALUES ('hello')", database=database)
    # Rollback the transaction
    meteor.rollback()
    # Start another transaction
    meteor.begin()
    # Execute a DML query
    meteor.execute(query="INSERT INTO tbl VALUES ('hello')", database=database)
    # Commit the transaction
    meteor.commit()
Deploying the previous blueprint will actually execute the INSERT query only once. The first one will be rollbacked and the second one will be committed.
INFO
Bear in mind that if we start a transaction into an already started one, all the queries executed in the previous transaction will be rollbacked and then a new transaction will start.
Example 9: Suppressing a query output
DESCRIPTION
This example shows how to use the optional output parameter and why it can come in handy.
BLUEPRINT
def main(self, meteor, environment, region, server, database):
    result = meteor.execute(query="SELECT 'hello' AS query1", database=database, output=False)
    # result = [{"query1": "hello"}]
    meteor.execute(query="SELECT %s AS query2", args=(result[0]['query1']), database=database)

The output parameter is used to suppress the execution output of a query.
Why can it come in handy?
Imagine you need to execute millions of queries and some of them are big SELECTs, just needed to perform some logic and not for data retrieval.
By disabling the output of these SELECT queries, the deployment execution will take less time to finish, and the execution log will take less space.
TIP
If you need to execute thousands of queries, disable the output for all SELECTs just needed to perform some logic and not for data retrieval.
Example 10: Generate multiple parameters from a list of values
DESCRIPTION
This example shows how to execute an INSERT passing multiple values at once from a list.
BLUEPRINT
from itertools import repeat

def __init__(self):
    self.queries = {
        '1': "INSERT INTO tbl VALUES {}",
    }

def main(self, meteor, environment, region, server, database):
    values = [1,2,3]
    params = ','.join(repeat('(%s)', len(values)))
    # params = '(%s),(%s),(%s)'
    meteor.execute(query=self.queries['1'].format(params), args=(values), database=database)
    # INSERT INTO tbl VALUES (1),(2),(3)
Example 11: Generate multiple parameters from a list of dictionaries
DESCRIPTION
This example shows how to execute an INSERT passing multiple values at once from a list of dictionaries.
BLUEPRINT
from itertools import repeat

def __init__(self):
    self.queries = {
        '1': "INSERT INTO tbl VALUES {}",
    }

def main(self, meteor, environment, region, server, database):
    values = [{'col1': 1, 'col2': 2, 'col3': 3}, {'col1': 4, 'col2': 5, 'col3': 6}]
    inner_params = '(' + ','.join(repeat('%s', len(values[0].keys()))) + ')'
    # inner_params = '(%s,%s,%s)'
    params = ','.join(repeat(inner_params, len(values)))
    # params = '(%s,%s,%s),(%s,%s,%s)'
    meteor.execute(query=self.queries['1'].format(params), args=(values), database=database)
    # INSERT INTO tbl VALUES (1,2,3),(4,5,6)
Example 12: Debugging code errors
DESCRIPTION
Pro Deployments fail when some error is introduced into the Python code blueprint. For example, using a variable that has not yet being declared, or trying to access a list element that does not exist.
This example shows how to properly debug these unwanted code errors.
BLUEPRINT
def main(self, meteor, environment, region, server, database):
    try:
        a = 1 / 0
    except Exception as e:
        meteor.execute(query="SELECT %s AS 'class', %s AS 'description', %s AS 'line'", args=(type(e).__name__, e, e.__traceback__.tb_lineno), database=database, alias="ERROR")
If you find that your Pro Deployment fails, try to put all your code into the try scope.
After that, execute the deployment and then go to the RESULTS tab, apply a Data Transformation, choose the [ALIAS] ERROR query, and you will get what kind of error has occurred and the line where the error is located.
In the above example, this is what we would receive:
- Class: ZeroDivisionError
- Description: division by zero
- Line: 24
Example 13: Cleaning tables in chunks
DESCRIPTION
Sometimes when executing massive DELETEs it can lead to unwanted table locks. Also, this operation can be tedious and most of the time it can fail due to unexpected circumstances: timeouts, deadlocks or CPU spikes.
The recommended way of deleting millions of rows of a table is by doing it in chunks.
USE CASE
The following example performs a DELETE of the table logs in the emp database. This deletion is done in chunks of 10000. It will be executing the DELETE query multiple times until there's no more rows matching the WHERE filters.
BLUEPRINT
def __init__(self):
    self.queries = {
        '1': "DELETE FROM logs WHERE status = 1 AND has_expired = 1 LIMIT {}",
    }

def main(self, meteor, environment, region, server, database):
    if database == 'emp':
        chunks = 10000
        while True:
            # Start a transaction
            meteor.begin()
            # Execute the DELETE
            rows_affected = meteor.execute(query=self.queries['1'].format(chunks), database=database)
            # Commit the transaction
            meteor.commit()
            # If the query has ended with an error (rows_affected=None) or there are no more rows to delete (rows_affected=0), then exit.
            if not rows_affected:
                break
TIP
When executing INSERTs, UPDATEs or DELETEs the meteor.execute(...) method returns the rows affected. This value can be useful to perform this kind of operations.
The transaction is used to reflect the changes of each bulk query immediately as they are being executed. If the DELETE query had been executed without using transactions, other connections would not have seen the DELETE operation until the deployment had finished.
Being said that, it's always recommended to use transactions when executing queries that are separated in chunks (INSERTs, UPDATEs or DELETEs).
Example 14: Retrieving the last inserted id
DESCRIPTION
This example shows how to retrieve the AUTO_INCREMENT id of the last row that has been inserted or updated in a table.
We will be using the following table schema for testing purposes.
CREATE TABLE table1 (
    `id` INT UNSIGNED NOT NULL AUTO_INCREMENT,
    `name` VARCHAR(255) NOT NULL,
    PRIMARY KEY (`id`)
);
BLUEPRINT
def __init__(self):
    self.queries = {
        '1': "INSERT INTO table1 (`name`) VALUES ('John')",
        '2': "INSERT INTO table2 (`name`) VALUES (%s)",
    }

def main(self, meteor, environment, region, server, database):
    # Execute the INSERT
    meteor.execute(query=self.queries['1'], database=database)
    # Retrieve the last inserted id from the previous INSERT (last_inserted_id = 1).
    last_inserted_id = meteor.lastrowid()
    # We could now use this value to insert it in another table.
    meteor.execute(query=self.queries['2'], args=(last_inserted_id), database=database)
Example 15: Executing a query passing different data types parameters
DESCRIPTION
This example shows how to execute a query passing it two parameters, a string and a list.
BLUEPRINT
from itertools import repeat

def __init__(self):
    self.queries = {
        '1': "SELECT * FROM tbl WHERE col1 = %s AND col2 IN ({})",
    }

def main(self, meteor, environment, region, server, database):
    col1 = 'value1'
    col2 = [1,2,3]
    # We need to build the params for the variables that are a list.
    params = ','.join(repeat('%s', len(col2)))
    # Execute the SELECT.
    meteor.execute(query=self.queries['1'].format(params), args=(col1, col2), database=database)
    # SELECT * FROM tbl WHERE col1 = 'value1' AND col2 IN ('1','2','3')
Scheduled
Scheduled deployments are used to program a deployment to be executed automatically in a given time.
This feature comes in four flavours:
- One-Time execution: Execute a deployment once in a given date time.
- Daily execution: Execute a deployment each day at the same time.
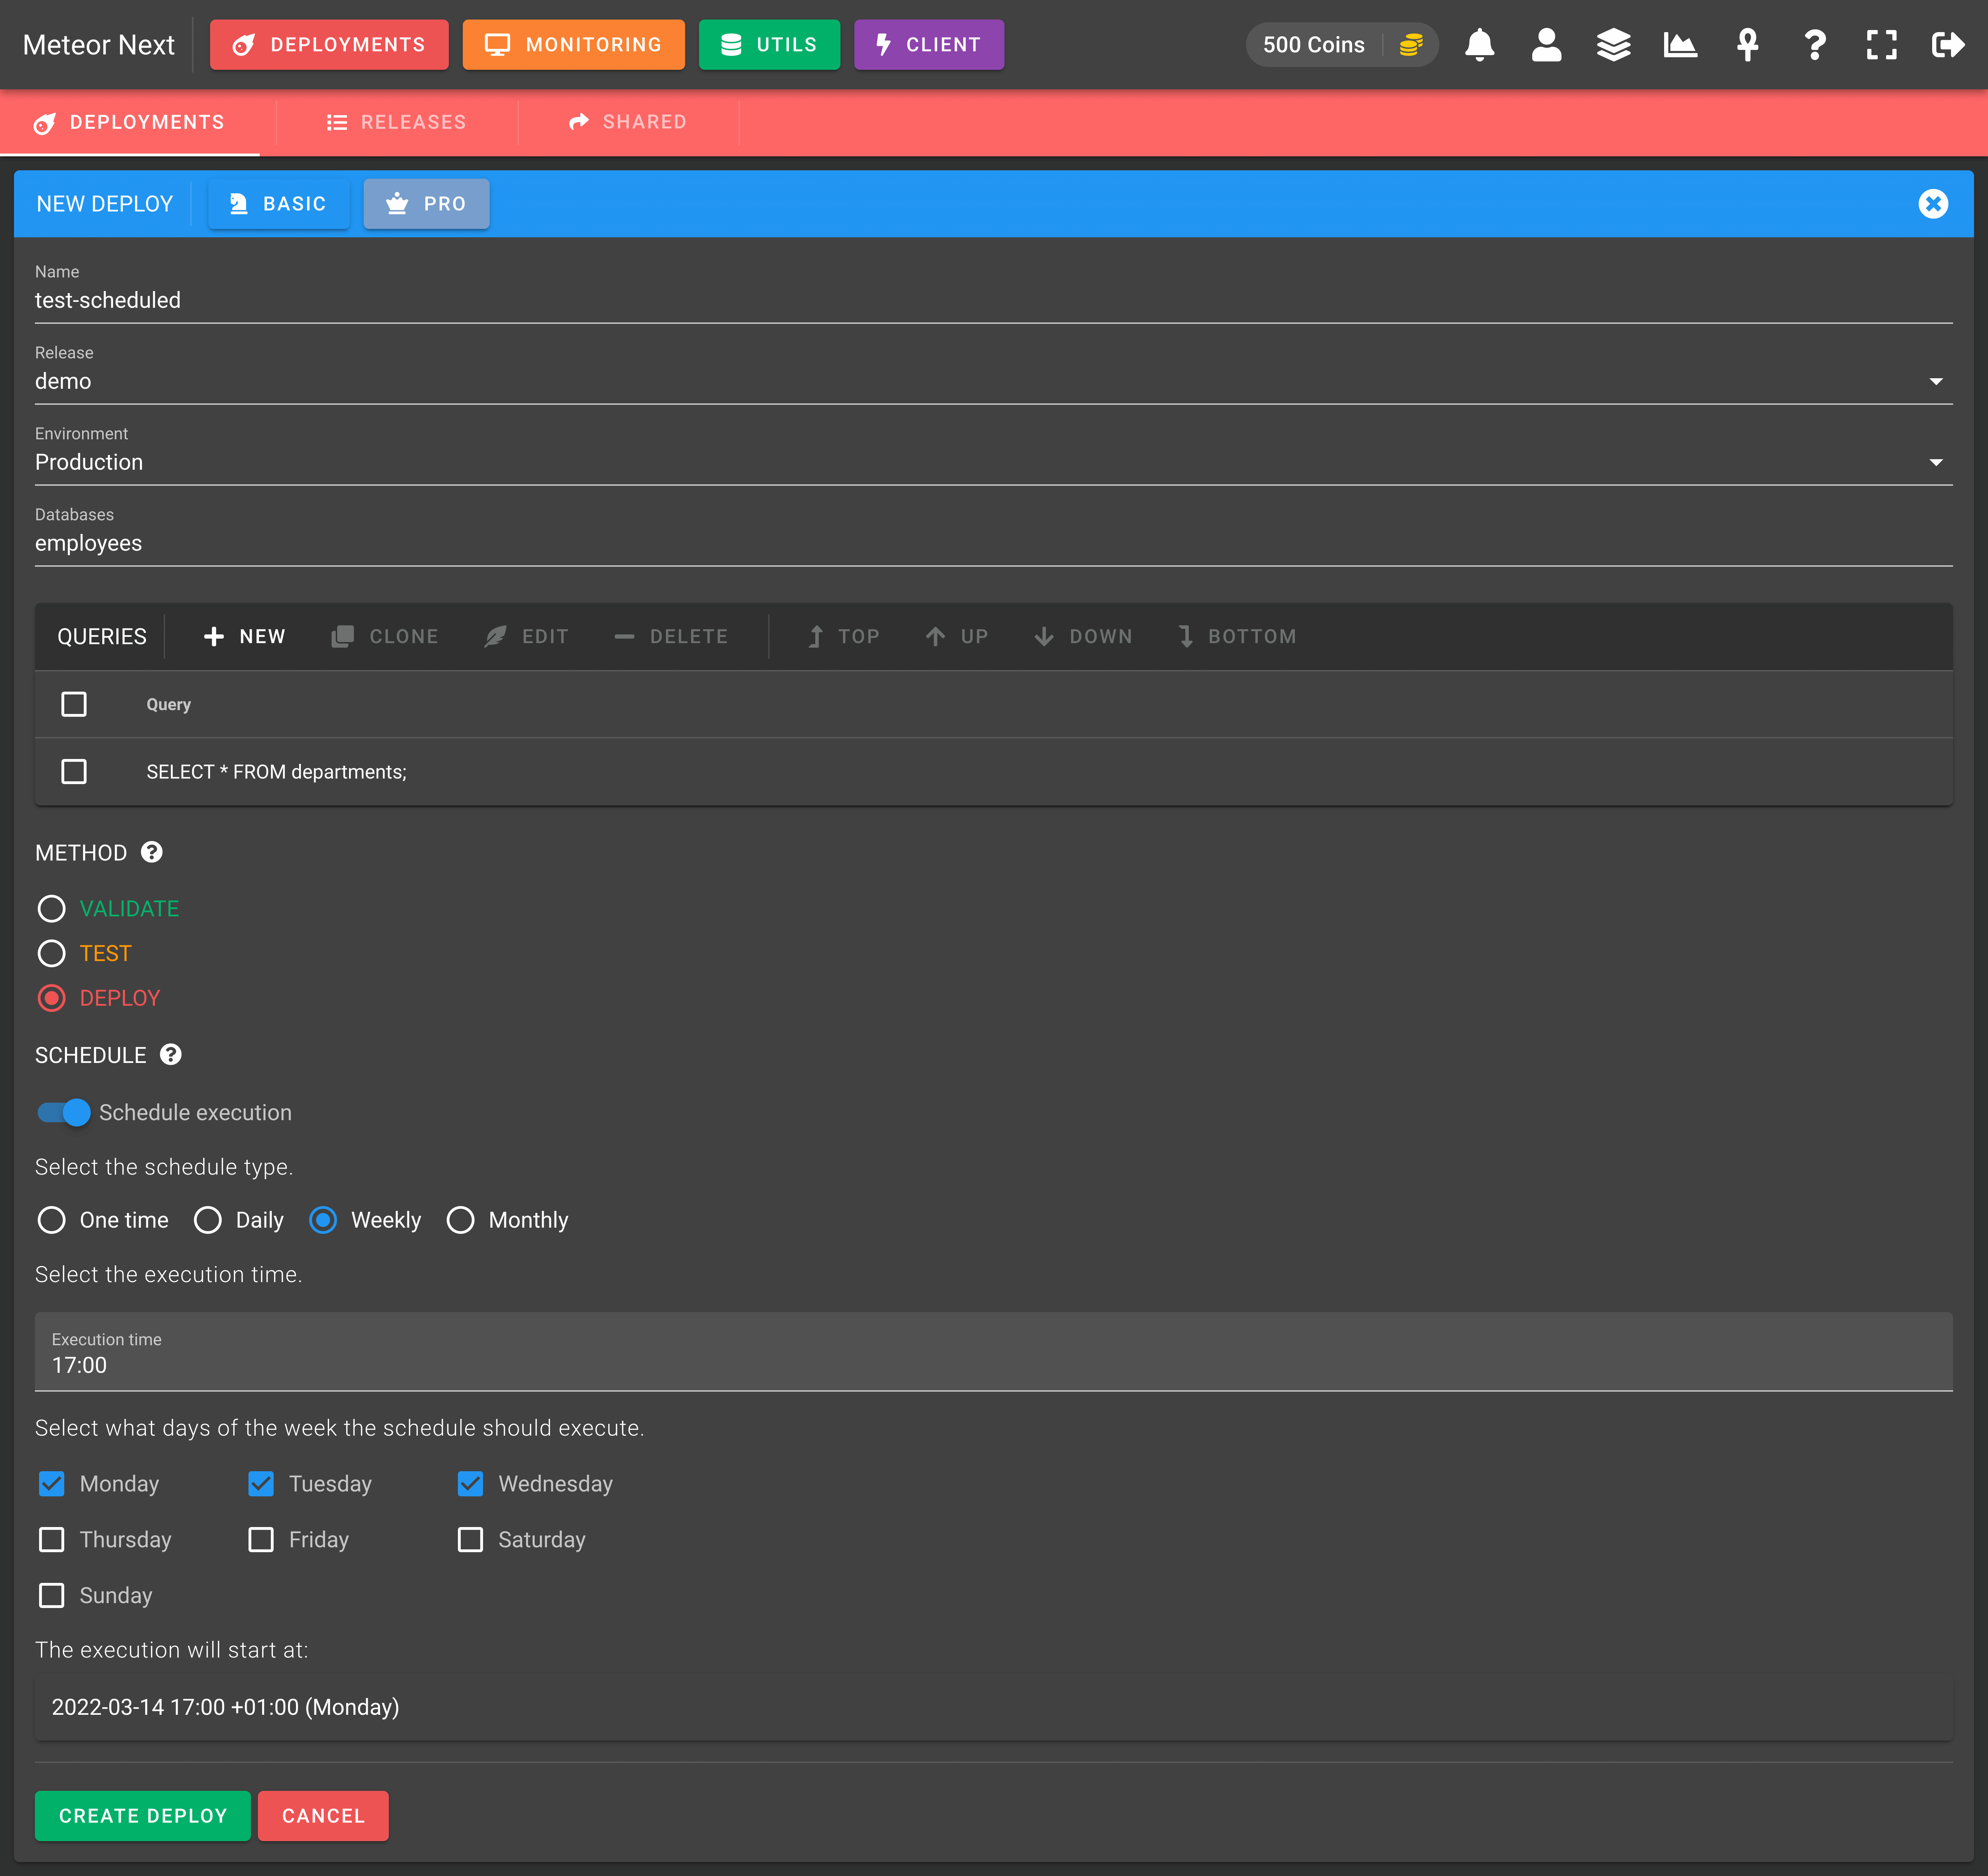
- Weekly execution: Execute a deployment in a specific time on the desired week days.
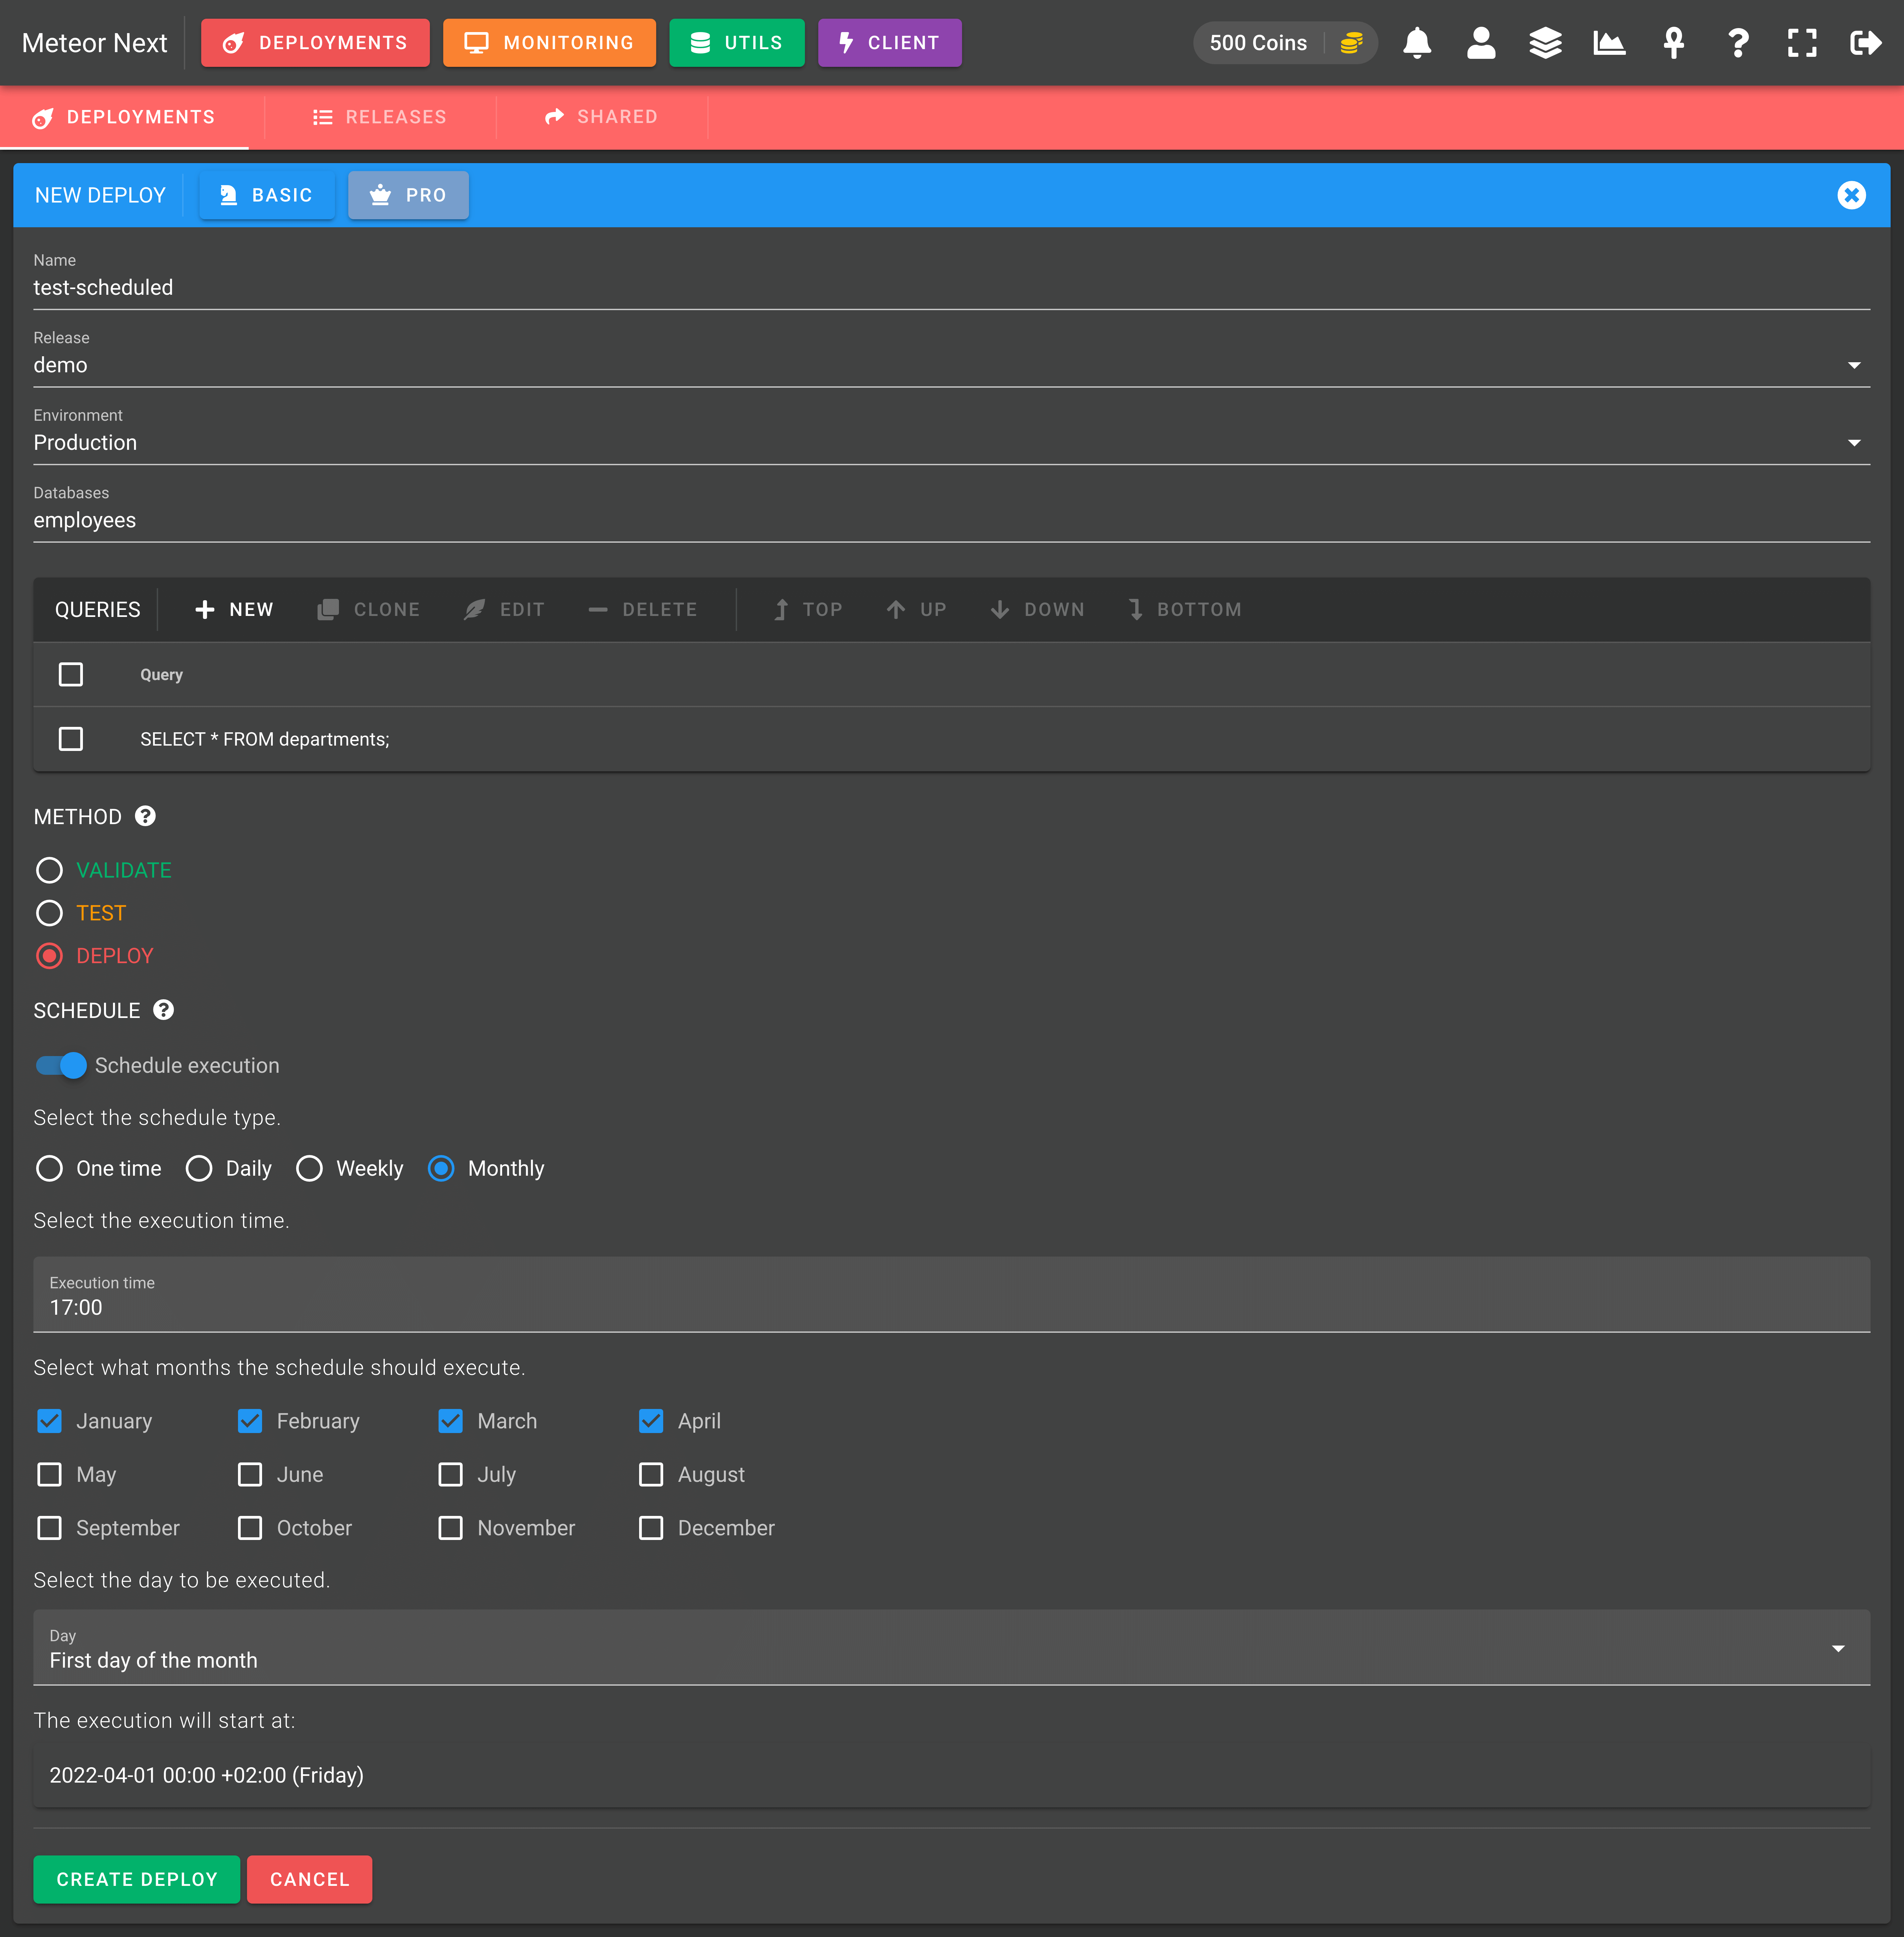
- Monthly execution: Execute a deployment in a specific time on the desired months.
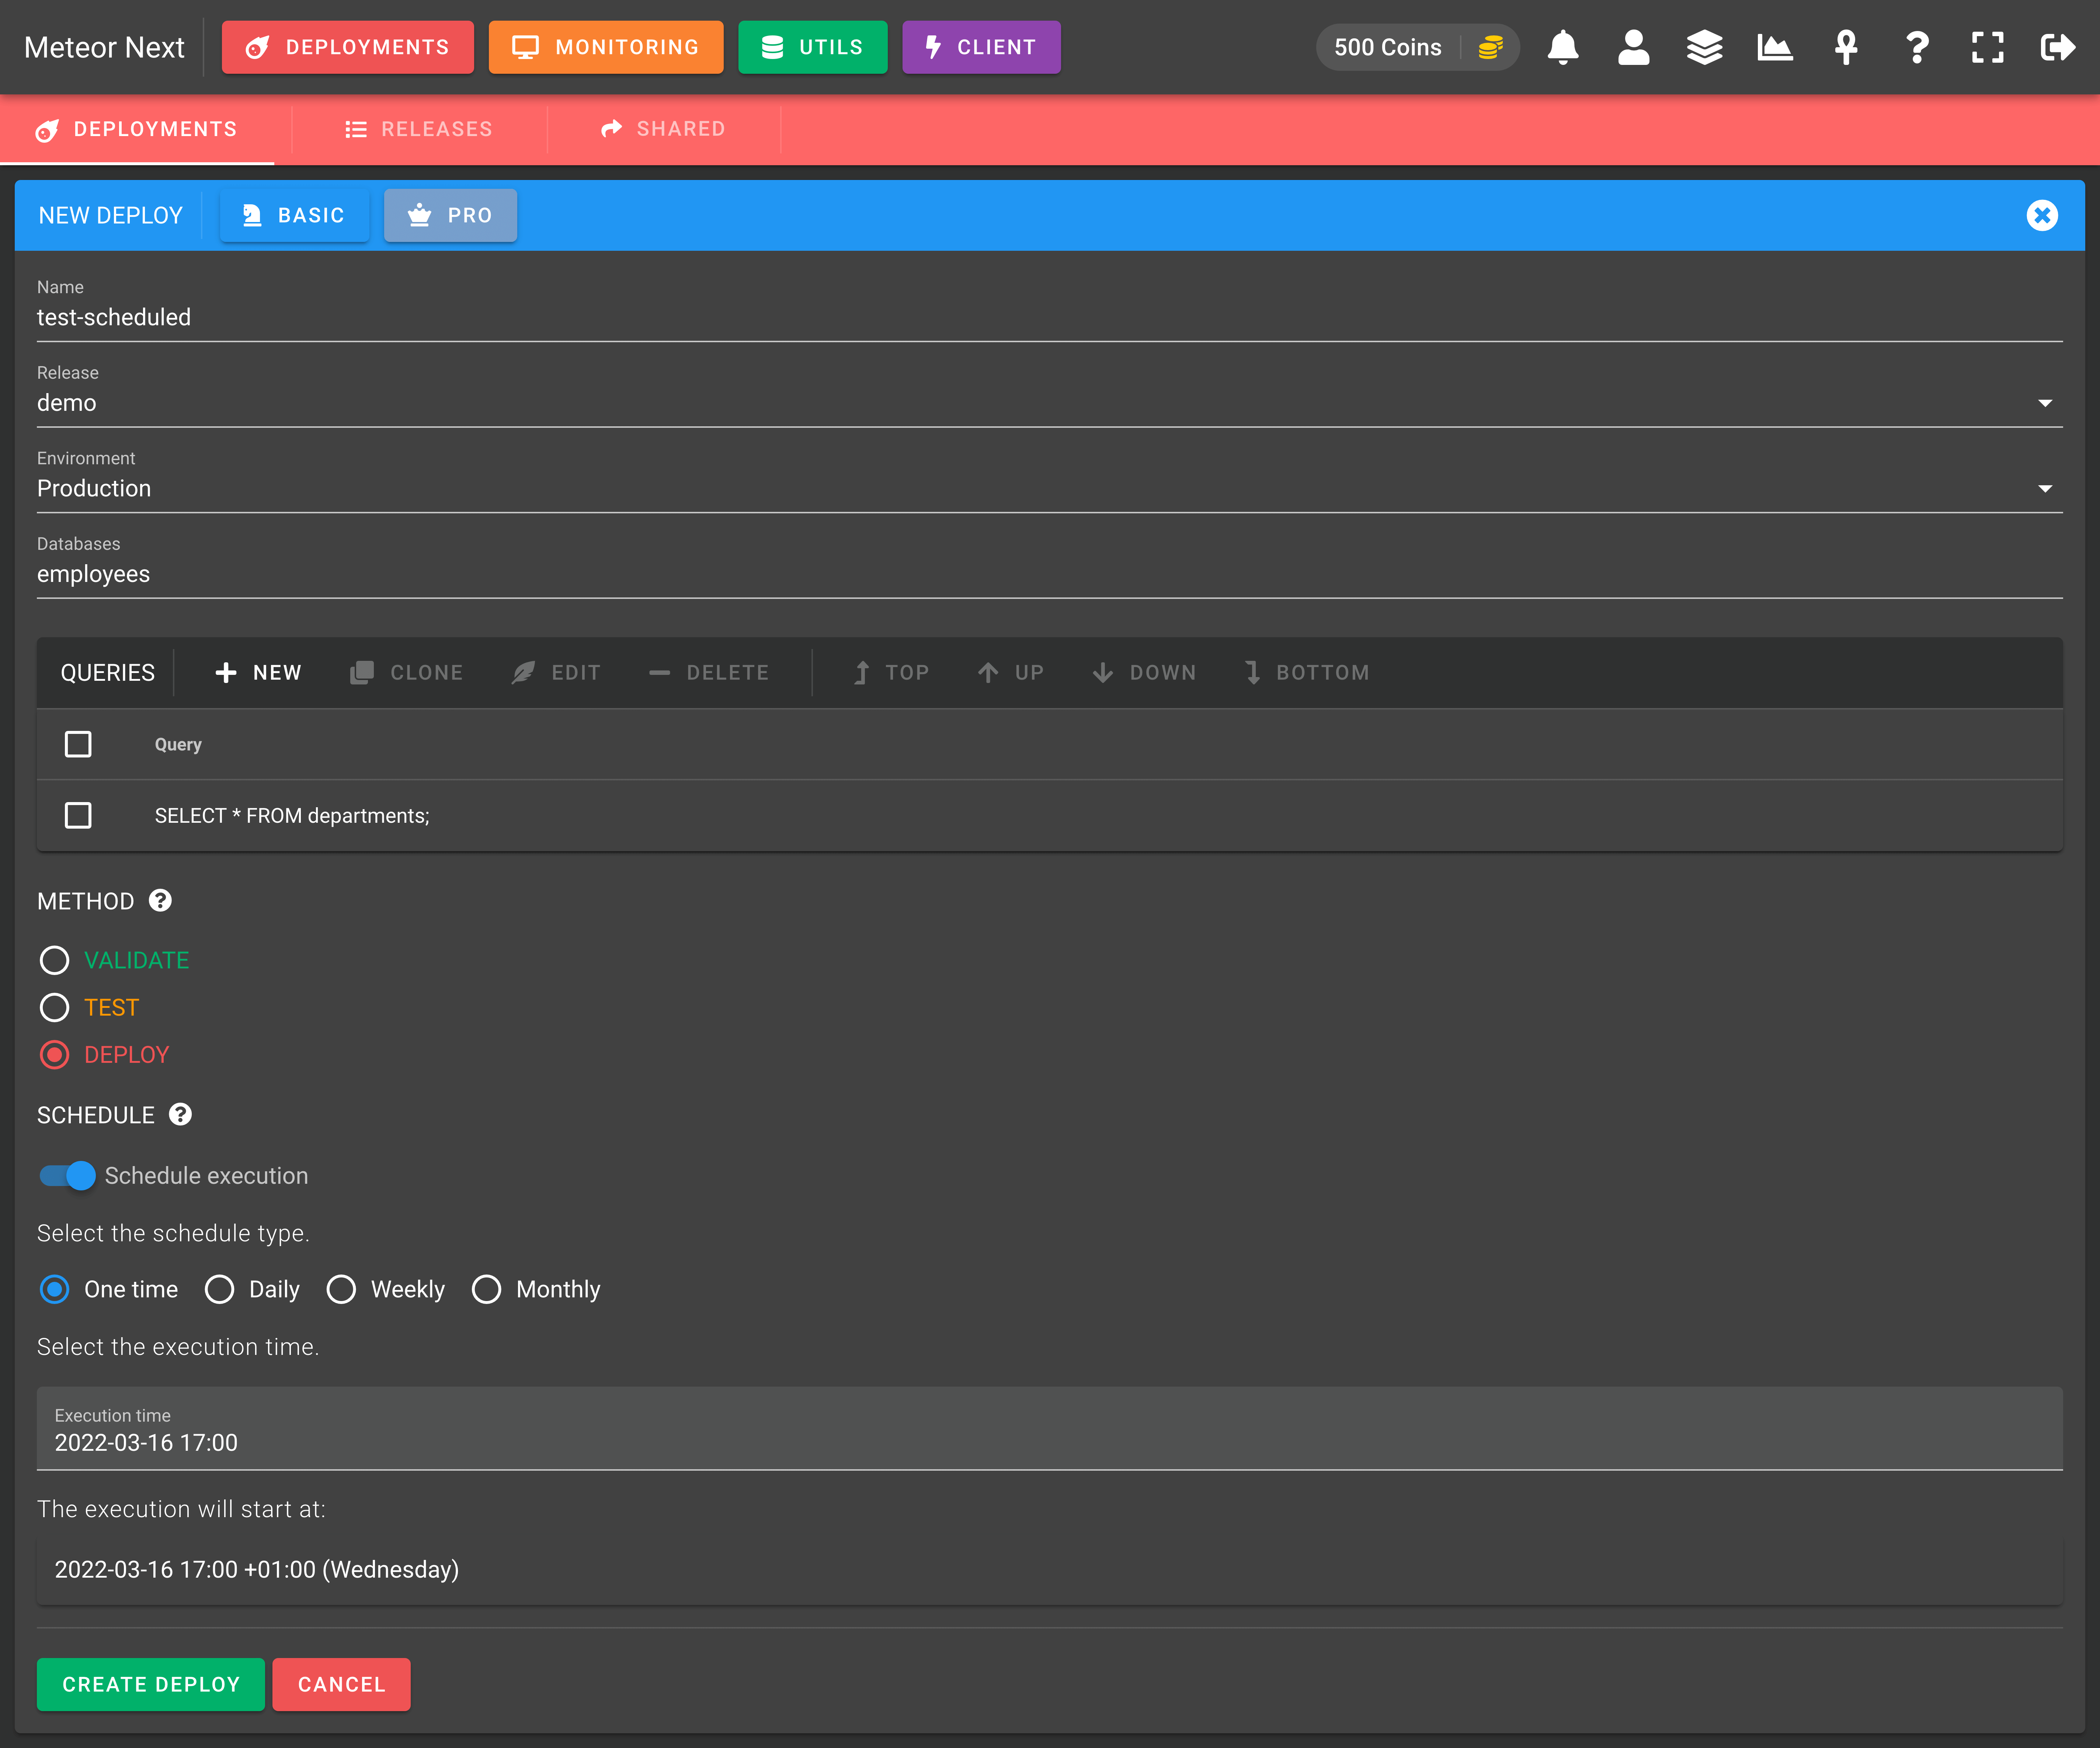
One-Time execution
One-Time executions are used to execute a deployment in a specific date time.
The following image shows an example of a one-time execution.
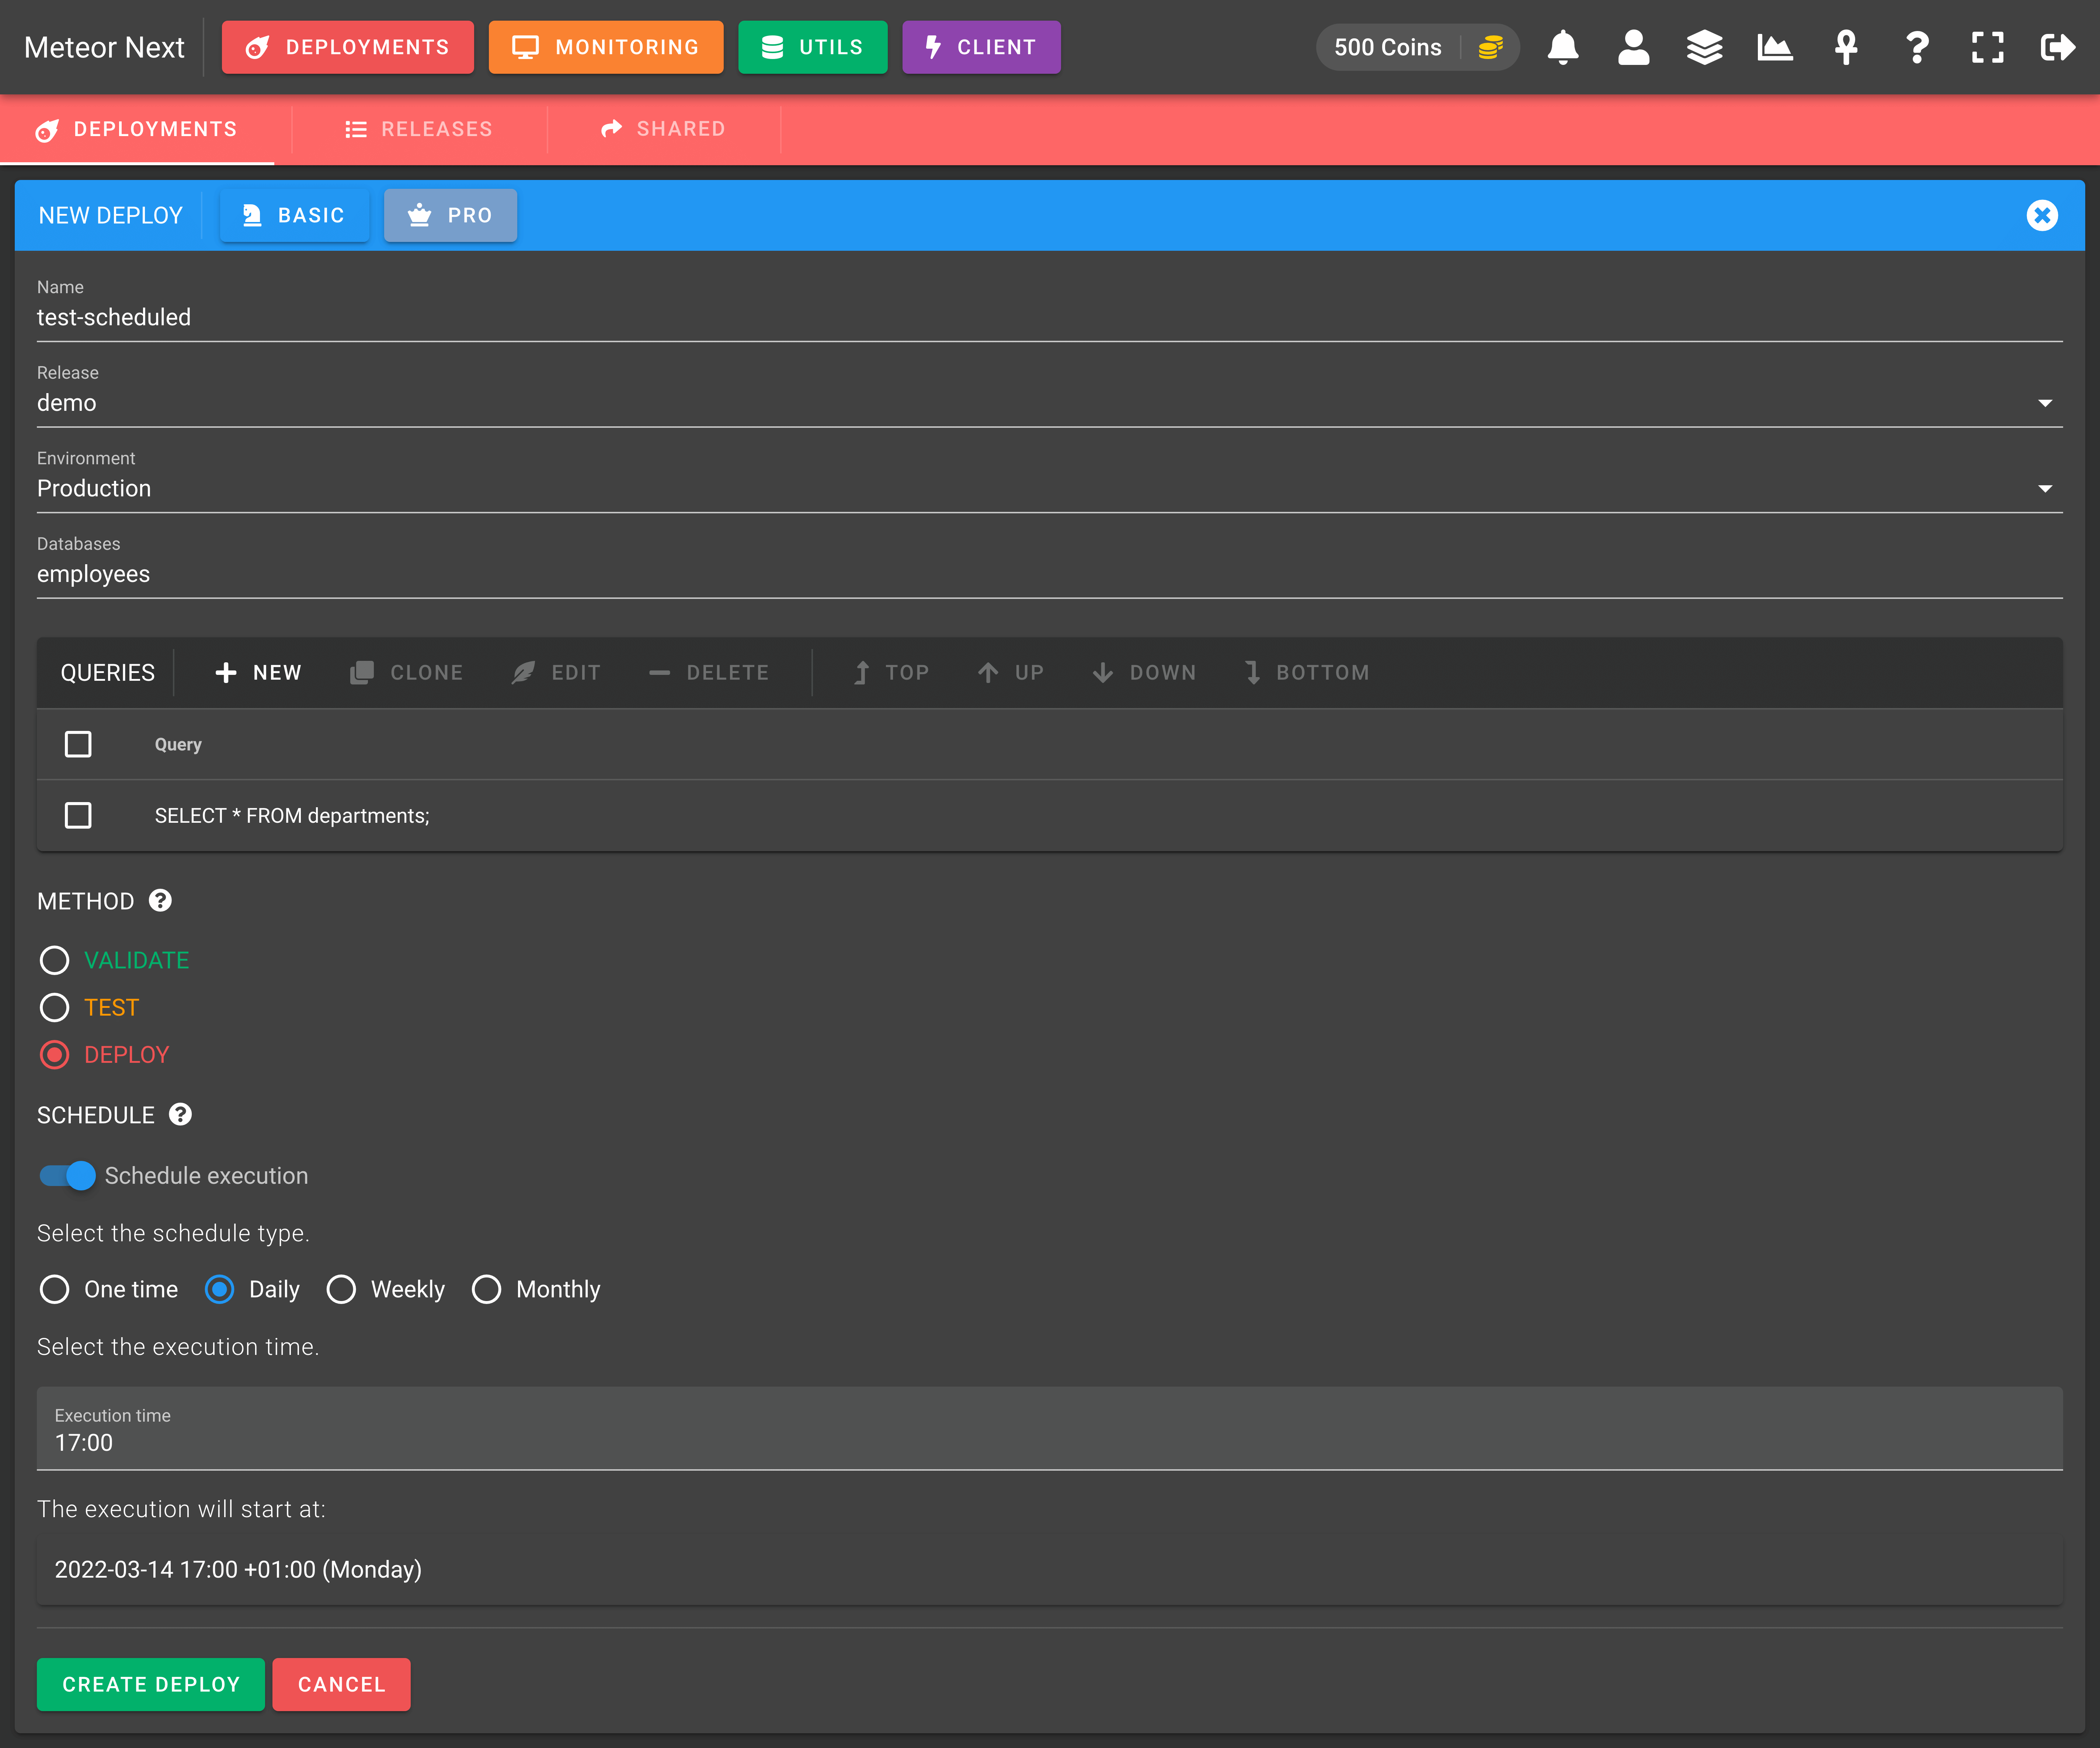
Daily execution
Daily executions are used to execute a deployment each day at the same time.
The following image shows an example of a daily execution.
Weekly execution
Weekly executions are used to execute a deployment in a specific time on the desired week days.
The following image shows an example of a weekly execution.
Monthly execution
Monthly executions are used to execute a deployment in a specific time on the desired months.
The following image shows an example of a monthly execution.
Execution
When a deployment starts, the execution goes through different steps: Validation, Execution, Post Execution and Queries.

VALIDATION
A network reachability is performed among the different servers that belong to the selected environment. Also checks if the server credentials (hostname, port, username, password, SSL, SSH) are valid.
EXECUTION
This step is performed for methods TEST and DEPLOY. Bear in mind that this step is only executed if the validation succeeds.
- TEST: A simulation is performed. Only SELECTs and SHOWs are executed.
EXAMPLE
Imagine a deployment executing DROP TABLE tbl. The execution will check if the current database contains the table named "tbl". And depending on the outcome, at the results we will see what would have happened if we had actually executed it.
- DEPLOY: All queries are executed.
POST EXECUTION
Here, we can track the status of all the tasks that are performed after the execution.
- The execution results are retrieved from all regions.
- The execution results are merged and ordered accordingly.
- A single compressed file is generated containing all the execution information (status and results).
- (Optional) The execution details are uploaded to Amazon S3.
- All regions are cleaned. Basically, all non compressed logs from the execution are removed.
- (Optional) A Slack message is sent to notify that the deployment has finished.
QUERIES
A summary of the total queries that have been executed, how many succeeded, failed or rollbacked.
Actions
On the top menu bar, there are some actions to perform:
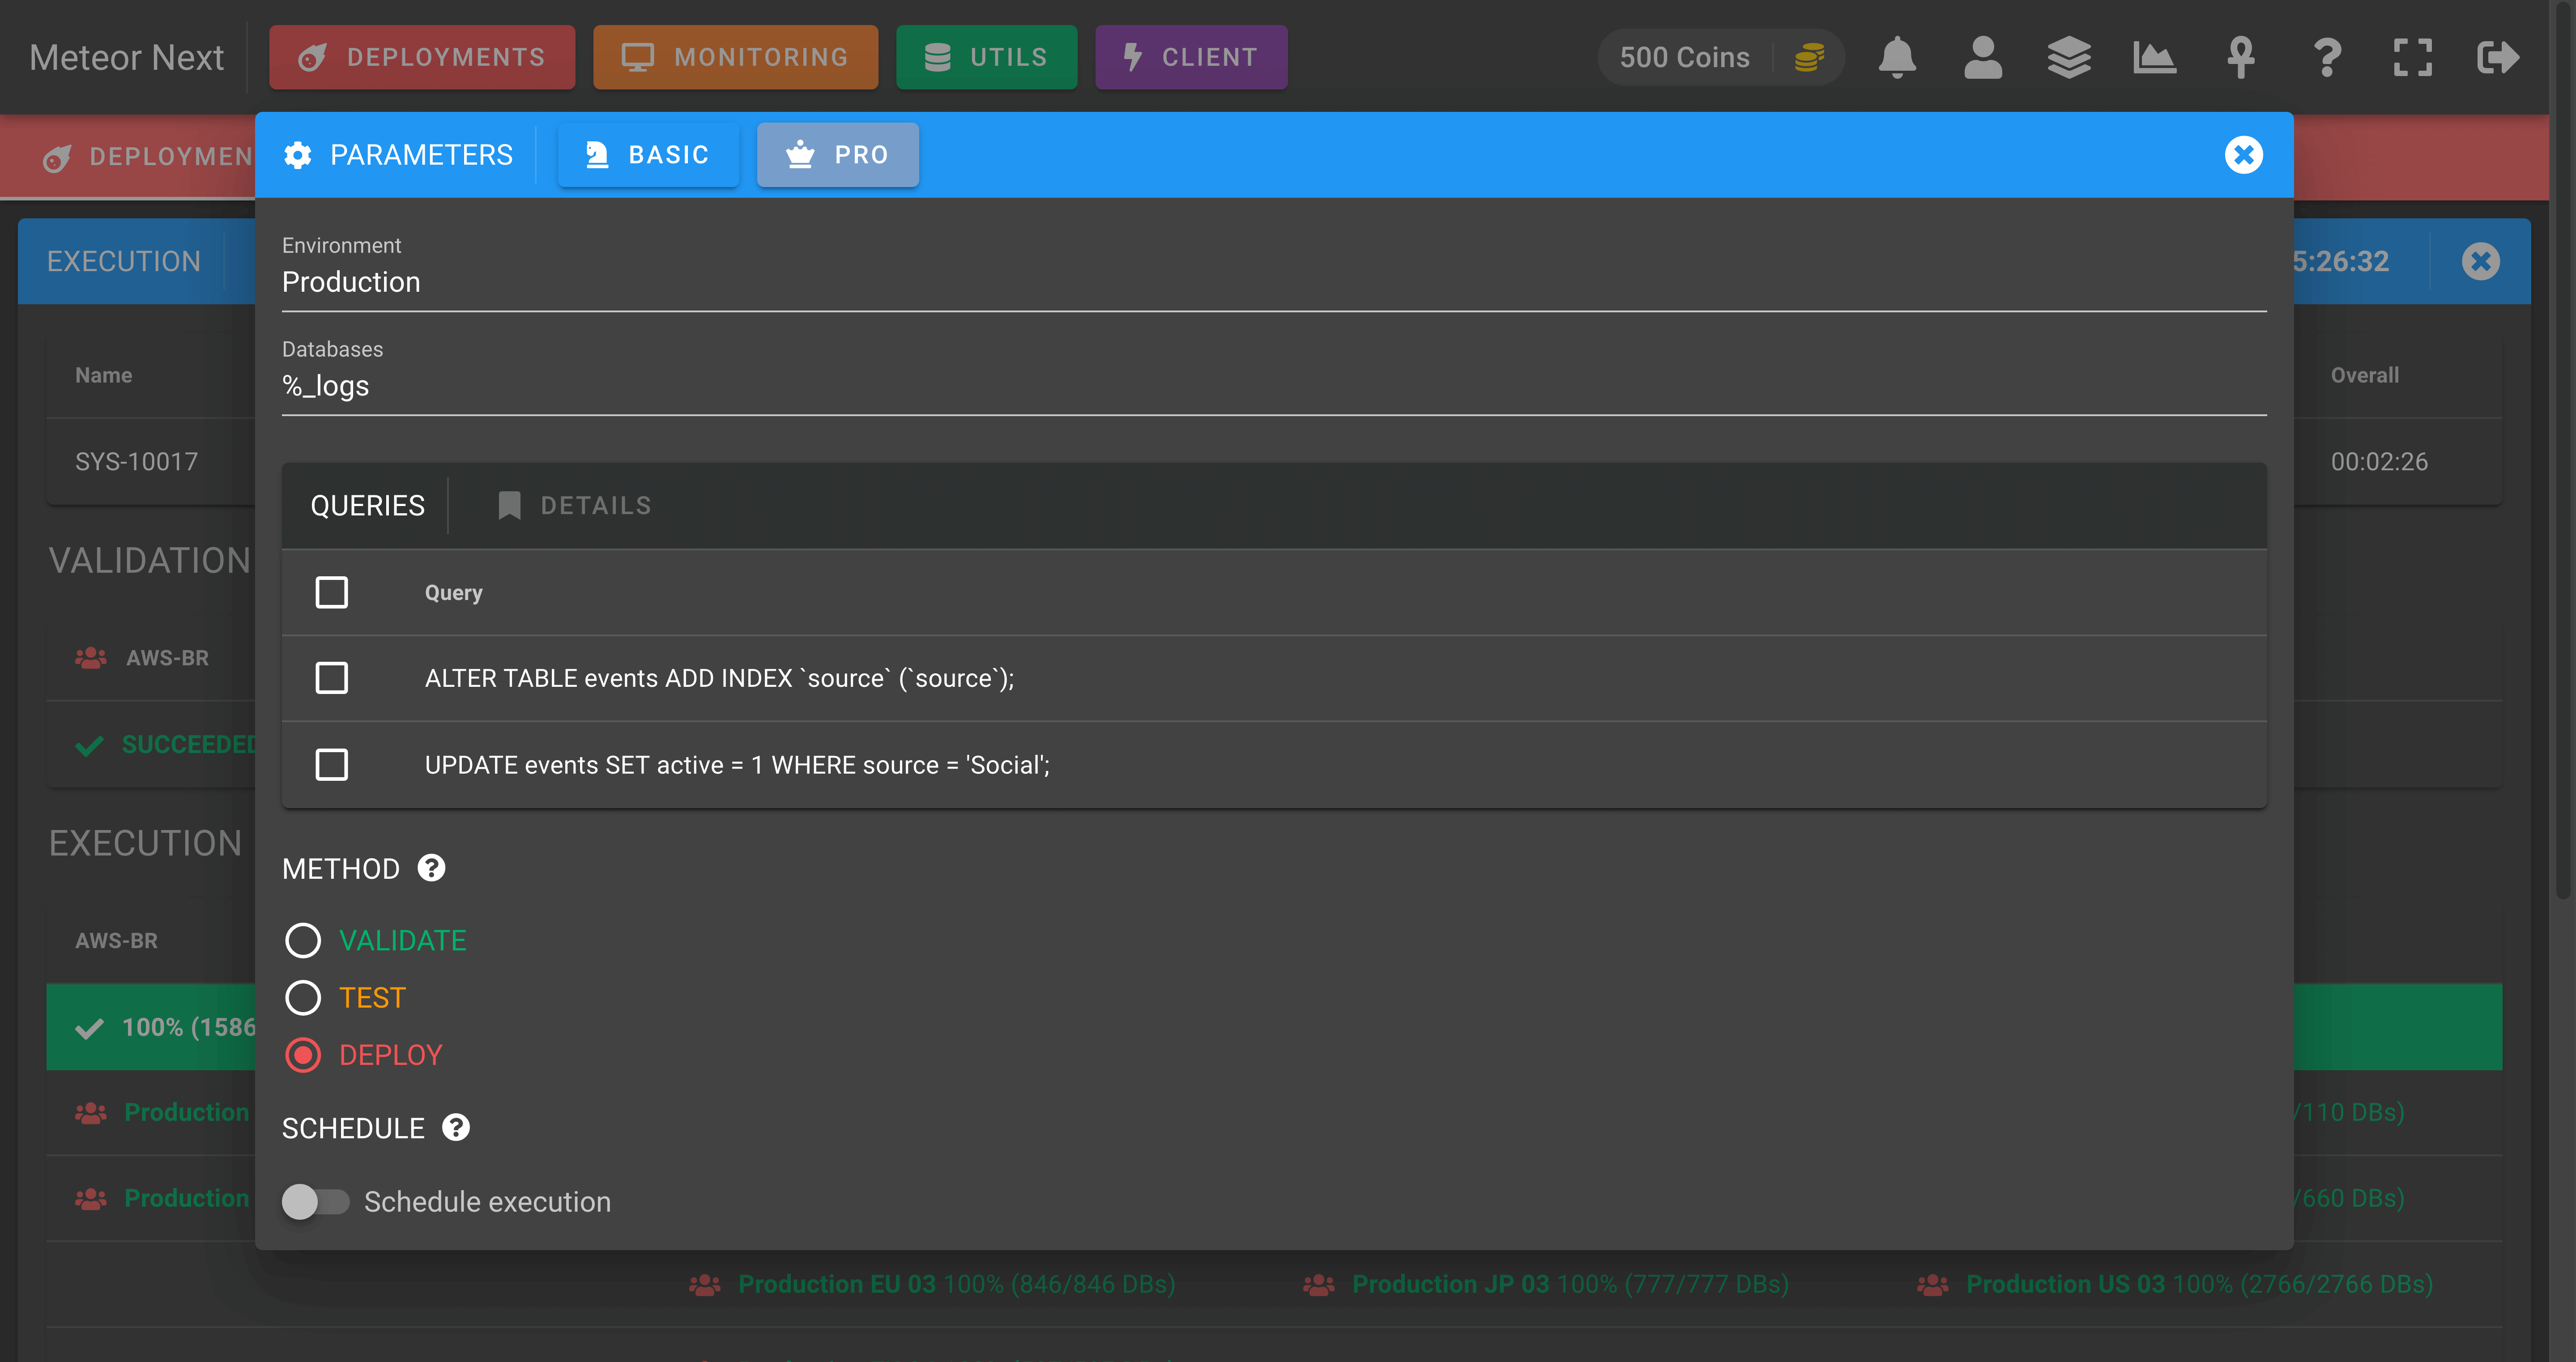
PARAMETERS
Shows the deployment details about the current execution (in read-only).
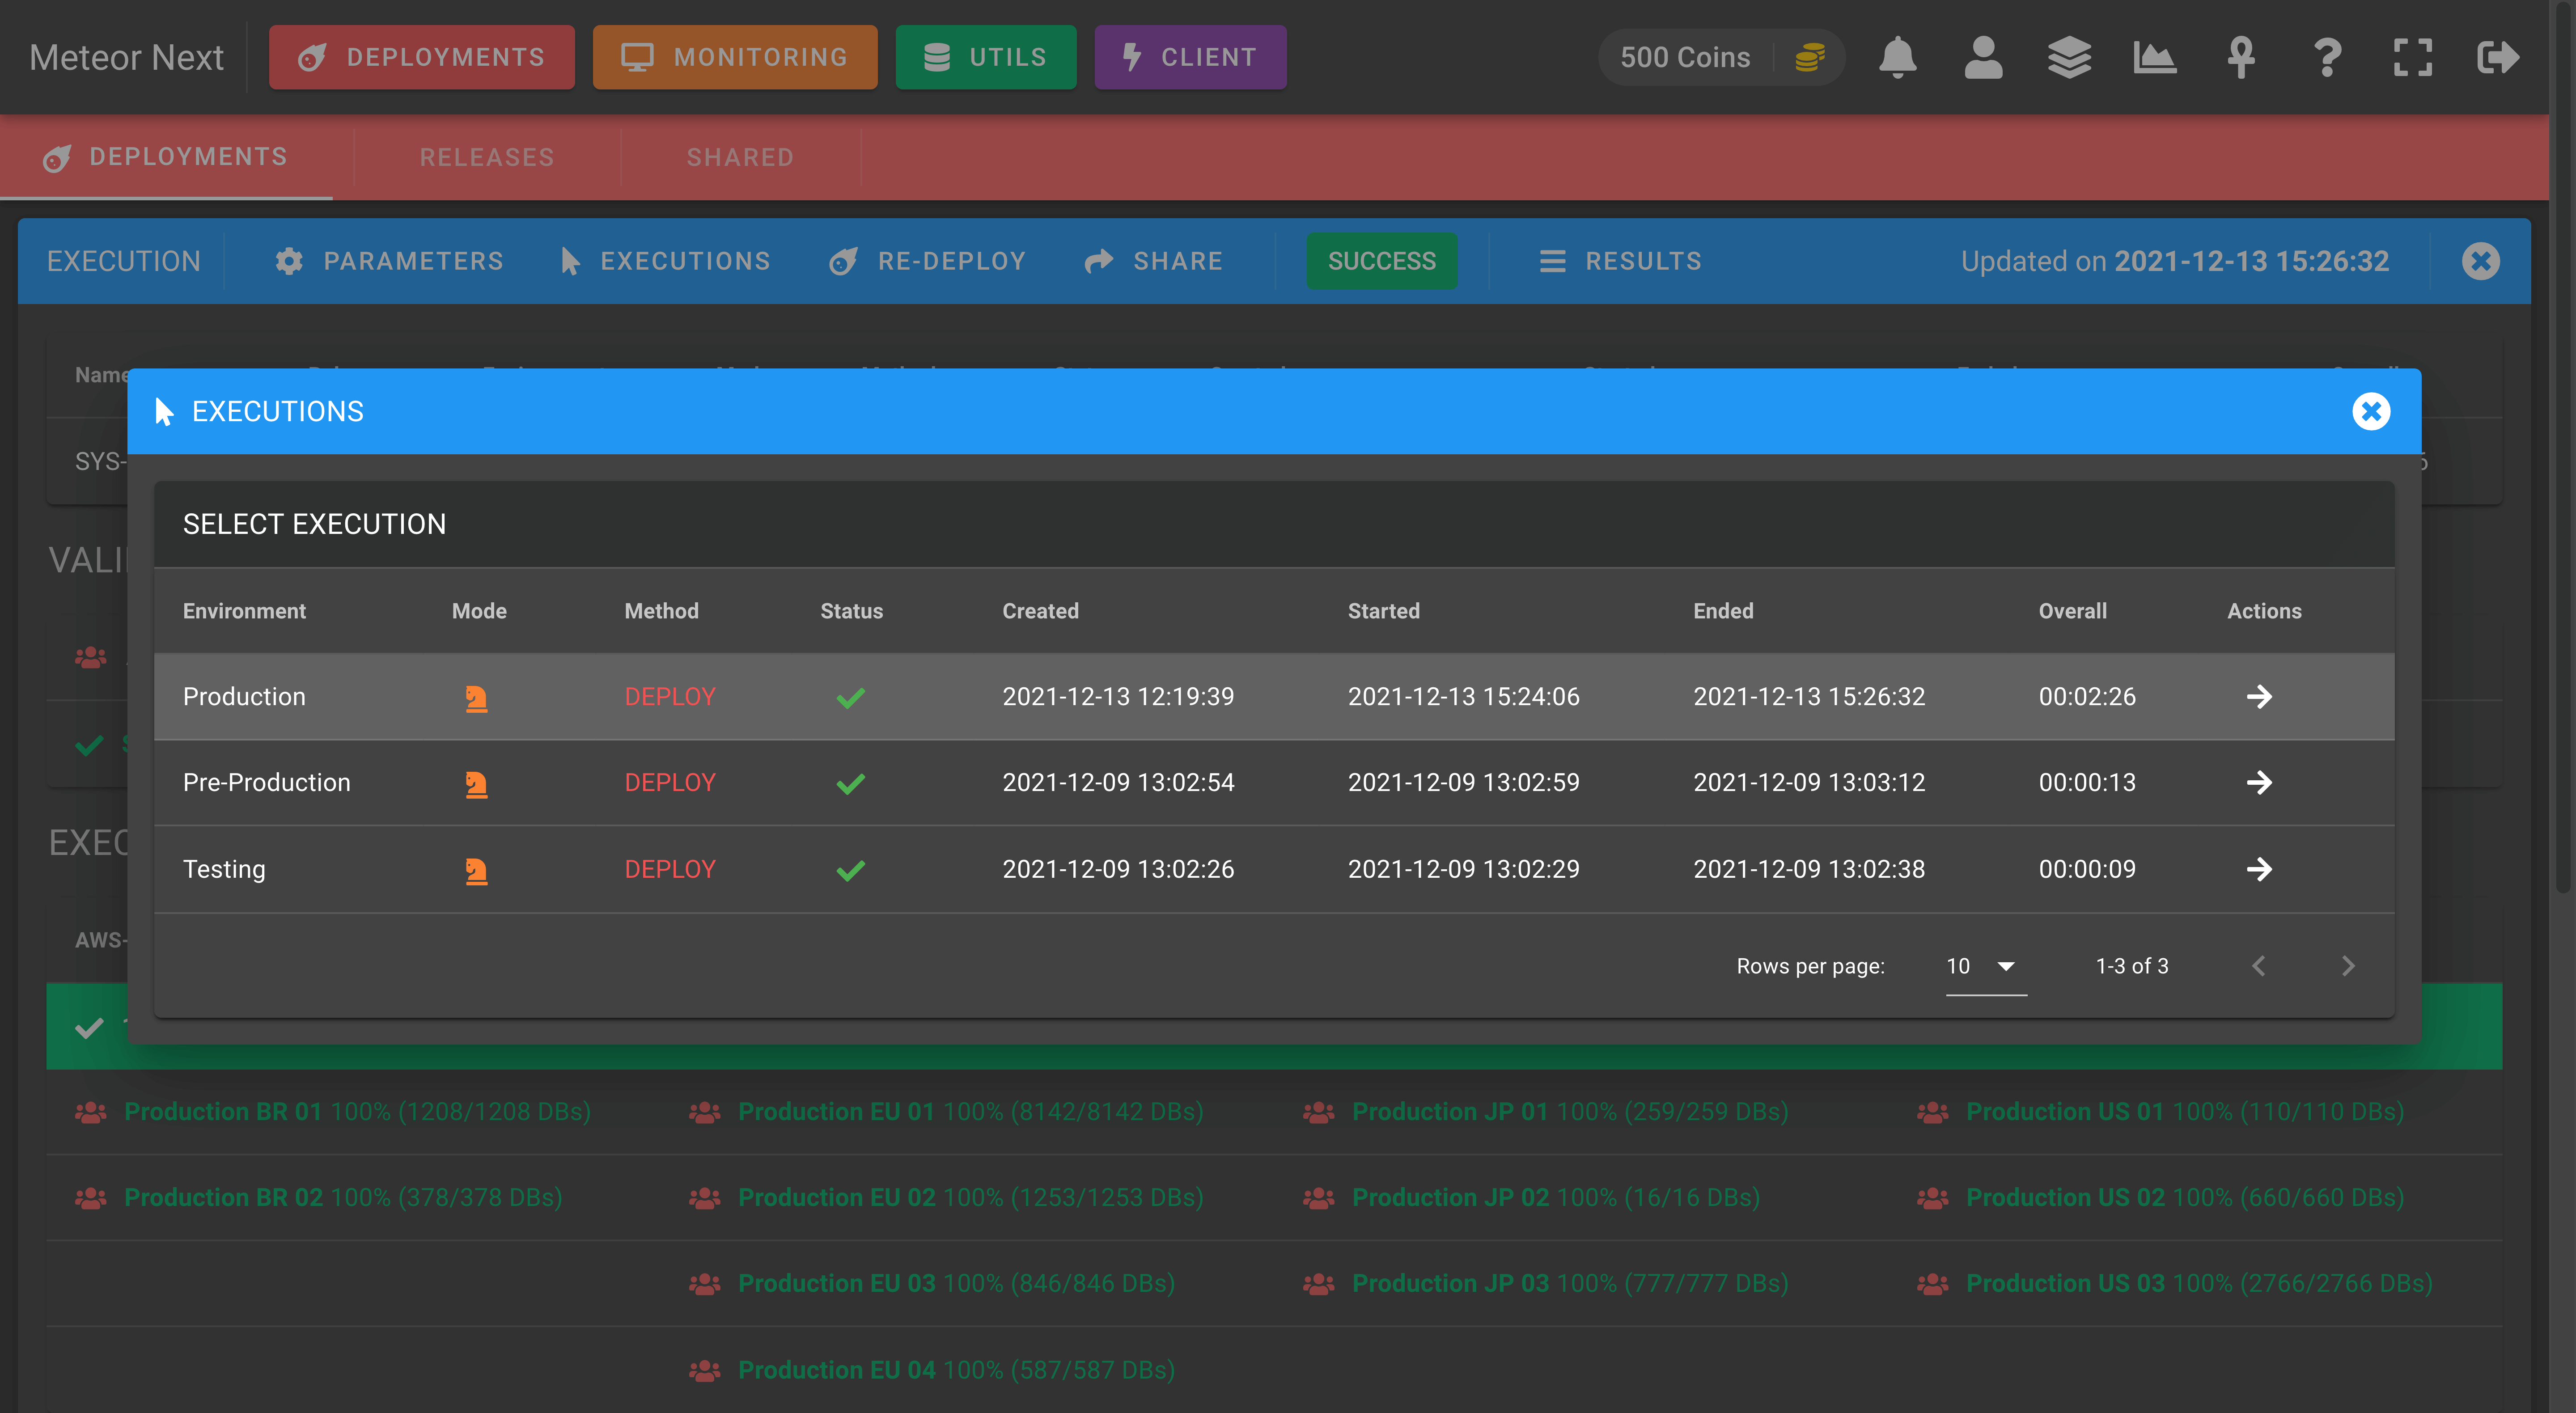
EXECUTIONS
Shows all the executions done in the current deployment. In this screen, we can see a previous execution by clicking the right arrow in the last column of the table.
RE-DEPLOY
It's used to perform another execution from the current deployment. It's useful if we want to execute the same deployment but changing some fields (environment, queries, ...).
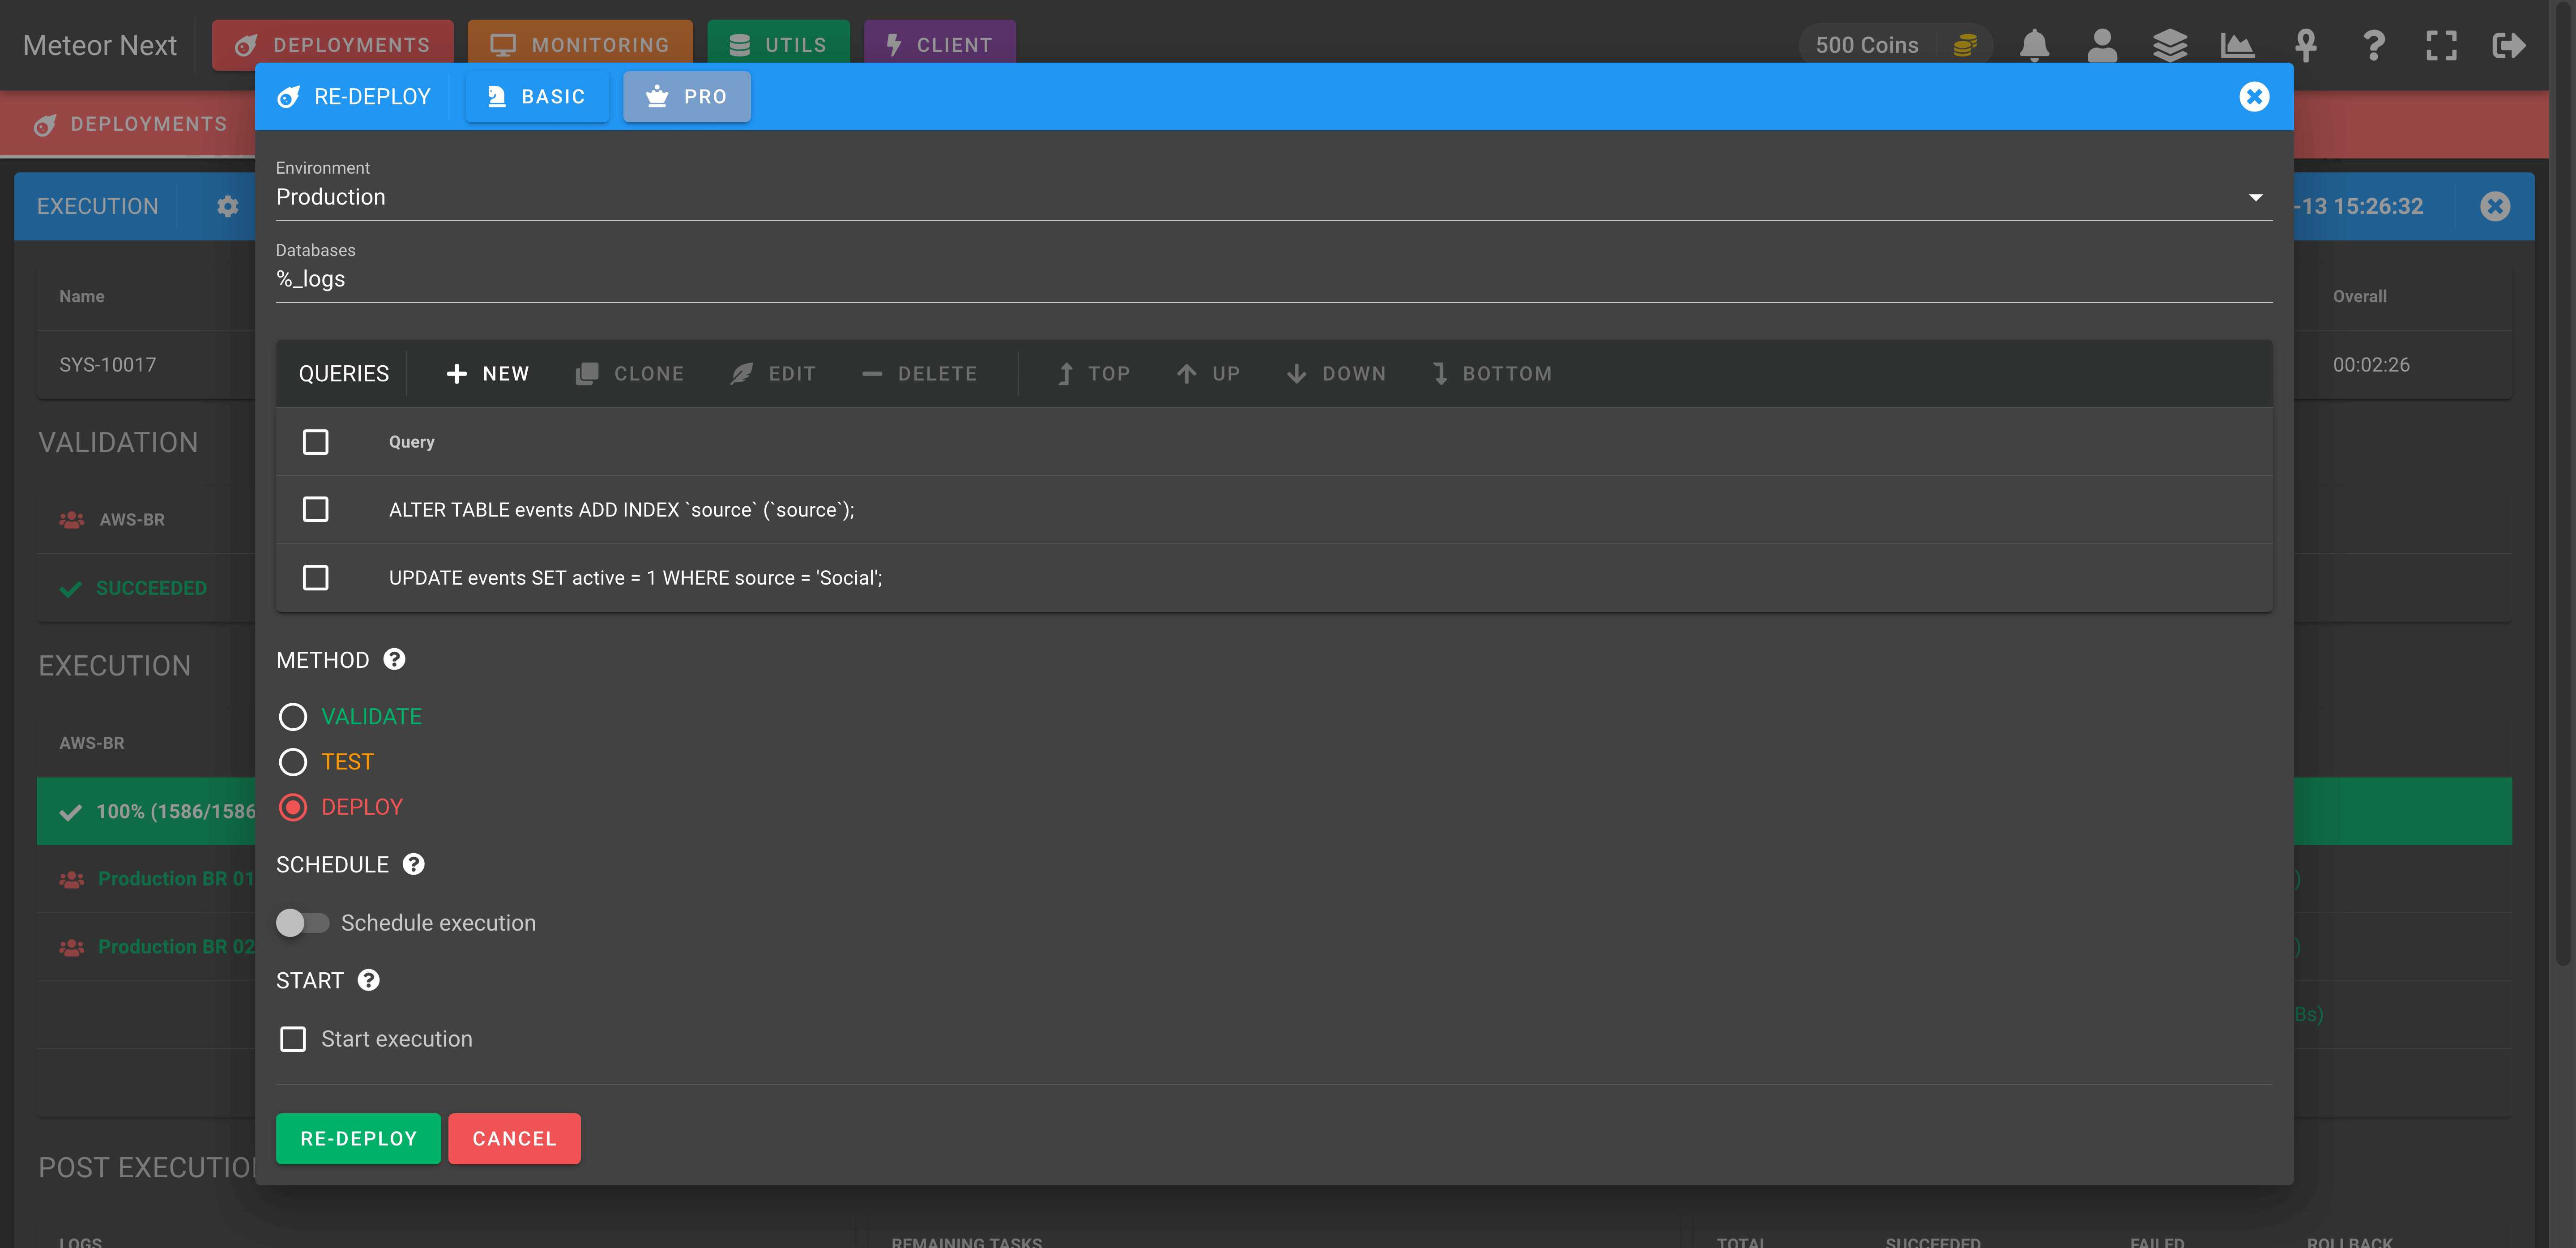
Imagine that we deployed some queries for all servers that are part of the Development environment, and now it's time to deploy it into Production. At this point we have two options, to create a new deployment from scratch or to re-deploy the existing one, changing the environment field from "Development" to "Production".
TIP
It's recommended to always perform a Re-Deploy if the deployment we want to perform is related to an existing one.
SHARE
This option is used to share the current deployment to make it visible for other users that have a Meteor account.
There are two URLs available. The first one it's to access the execution details and the second one is to see the execution results.
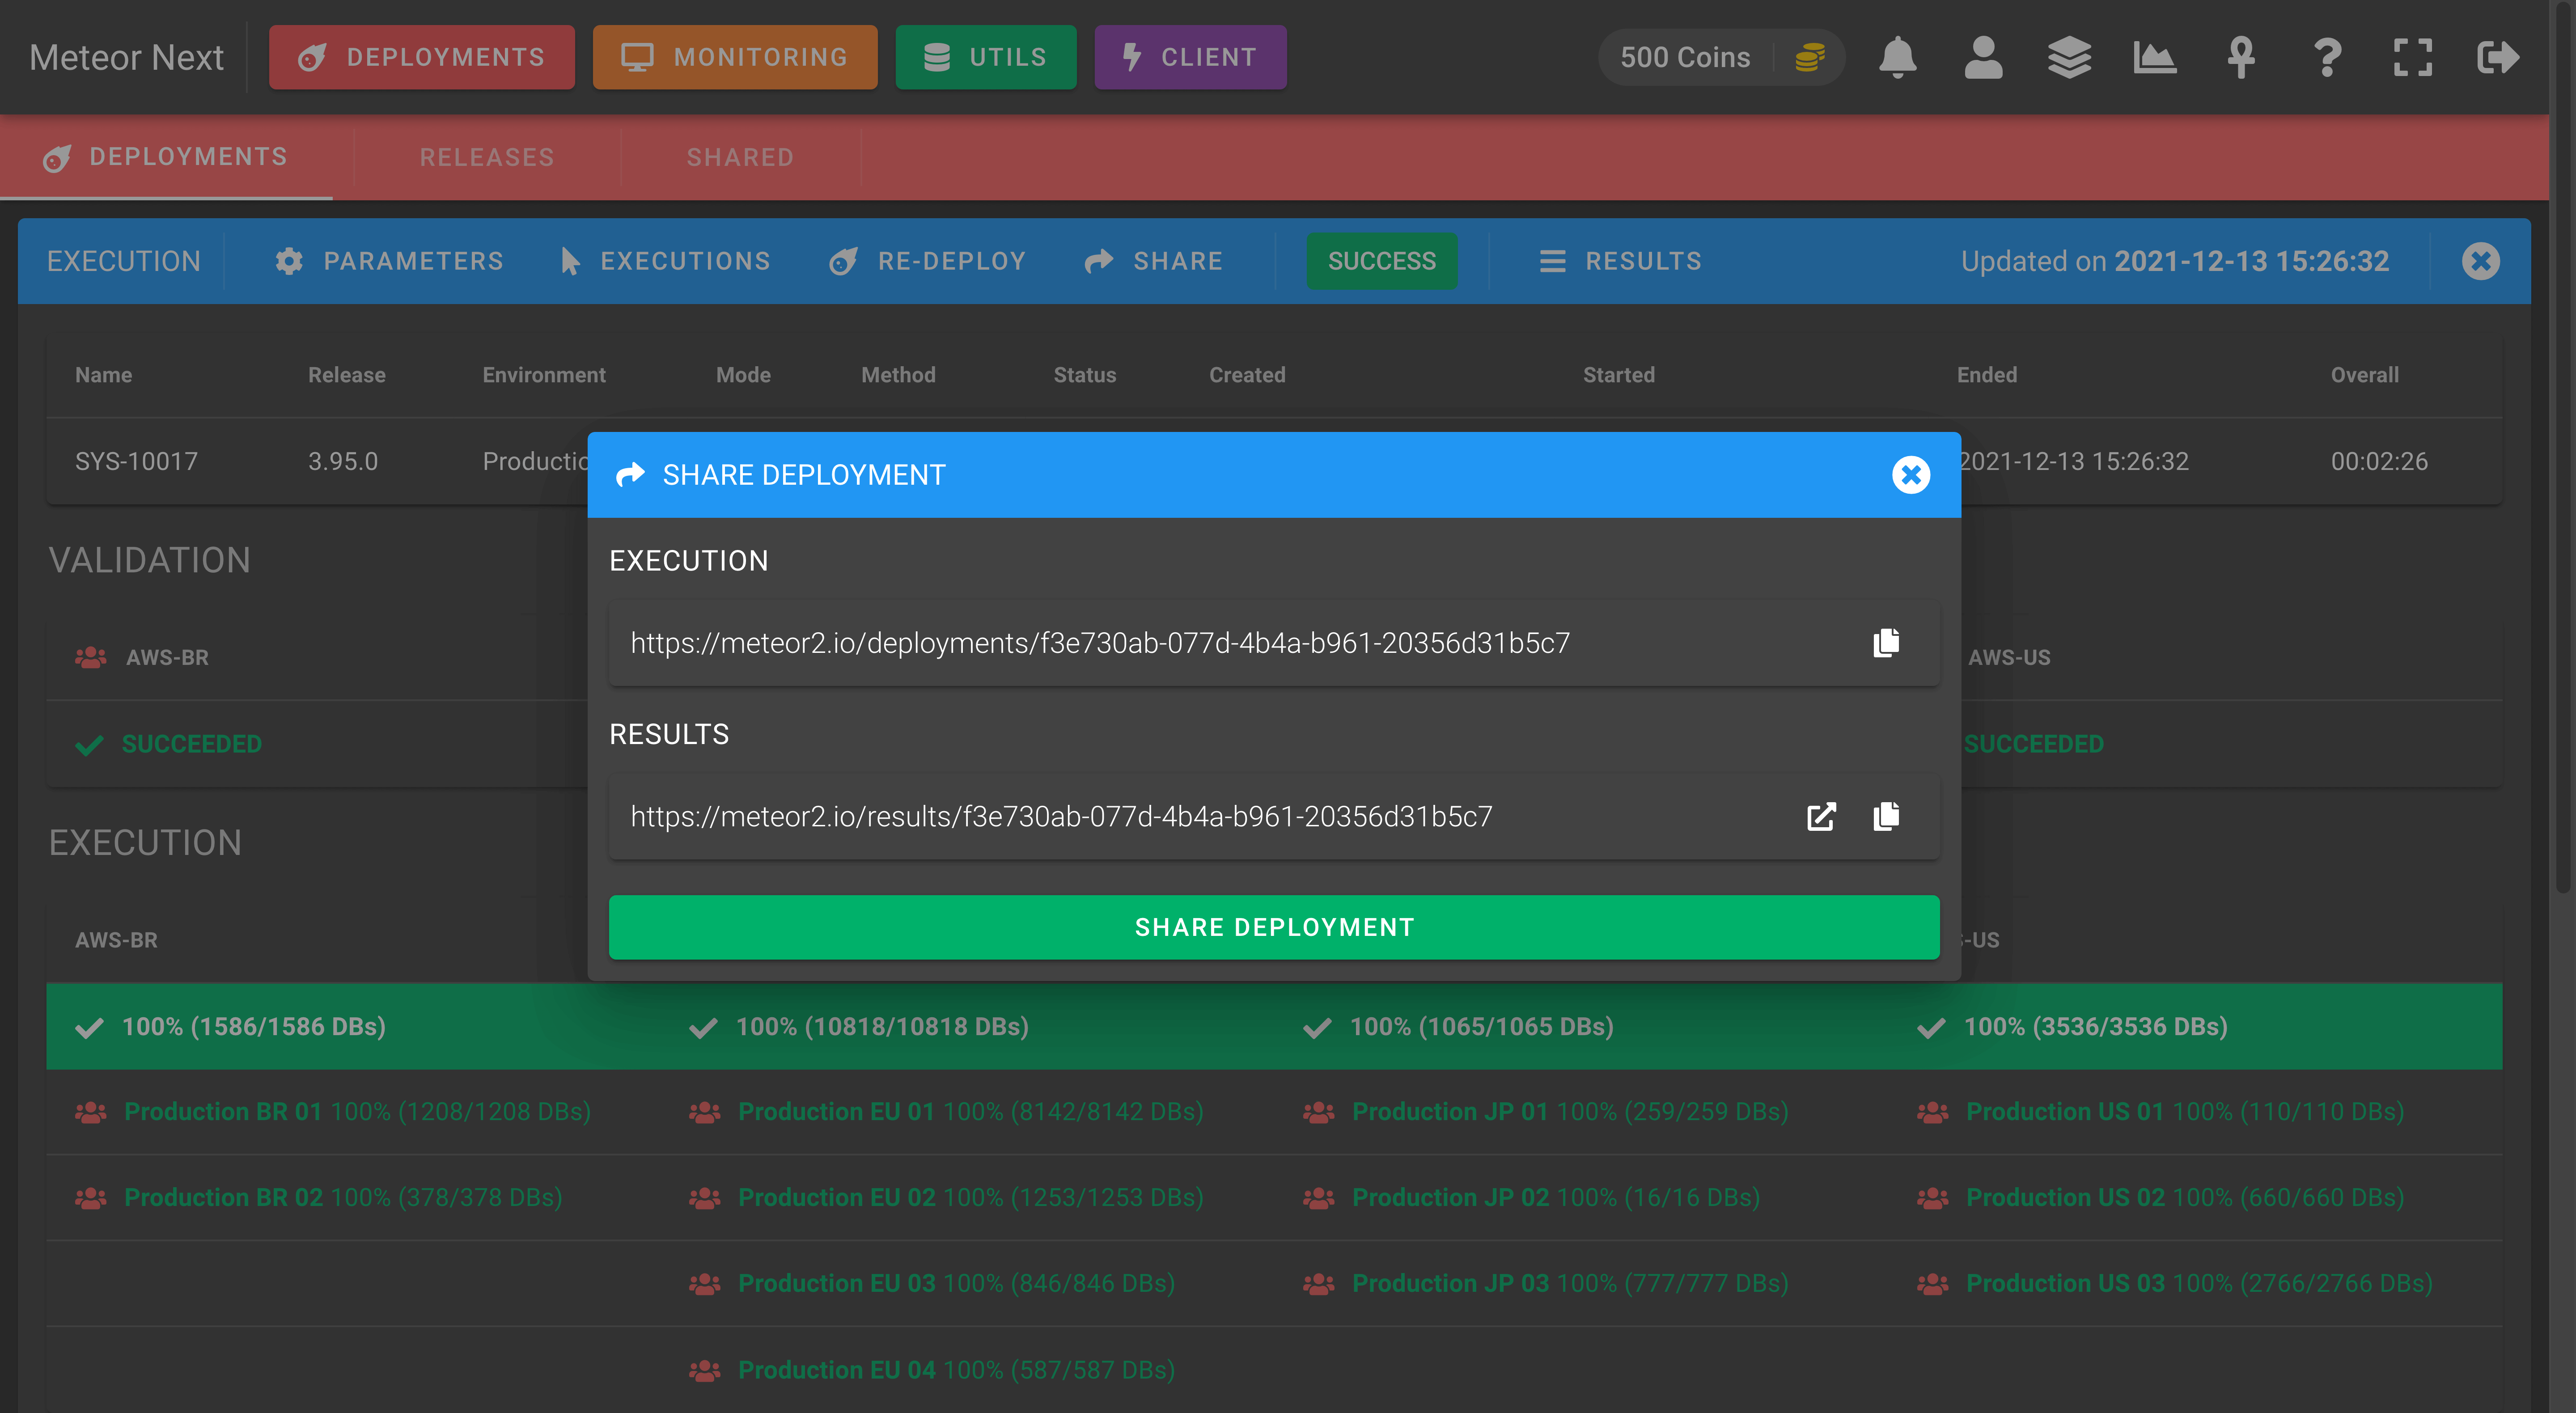
INFO
If a deployment is not shared, the owner will be the only one allowed to access it.
Otherwise, any user with a Meteor account will have access to see the deployment execution (in read-only) and also will be able to see the execution results.
Results
When a deployment finishes, we can see a detailed log in table format of all queries that have been executed.
Every row is an executed query, and the table is sorted in ascending order by the date time it was run.

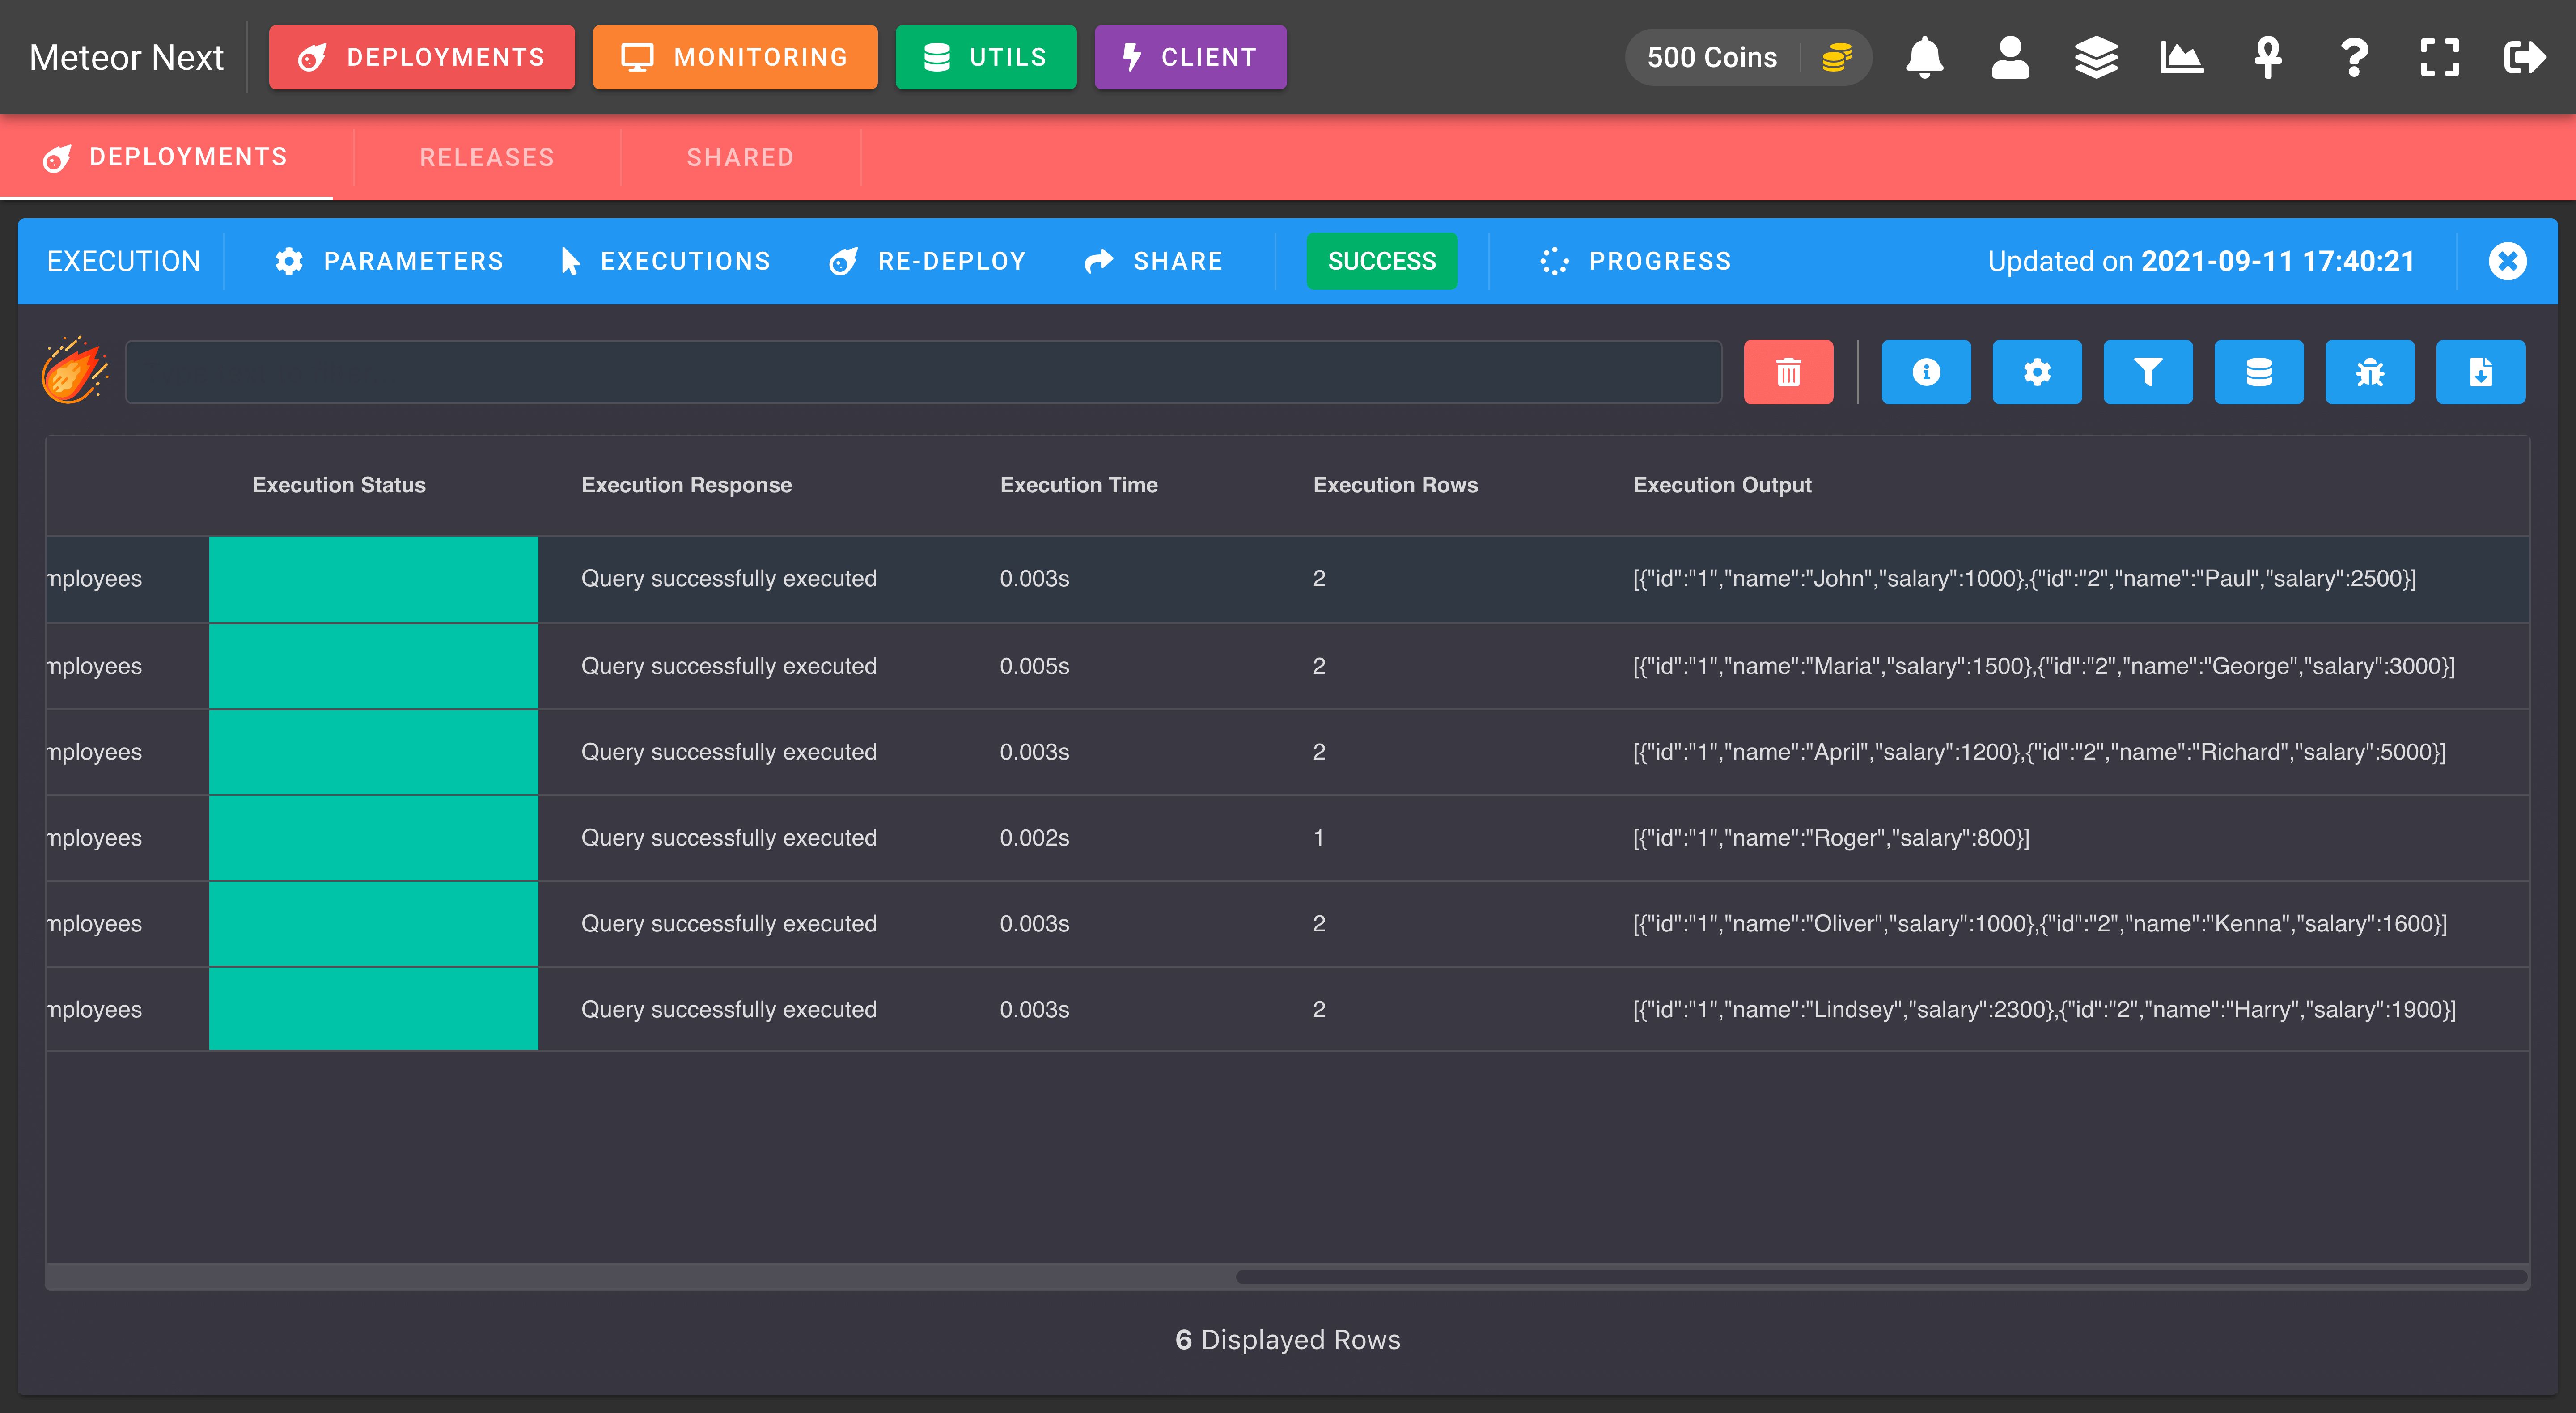
Every row contains 11 columns:
- Timestamp: The date time when the query was executed.
- Environment: The selected environment.
- Region: The server's region.
- Server: The server used to execute the query.
- Database: The database used to execute the query.
- Query: The query that has been executed.
- Execution Status: the execution's outcome. Can be either green (success), yellow (rollbacked), red (error).
- Execution Response: The engine response after executing the query. When a query fails, it shows the execution error.
- Execution Time: The query's elapsed time.
- Execution Rows: How many rows were affected by executing the query. Executing a SELECT will show the amount of rows returned, and executing an INSERT/UPDATE/DELETE will show the amount of rows affected.
- Execution Output: The result of executing the query. This column will show the SELECT's results formatted in JSON.
Features
There are some useful actions that can be done into the results section:

SEARCH
Perform searches across all rows and columns.
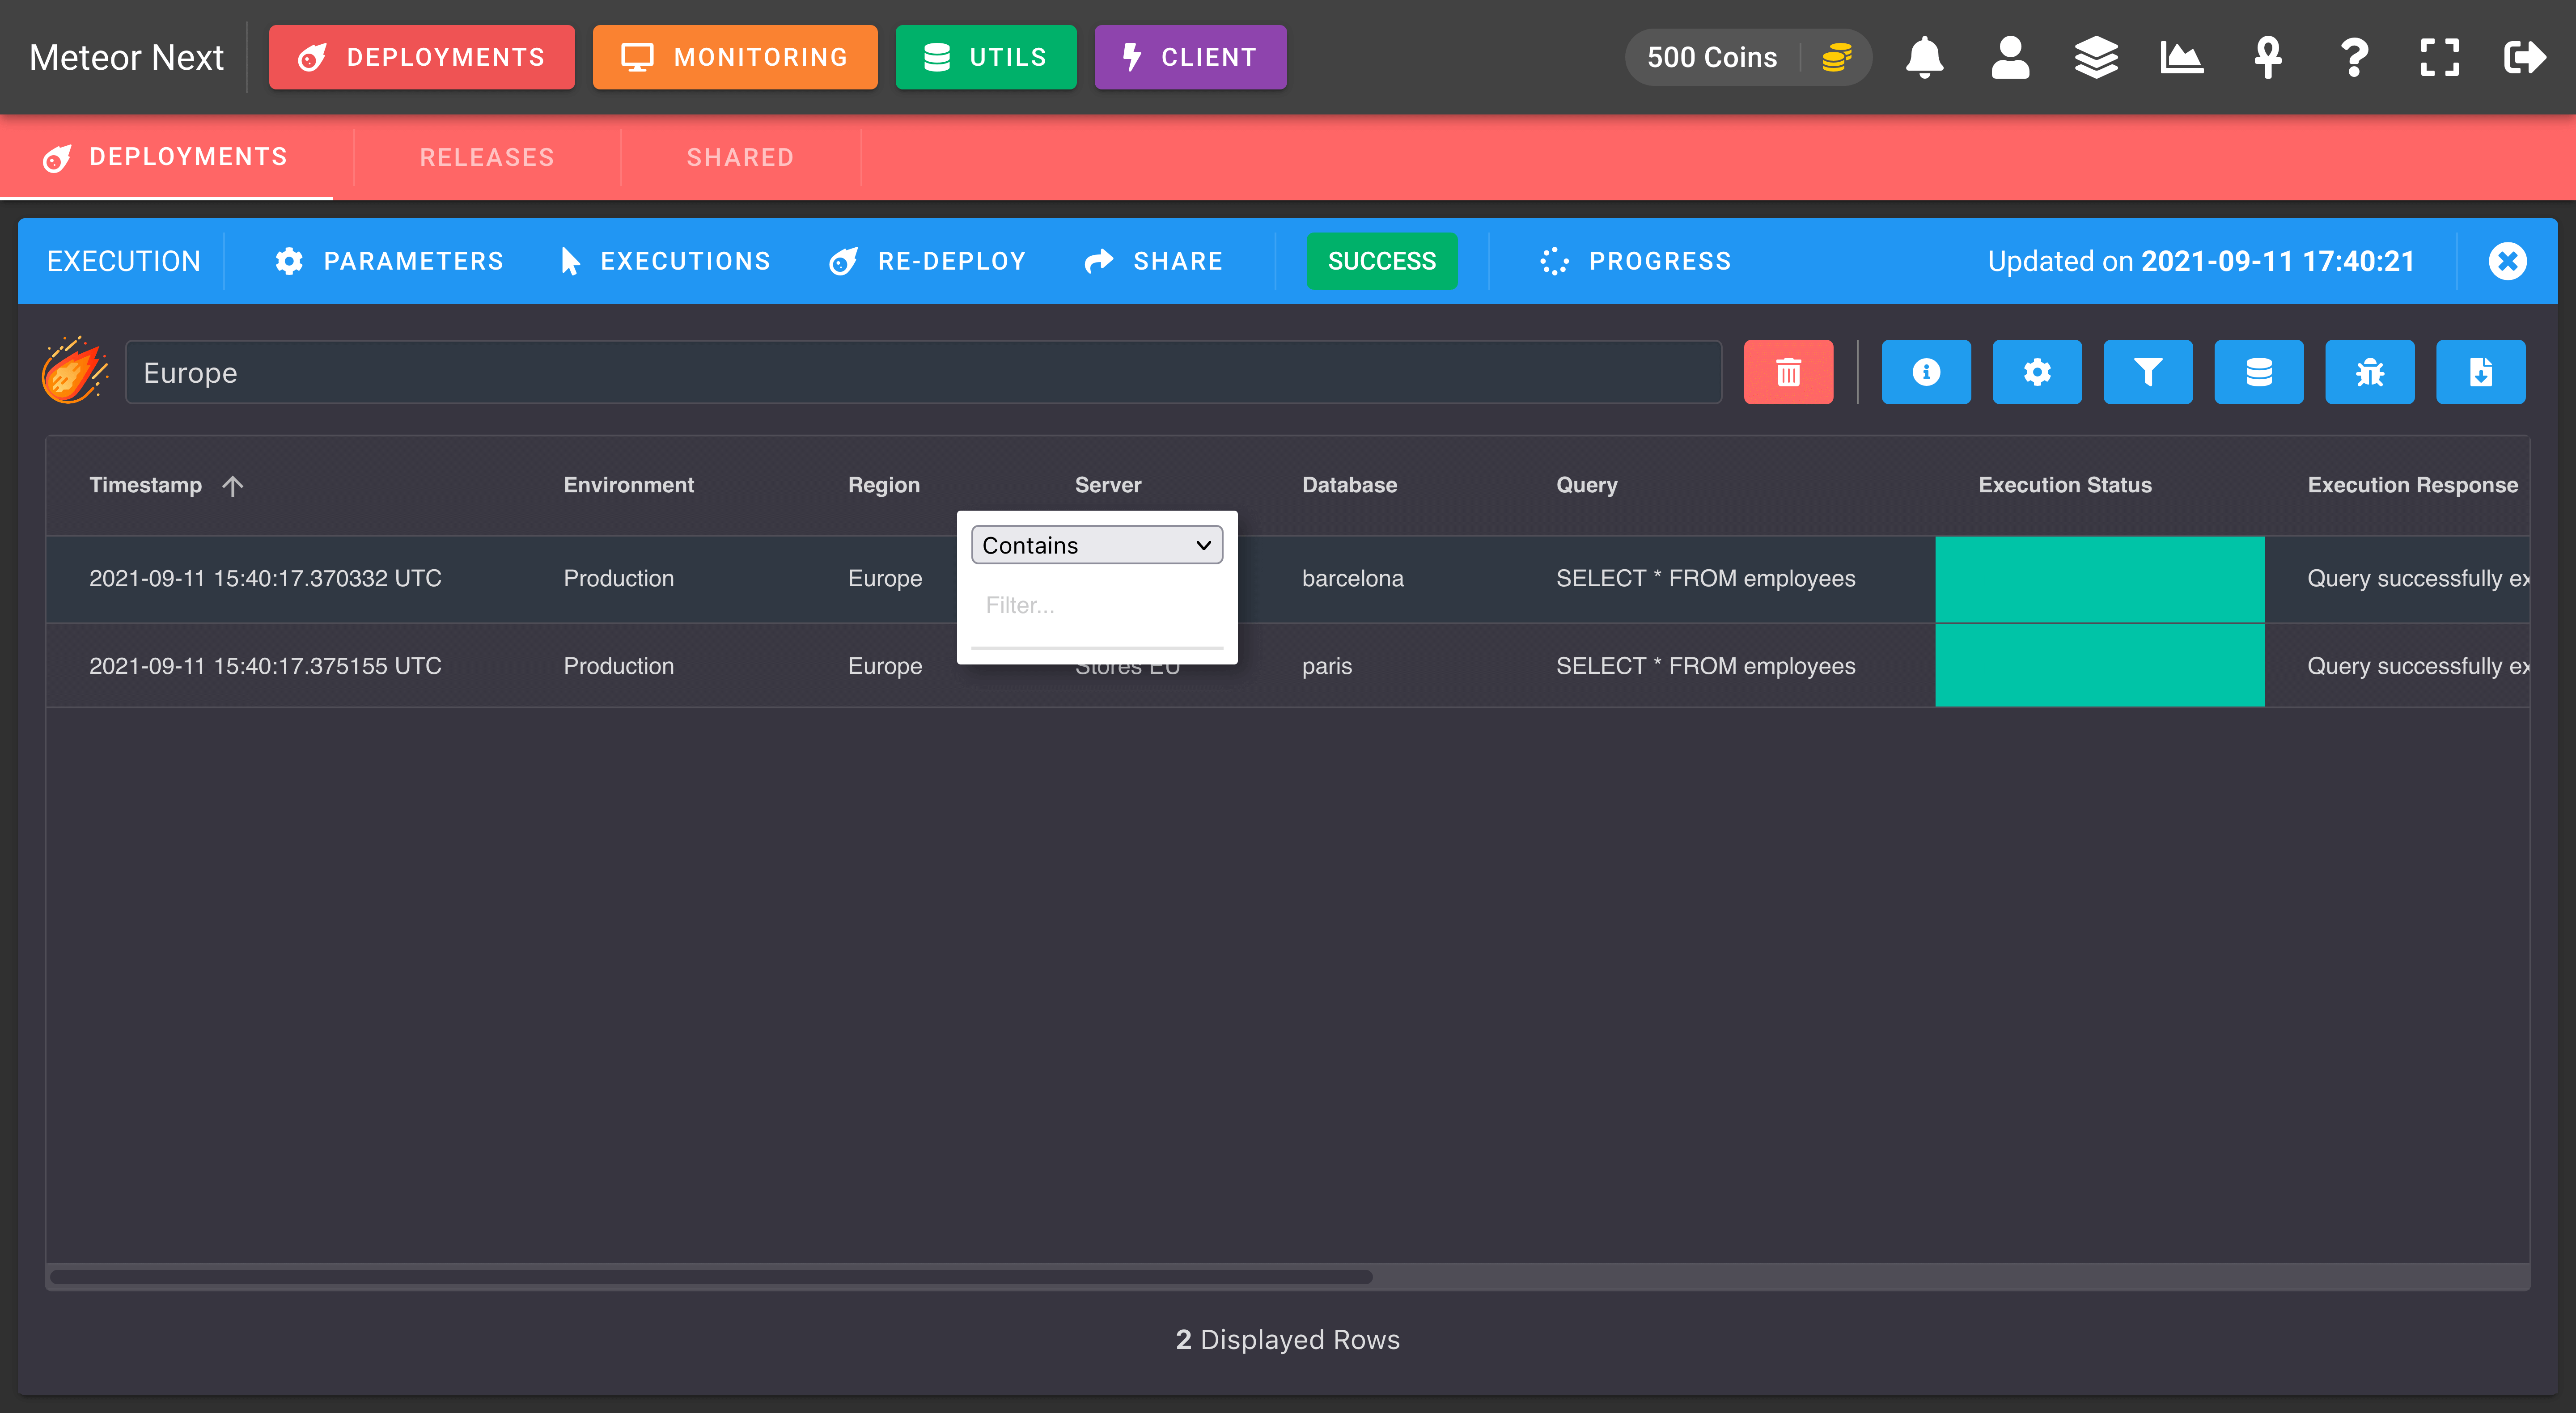
The following screenshot shows an example of a search. The table shows all rows which one of their columns contain the Europe string.
Furthermore, as It can be seen in the screenshot, there's one additional way to filter results. By clicking the icon placed in the right of a column name, we can filter the results by that column. The available modes are: Contains, Not contains, Equals, Not equal, Starts with and Ends with.
REMOVE ROW/s
Click the red thrash icon to remove rows from the table. This option is useful if we want to remove some rows before exporting the data from the table.
Bear in mind that the action of removing rows is not permanent. If we close the results and open it again, all previous deleted rows will appear again.
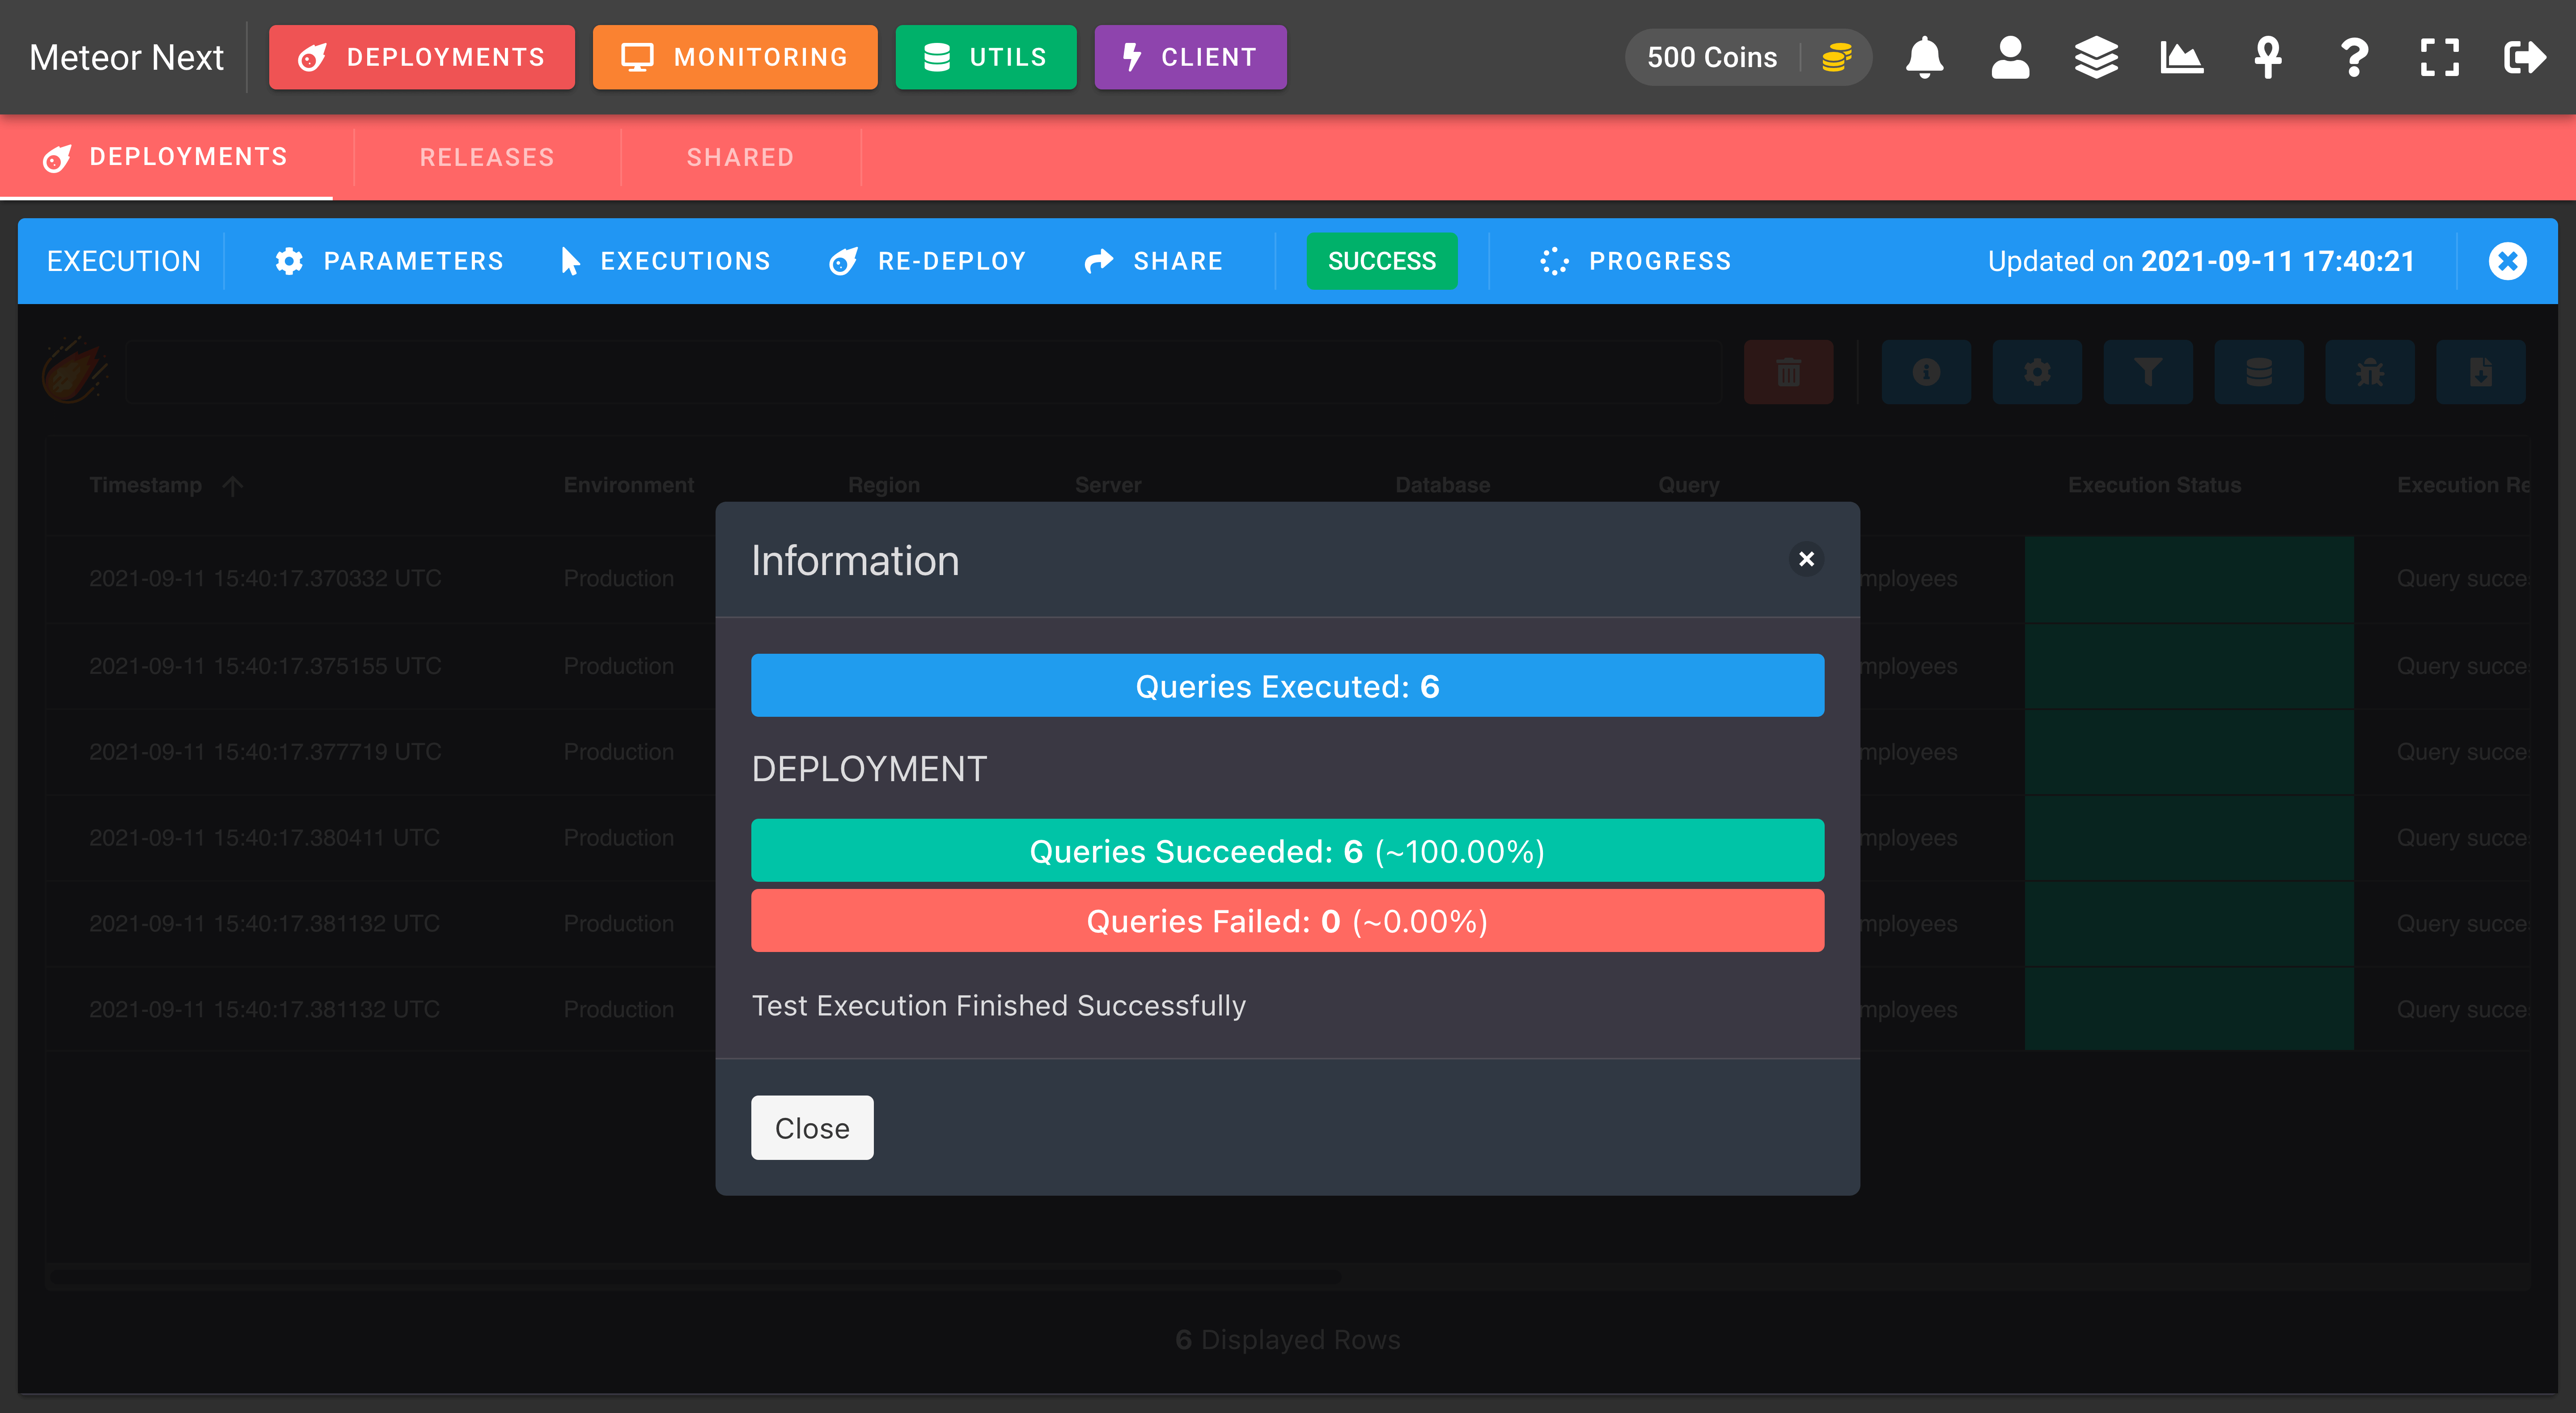
INFORMATION
This option is useful to get a summary of the amount of queries succeeded or failed.
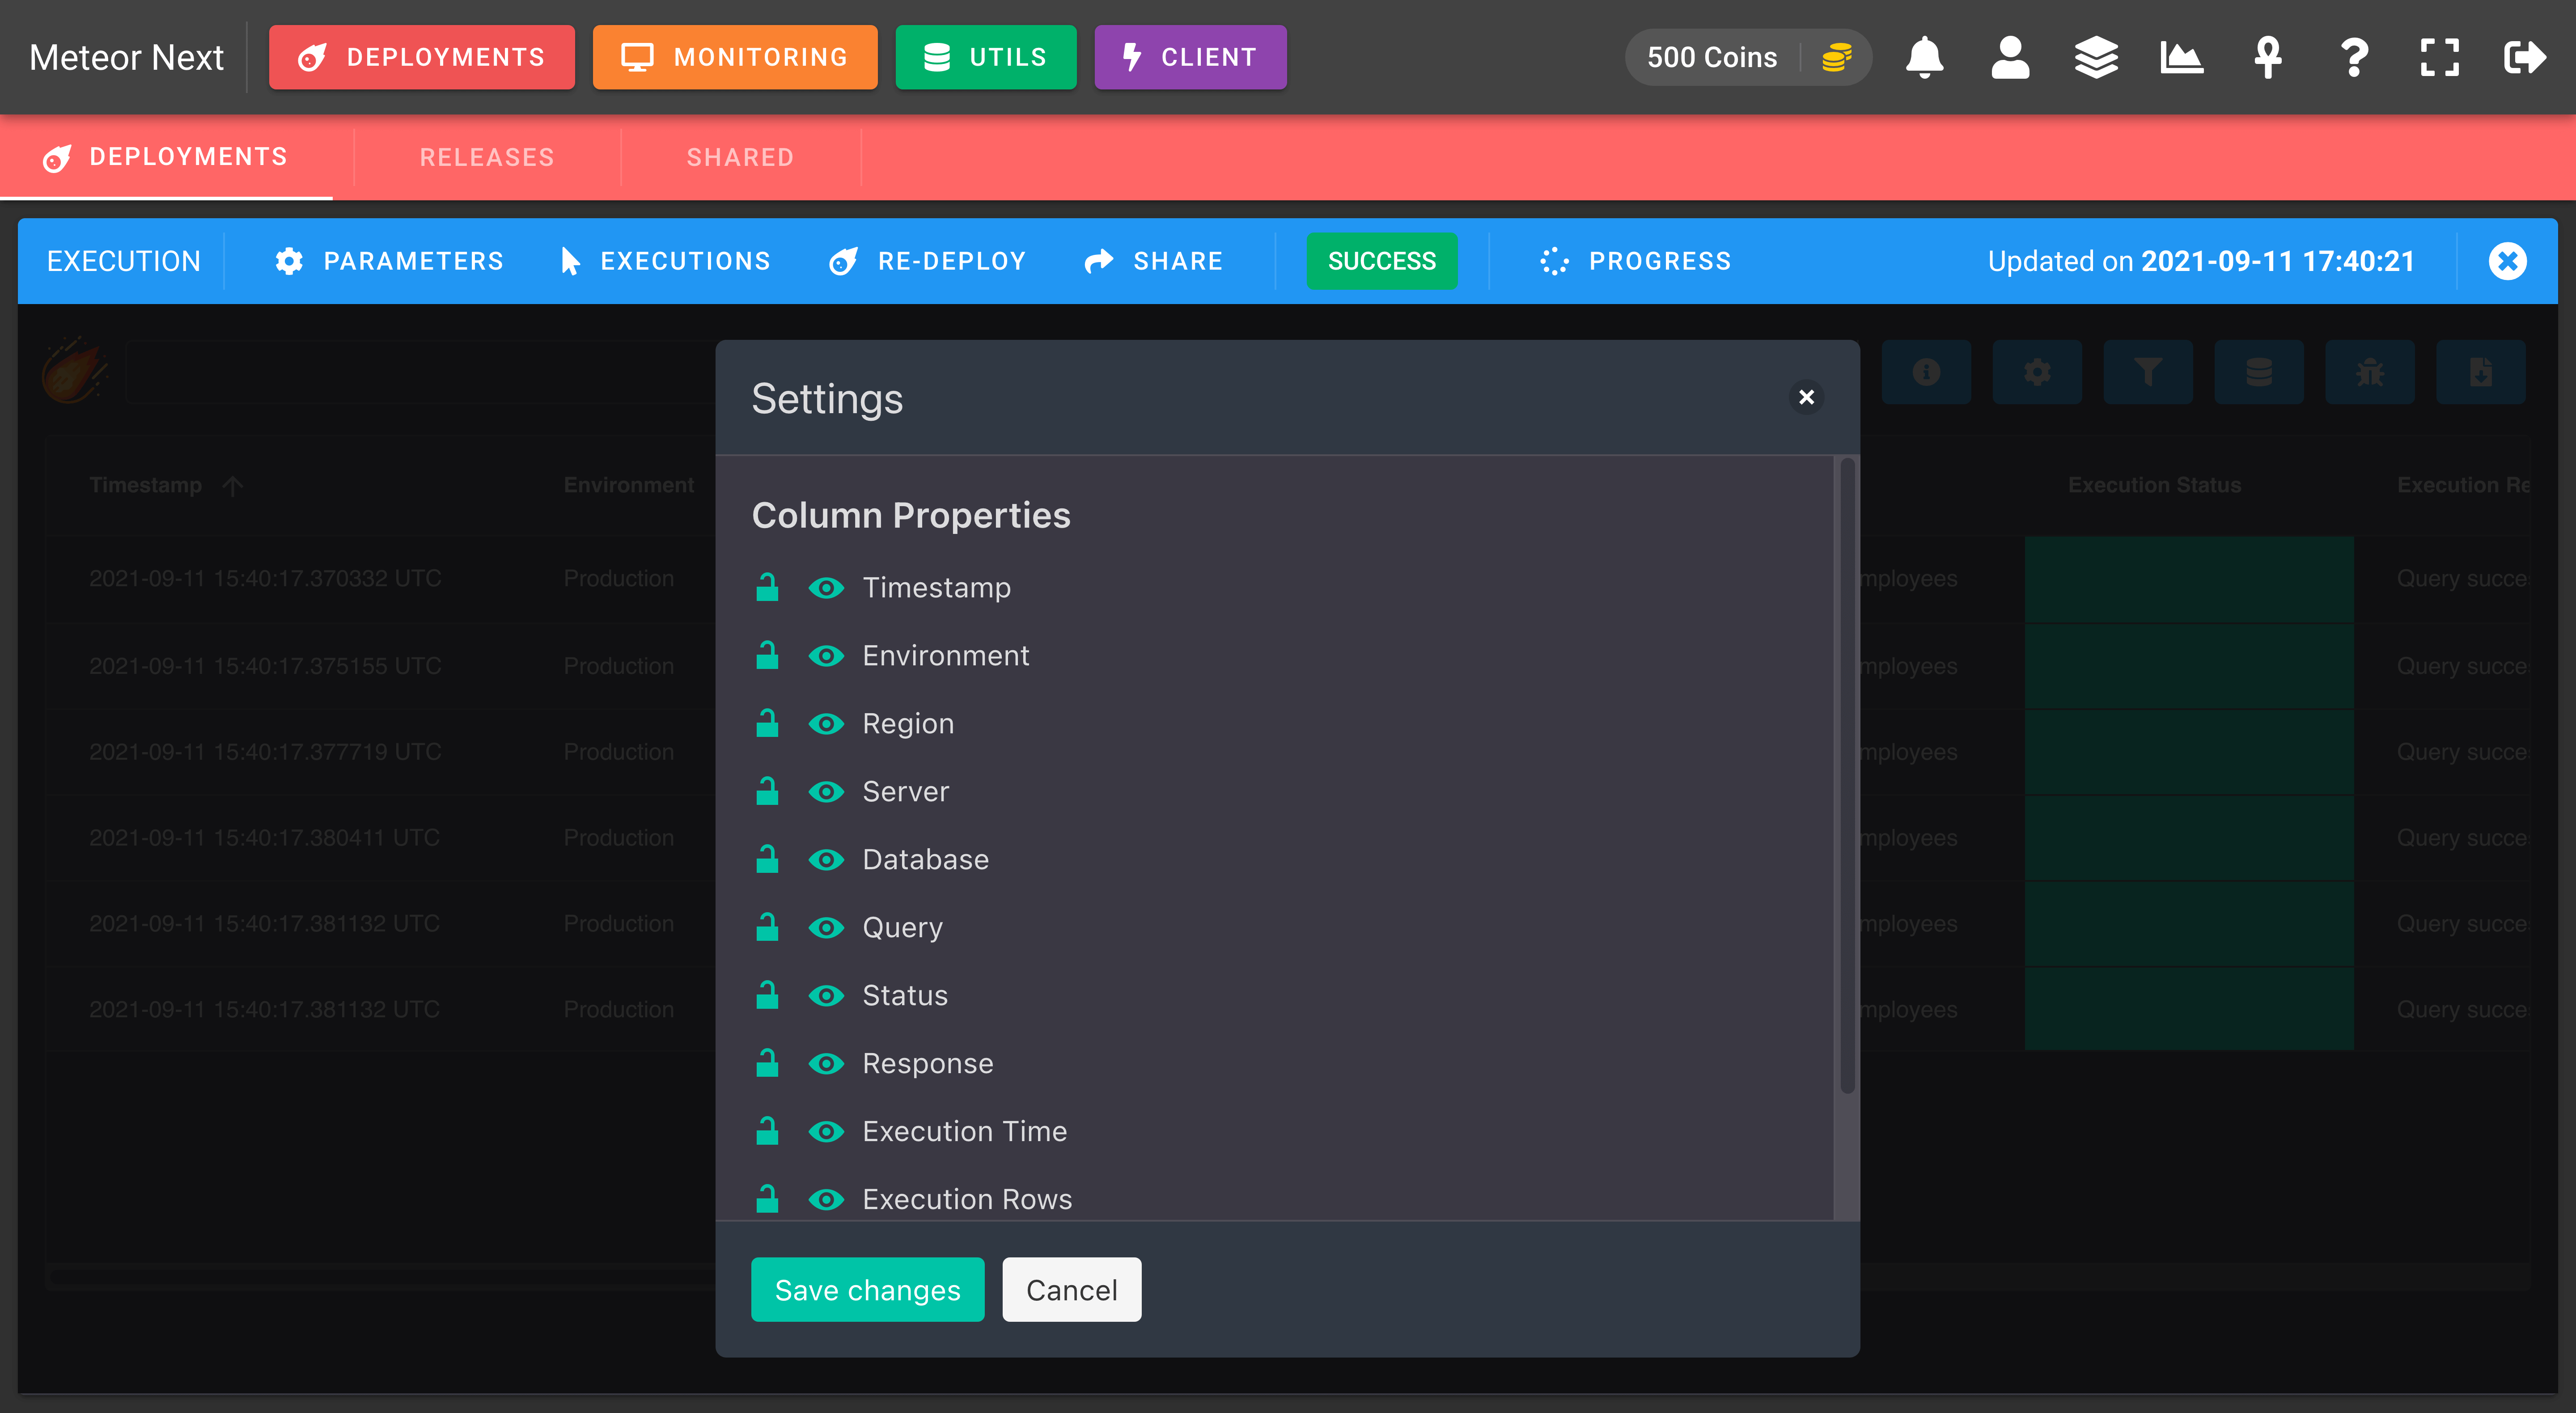
SETTINGS
This option is used to show/hide columns or to pin/unpin them.
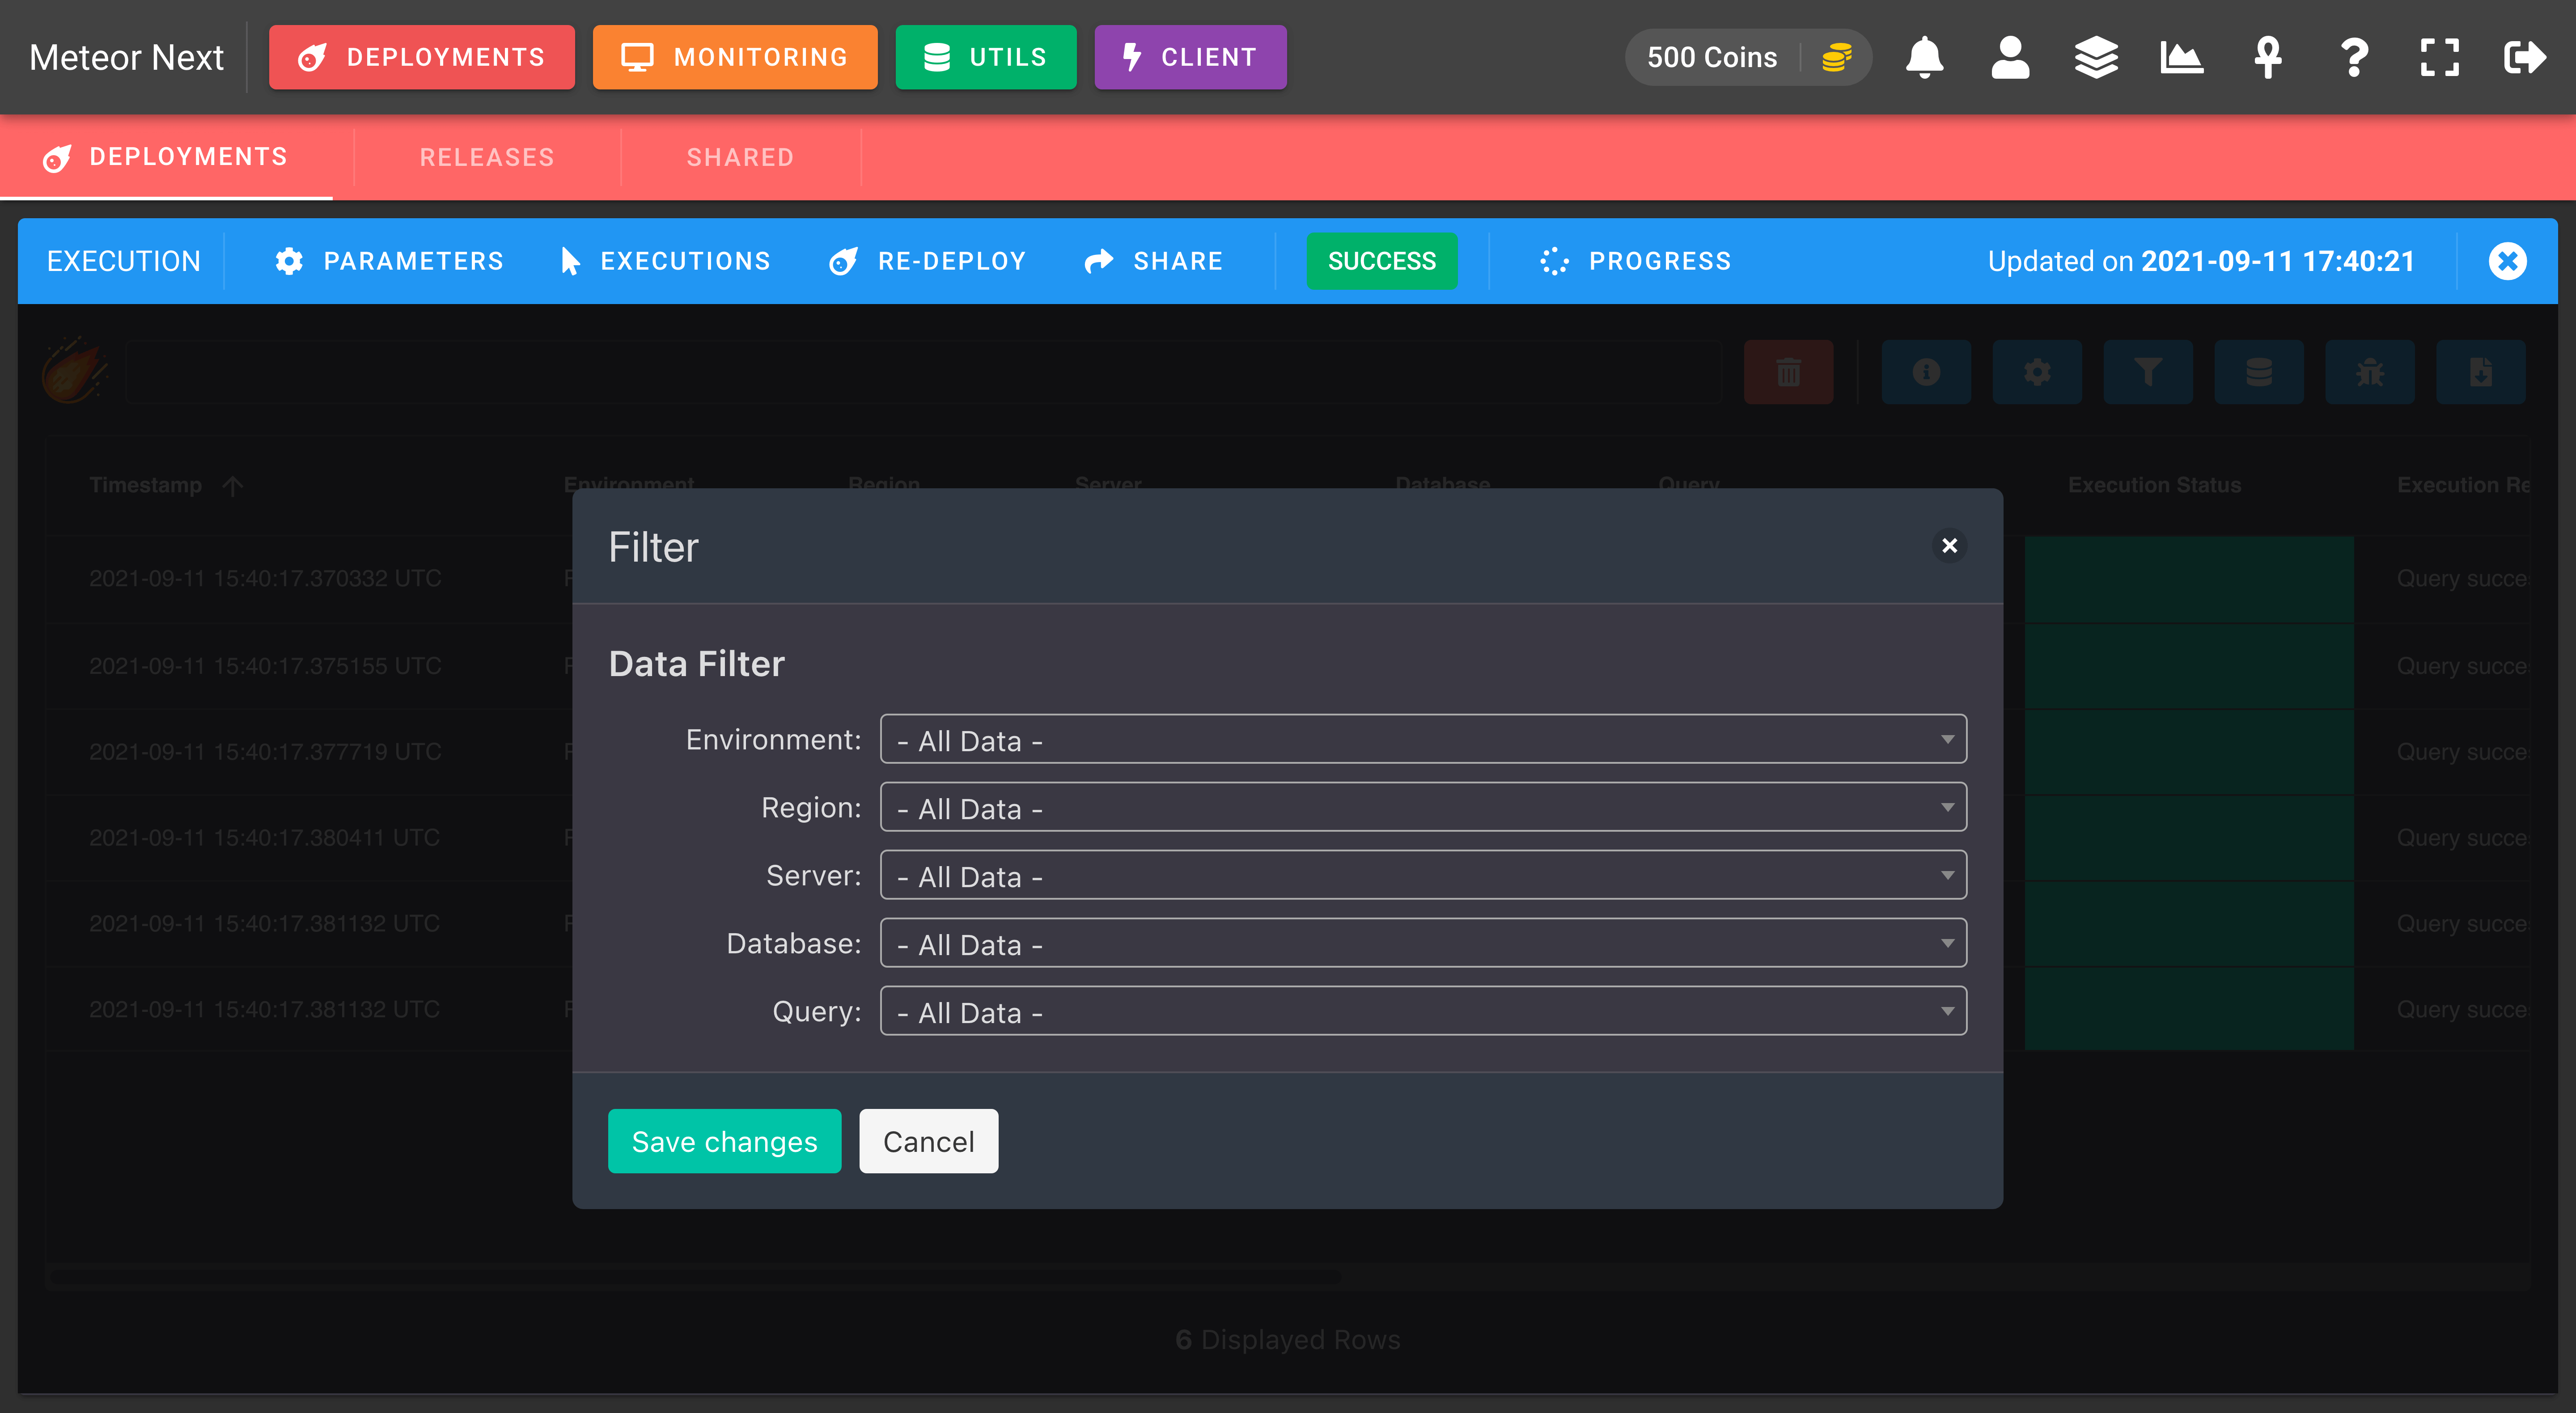
FILTER
This option is used to filter the results by some existing values.
TRANSFORMATION
This is one of the most used and interesting tools in this section. It's used to transform the execution output of a query (mostly SELECTs) stored in JSON format to a visual table representation.
It's useful if we want to work with the results returned by a SELECT query or to perform some filtering / sorting actions with that results.
Let's make an example to better understand it.
As we can see in the first screenshot of this section, the results table shows the execution of a SELECT * FROM employees query in different servers and databases.
Imagine that after executing this query we would like to get the employee that earns more money. Having all the SELECTs results in JSON format, it is a bit unhandy to perform any sorting by a column name.
- Execution Outputs
// DB: barcelona
[{"id":"1","name":"John","salary":1000},{"id":"2","name":"Paul","salary":2500}]
// DB: paris
[{"id":"1","name":"Maria","salary":1500},{"id":"2","name":"George","salary":3000}]
// DB: new_york
[{"id":"1","name":"April","salary":1200},{"id":"2","name":"Richard","salary":5000}]
// DB: san_francisco
[{"id":"1","name":"Roger","salary":800}]
// DB: tokyo
[{"id":"1","name":"Oliver","salary":1000},{"id":"2","name":"Kenna","salary":1600}]
// DB: osaka
[{"id":"1","name":"Lindsey","salary":2300},{"id":"2","name":"Harry","salary":1900}]
What we can do is to perform a Data Transformation.
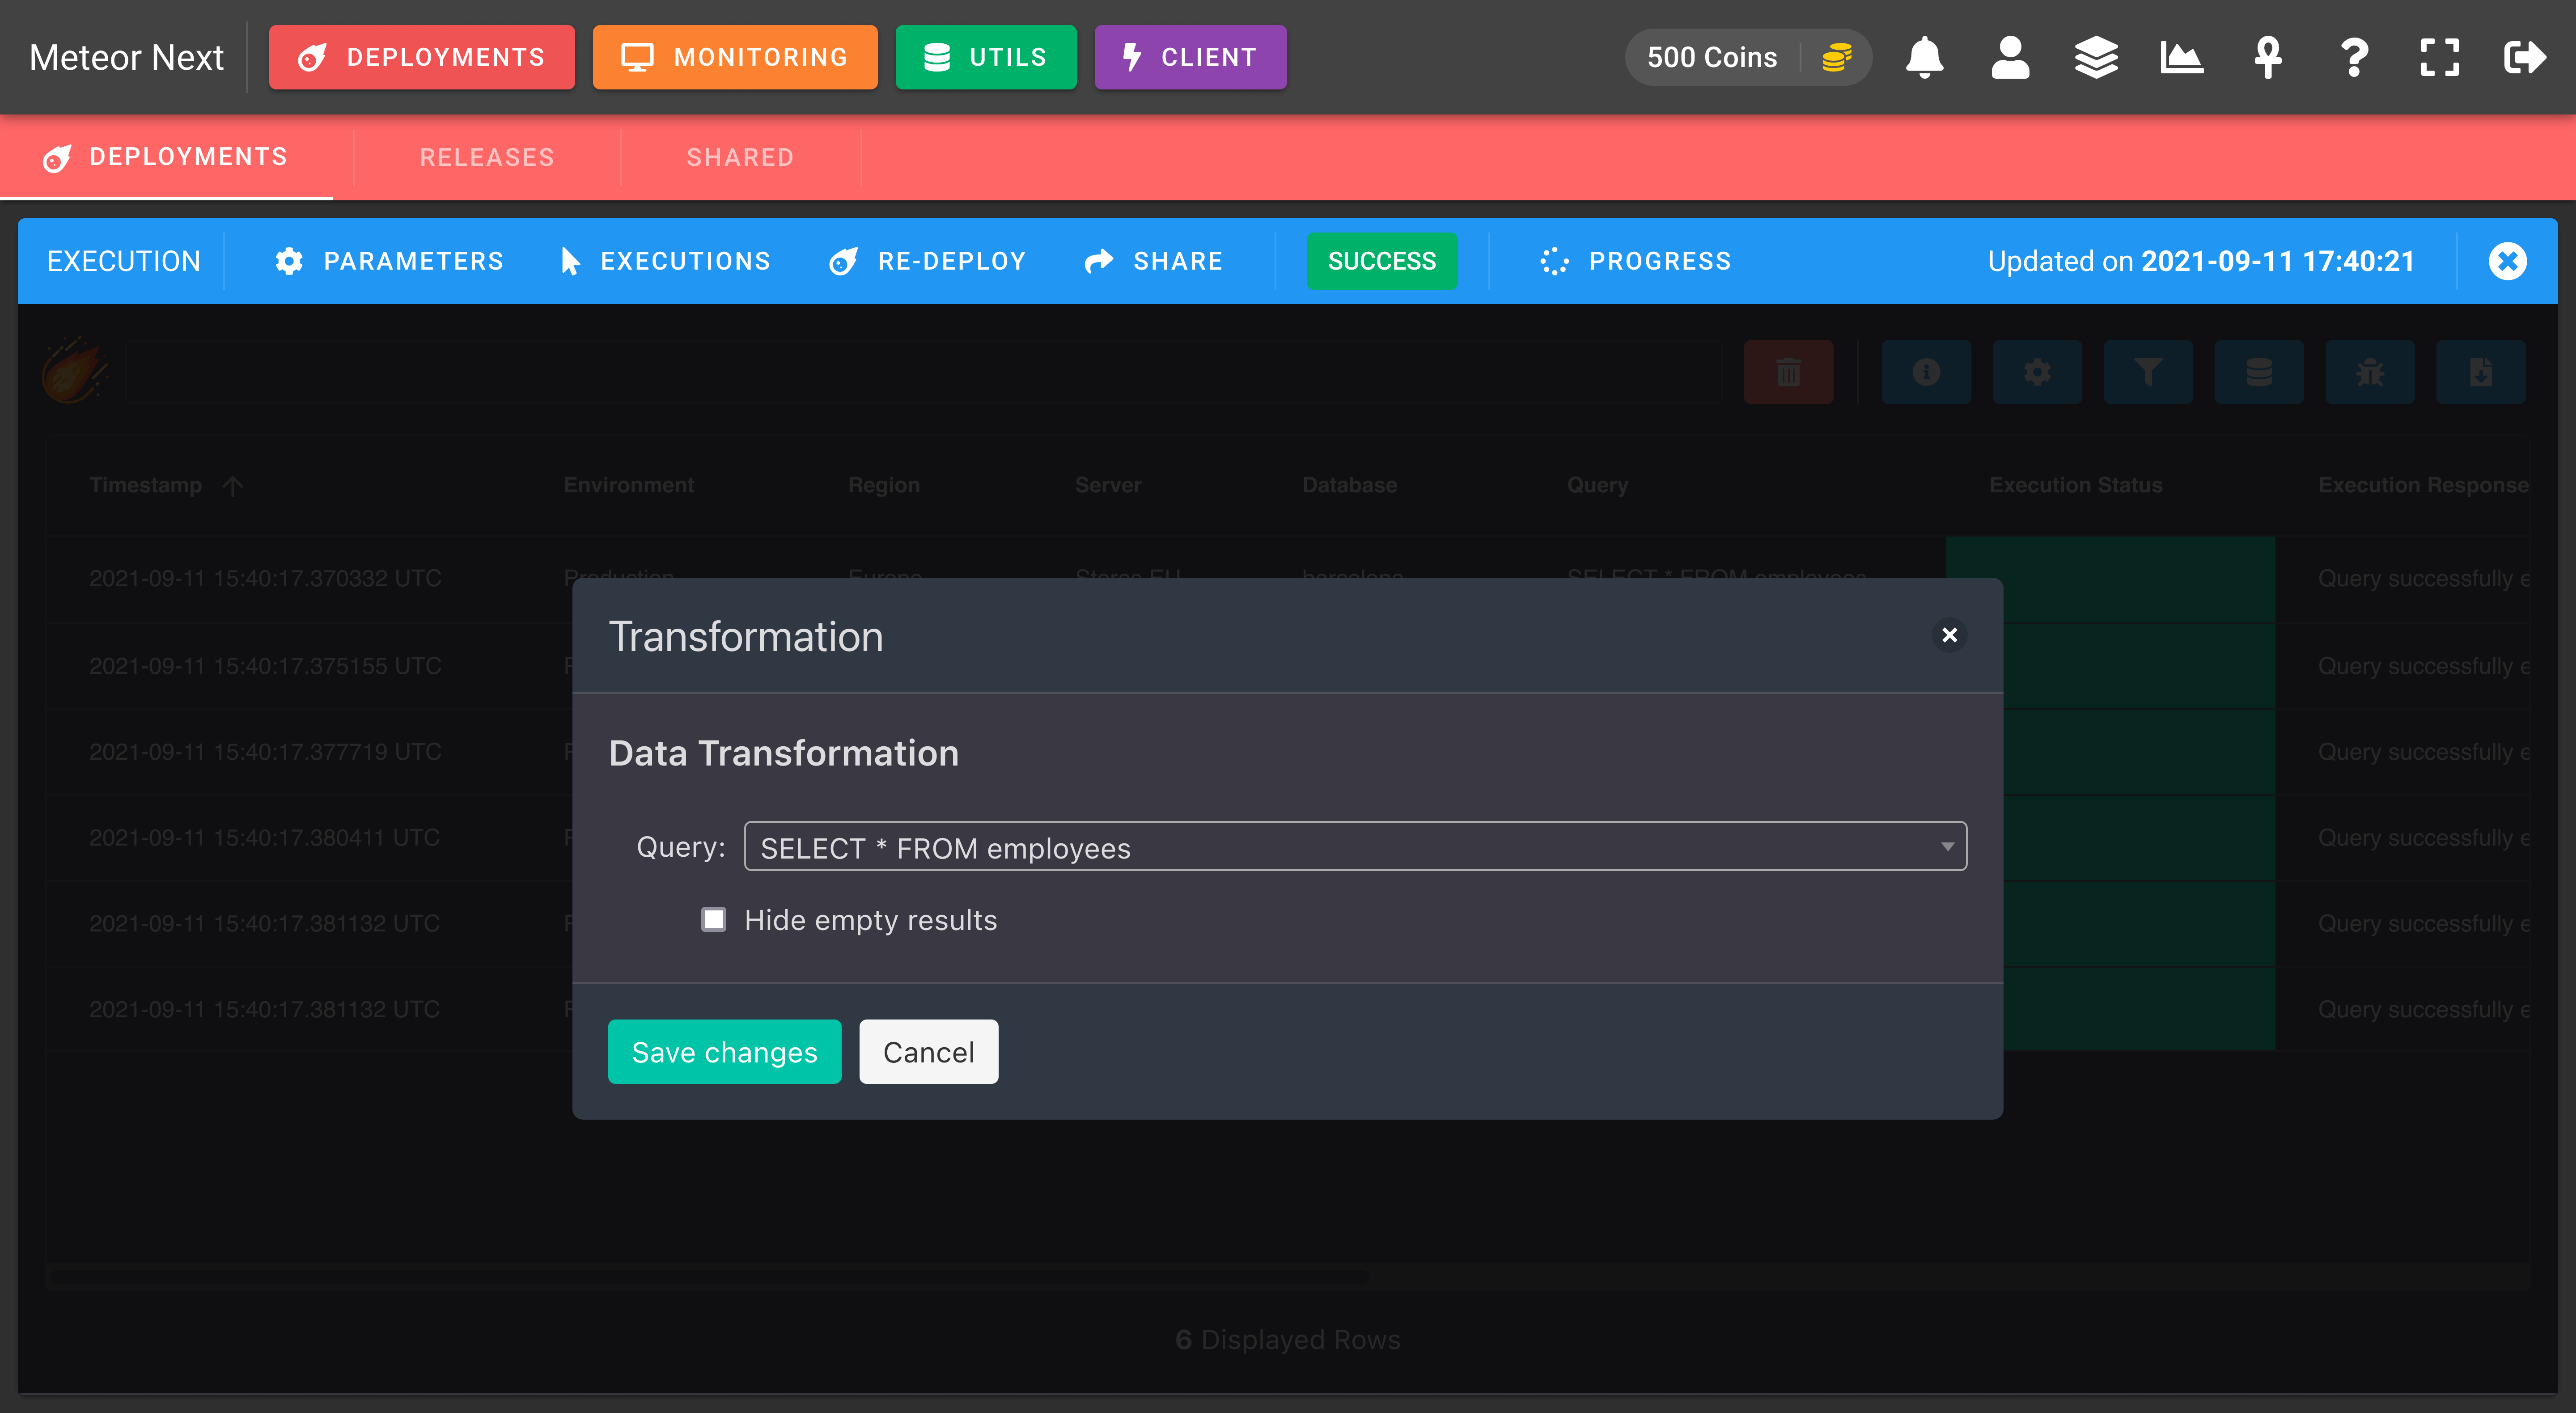
After proceeding, we will get a new table with the results of all the executed SELECTs.
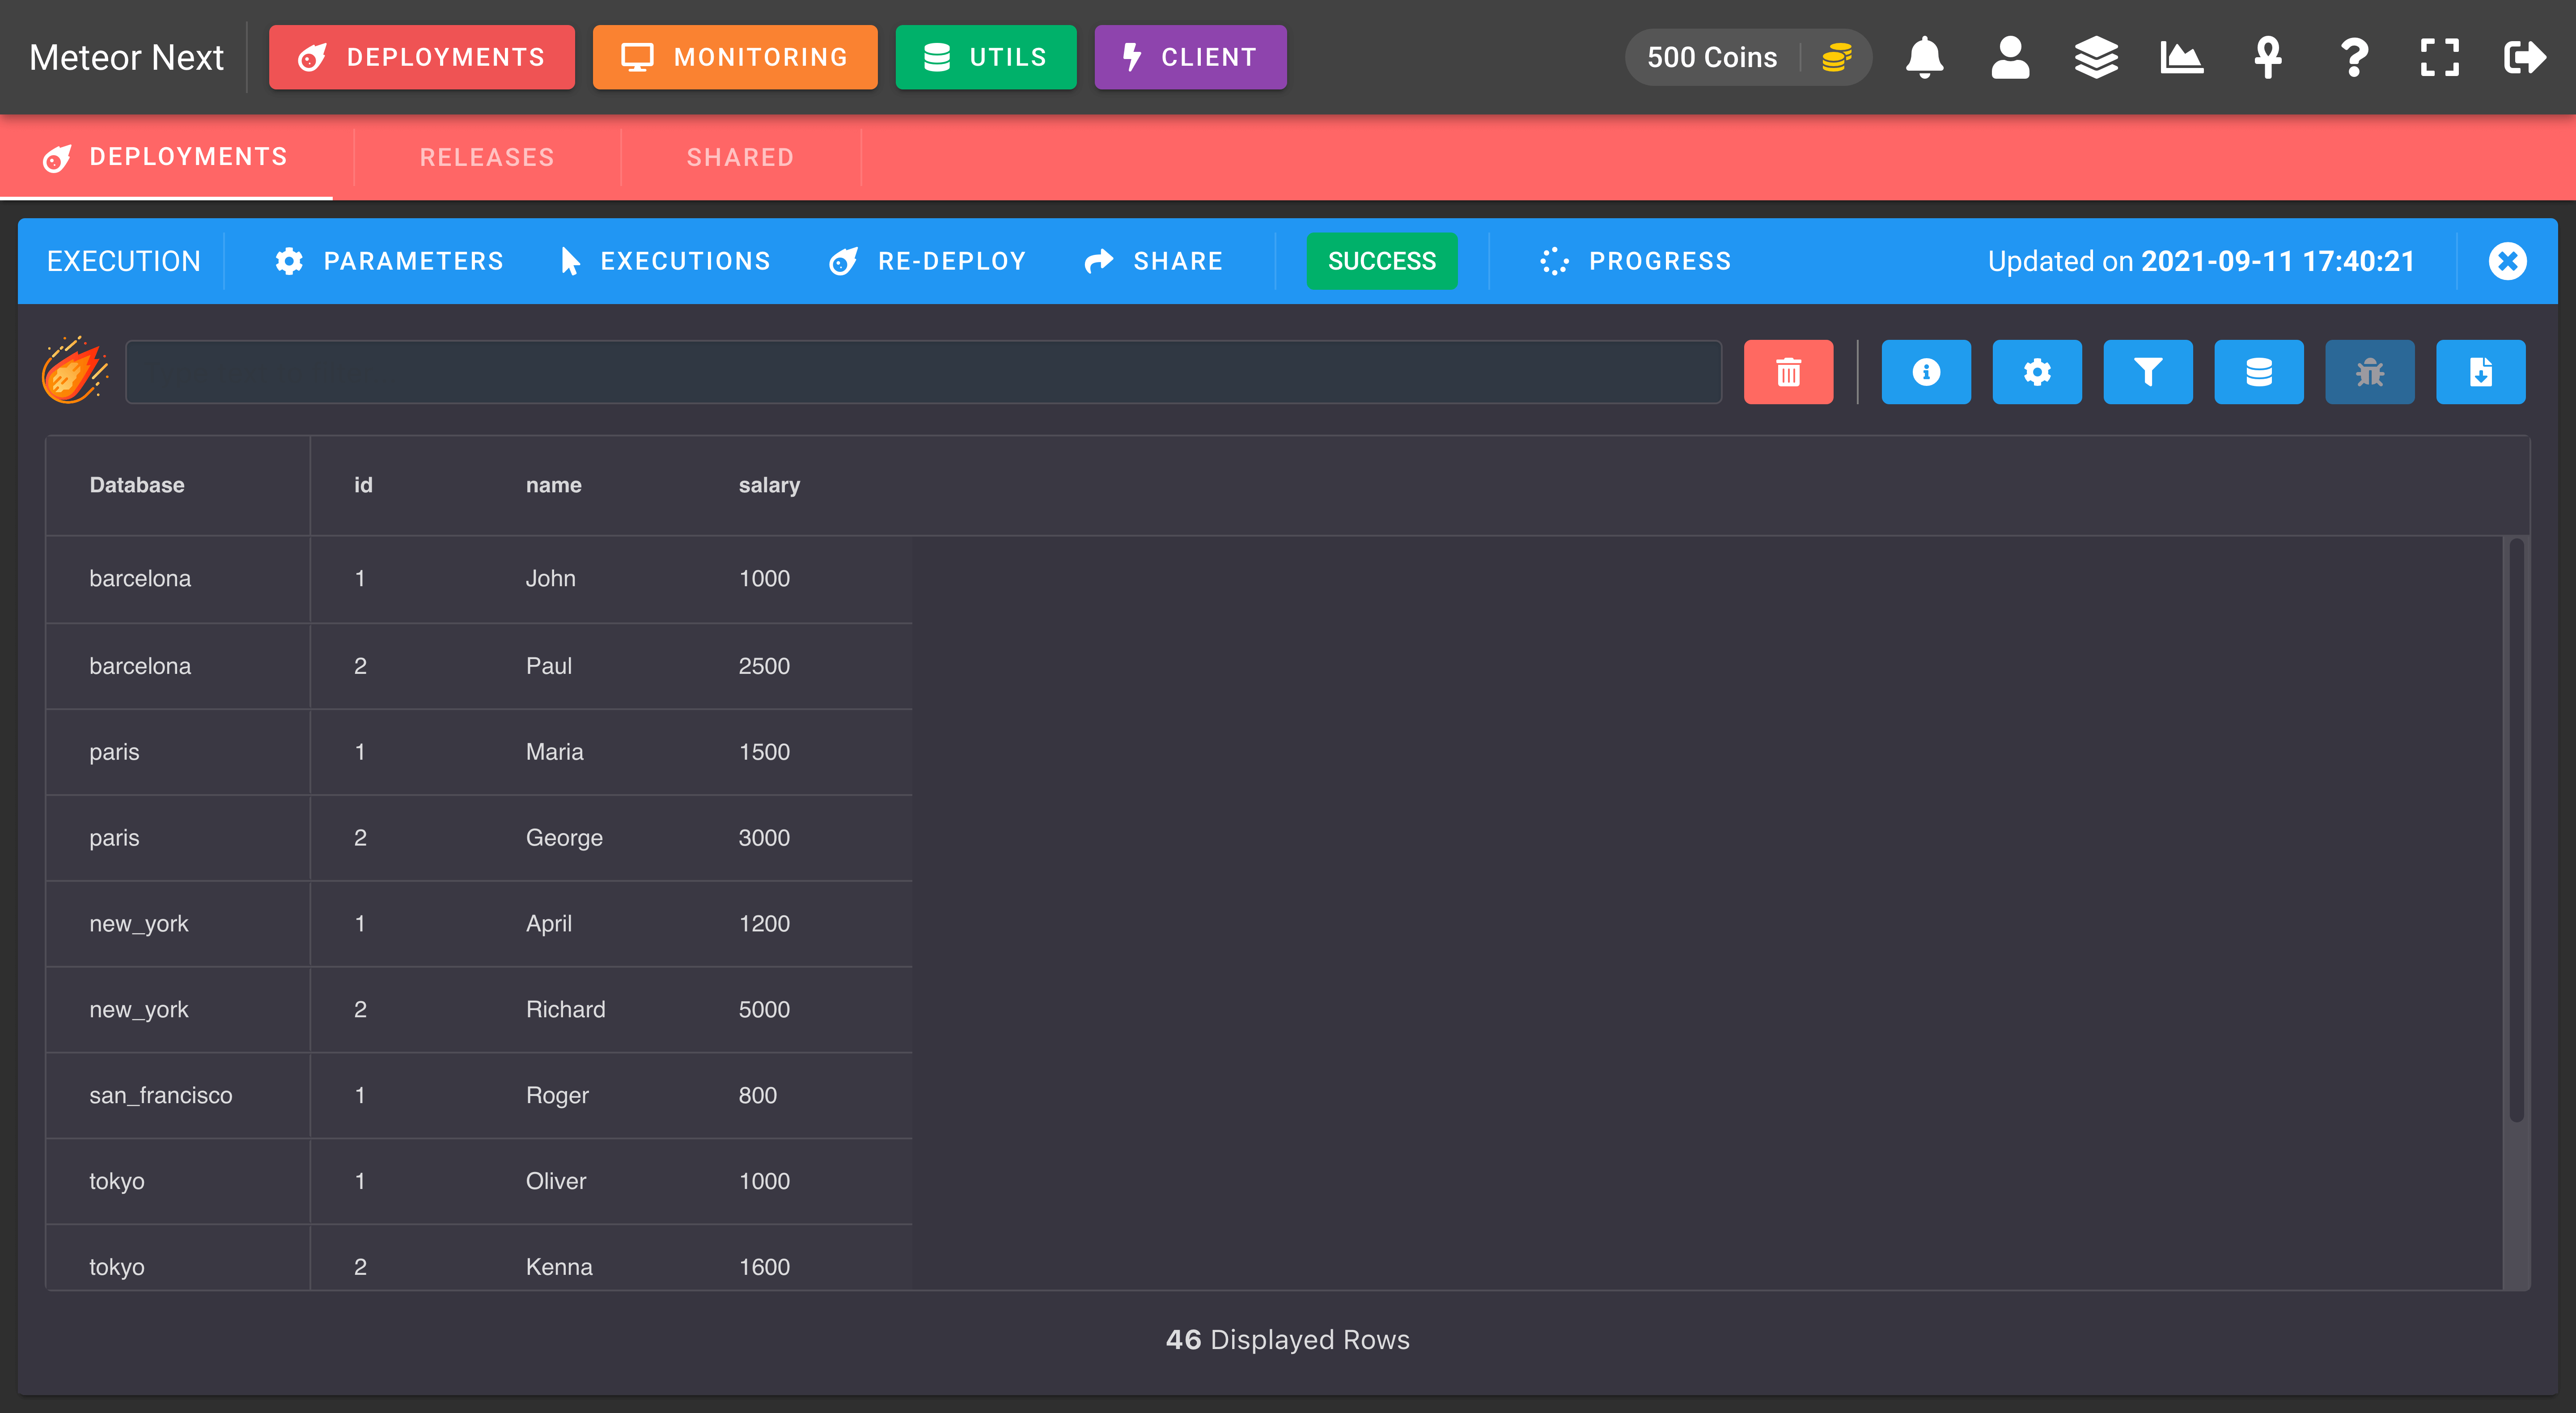
Now we can perform any sorting / searching / filtering operation with the SELECT results.
So, to get which is the employee that earns more, just sort the salary column by clicking the column name and voilà!
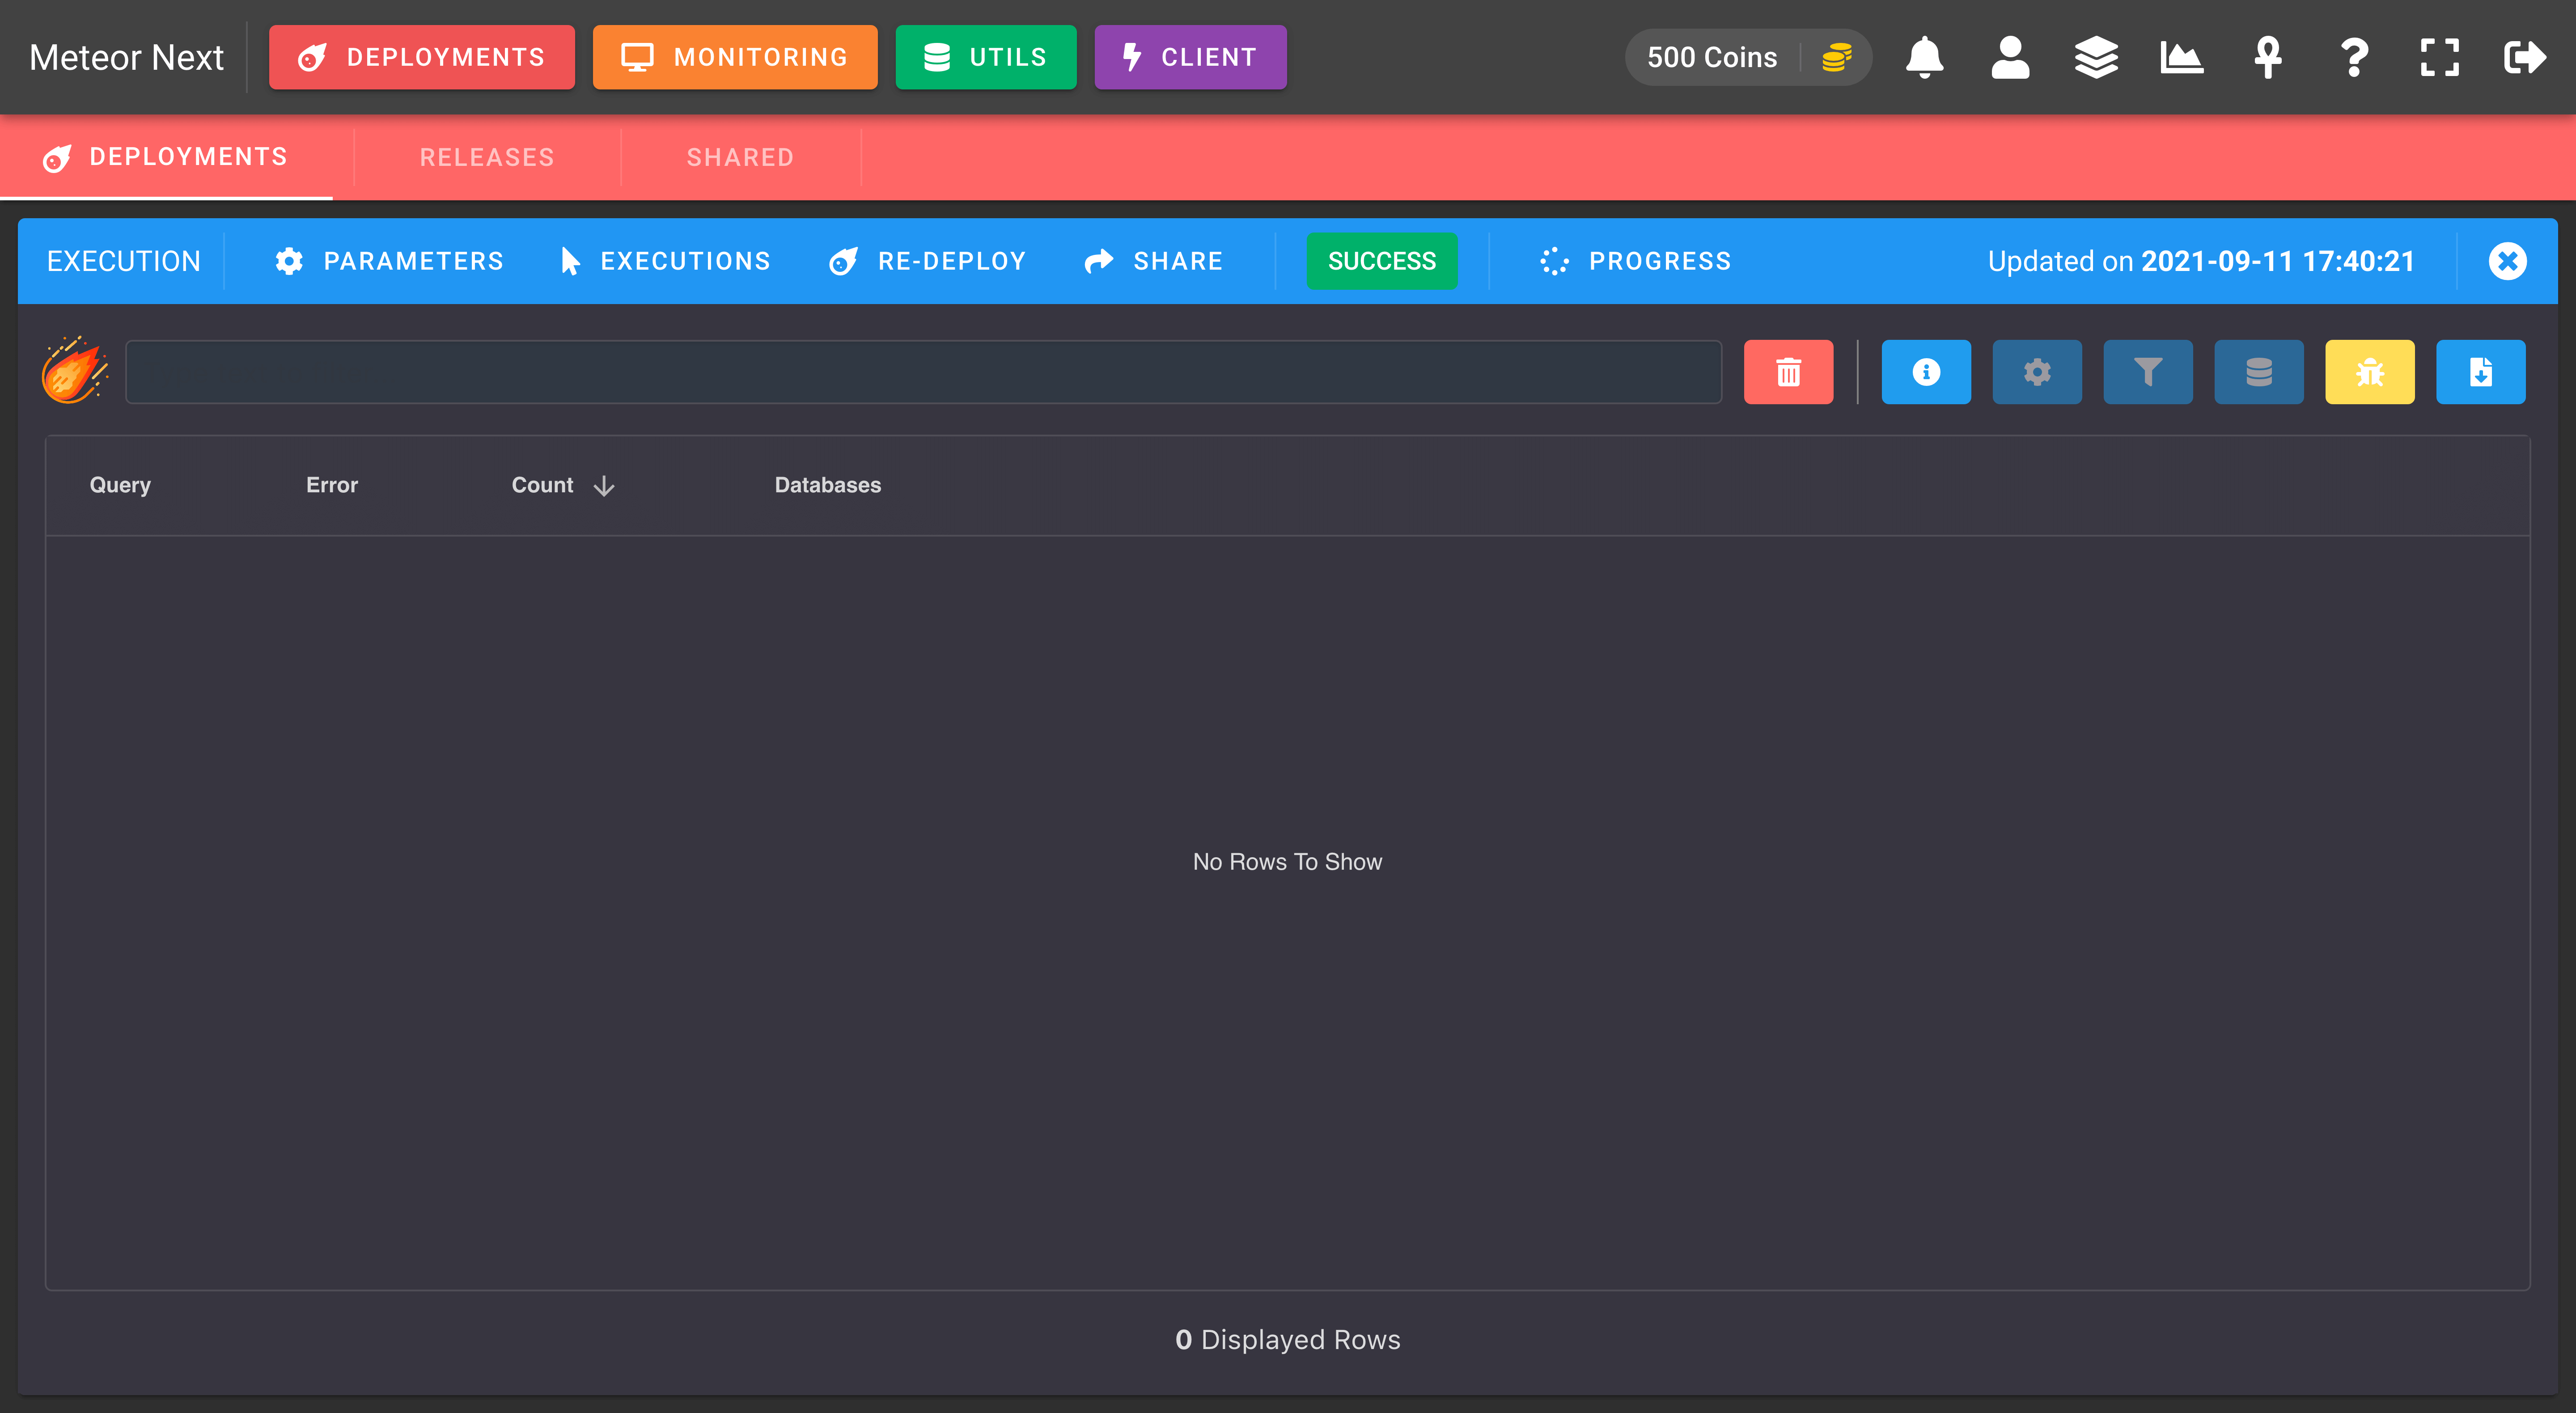
ERRORS
This option is used to group all queries that have failed. Here we will see:
- Query: The query that has failed.
- Error: The error that the engine returned when executing the query (e.g., The table does not exist).
- Count: The amount of times a query failed (e.g., If we execute the same query in several databases, this value will be equal to the times this query failed in some of them).
- Databases: The list of databases (separated by commas) that the query has failed.
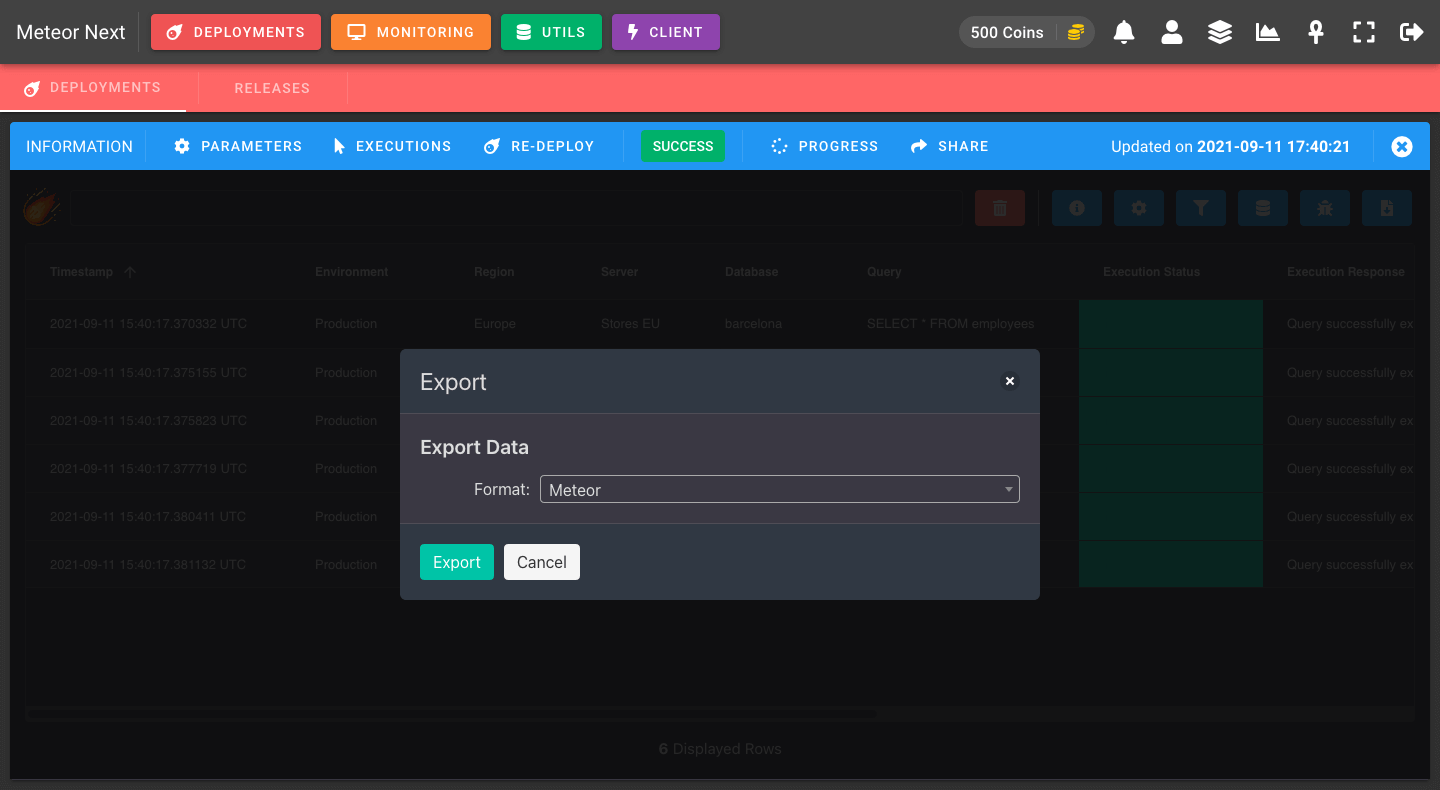
EXPORT
This option is used to export the data in the table. There are three available formats:
- Meteor: A Meteor representation of the data table. This mode is useful as you can share a Meteor file format to another user, and they will be able to import this file in the Meteor Results section to see exactly the data you exported, and then perform any sorting/filtering/search operation.
- JSON: A JSON representation of the table data.
- CSV: A CSV representation of the table data.
SHARE
This option is used to share a deployment result to a user or many.
Click the SHARE button located in the EXECUTION bar. After that click the SHARE DEPLOYMENT button to make it accessible from everyone having a Meteor account.
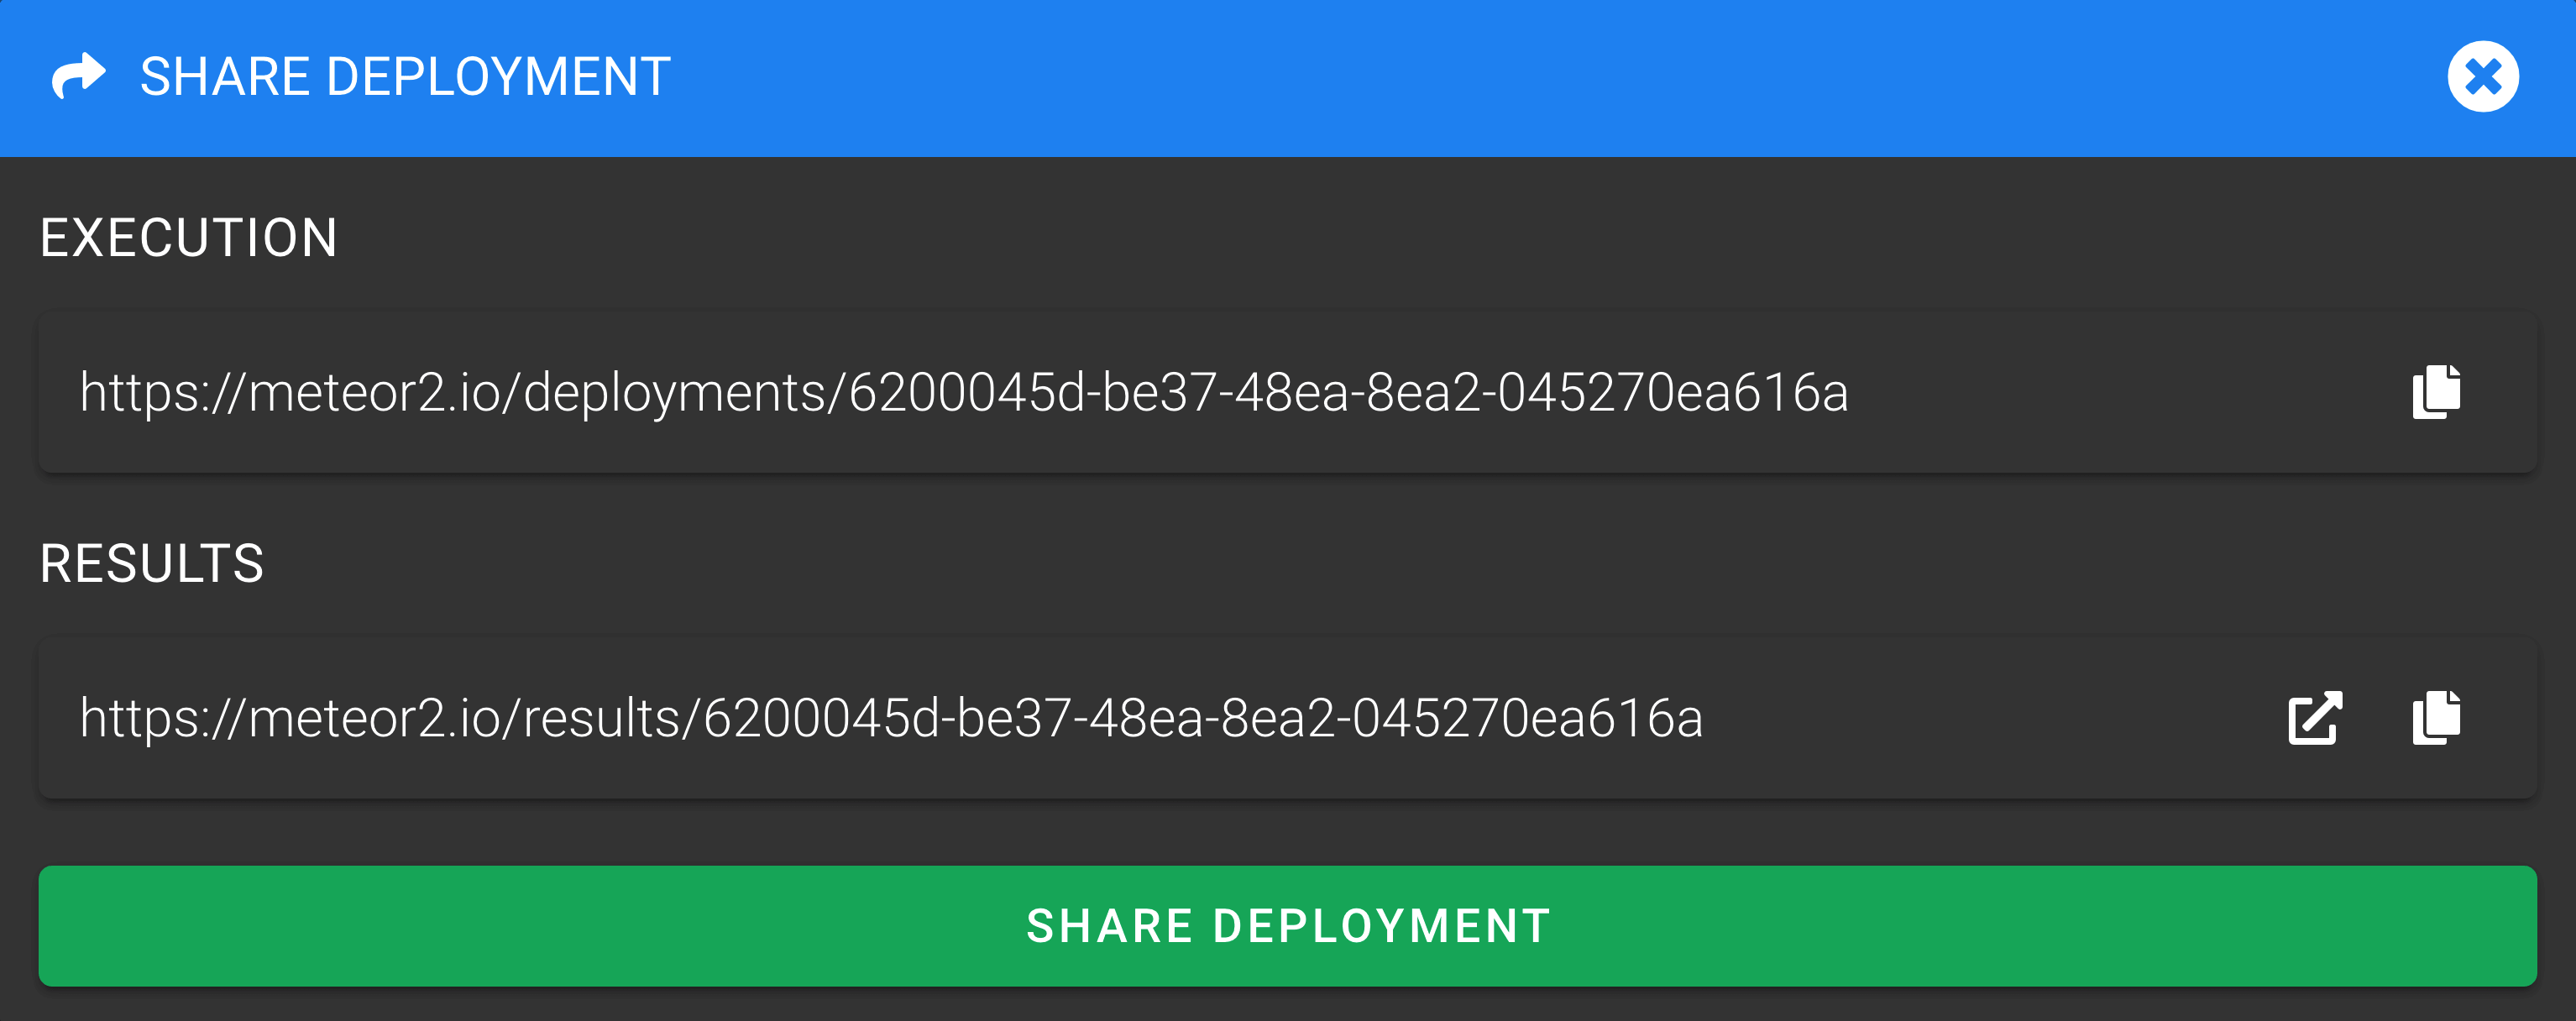
If we shared the Results URL to another user, it would see the execution results in full screen.
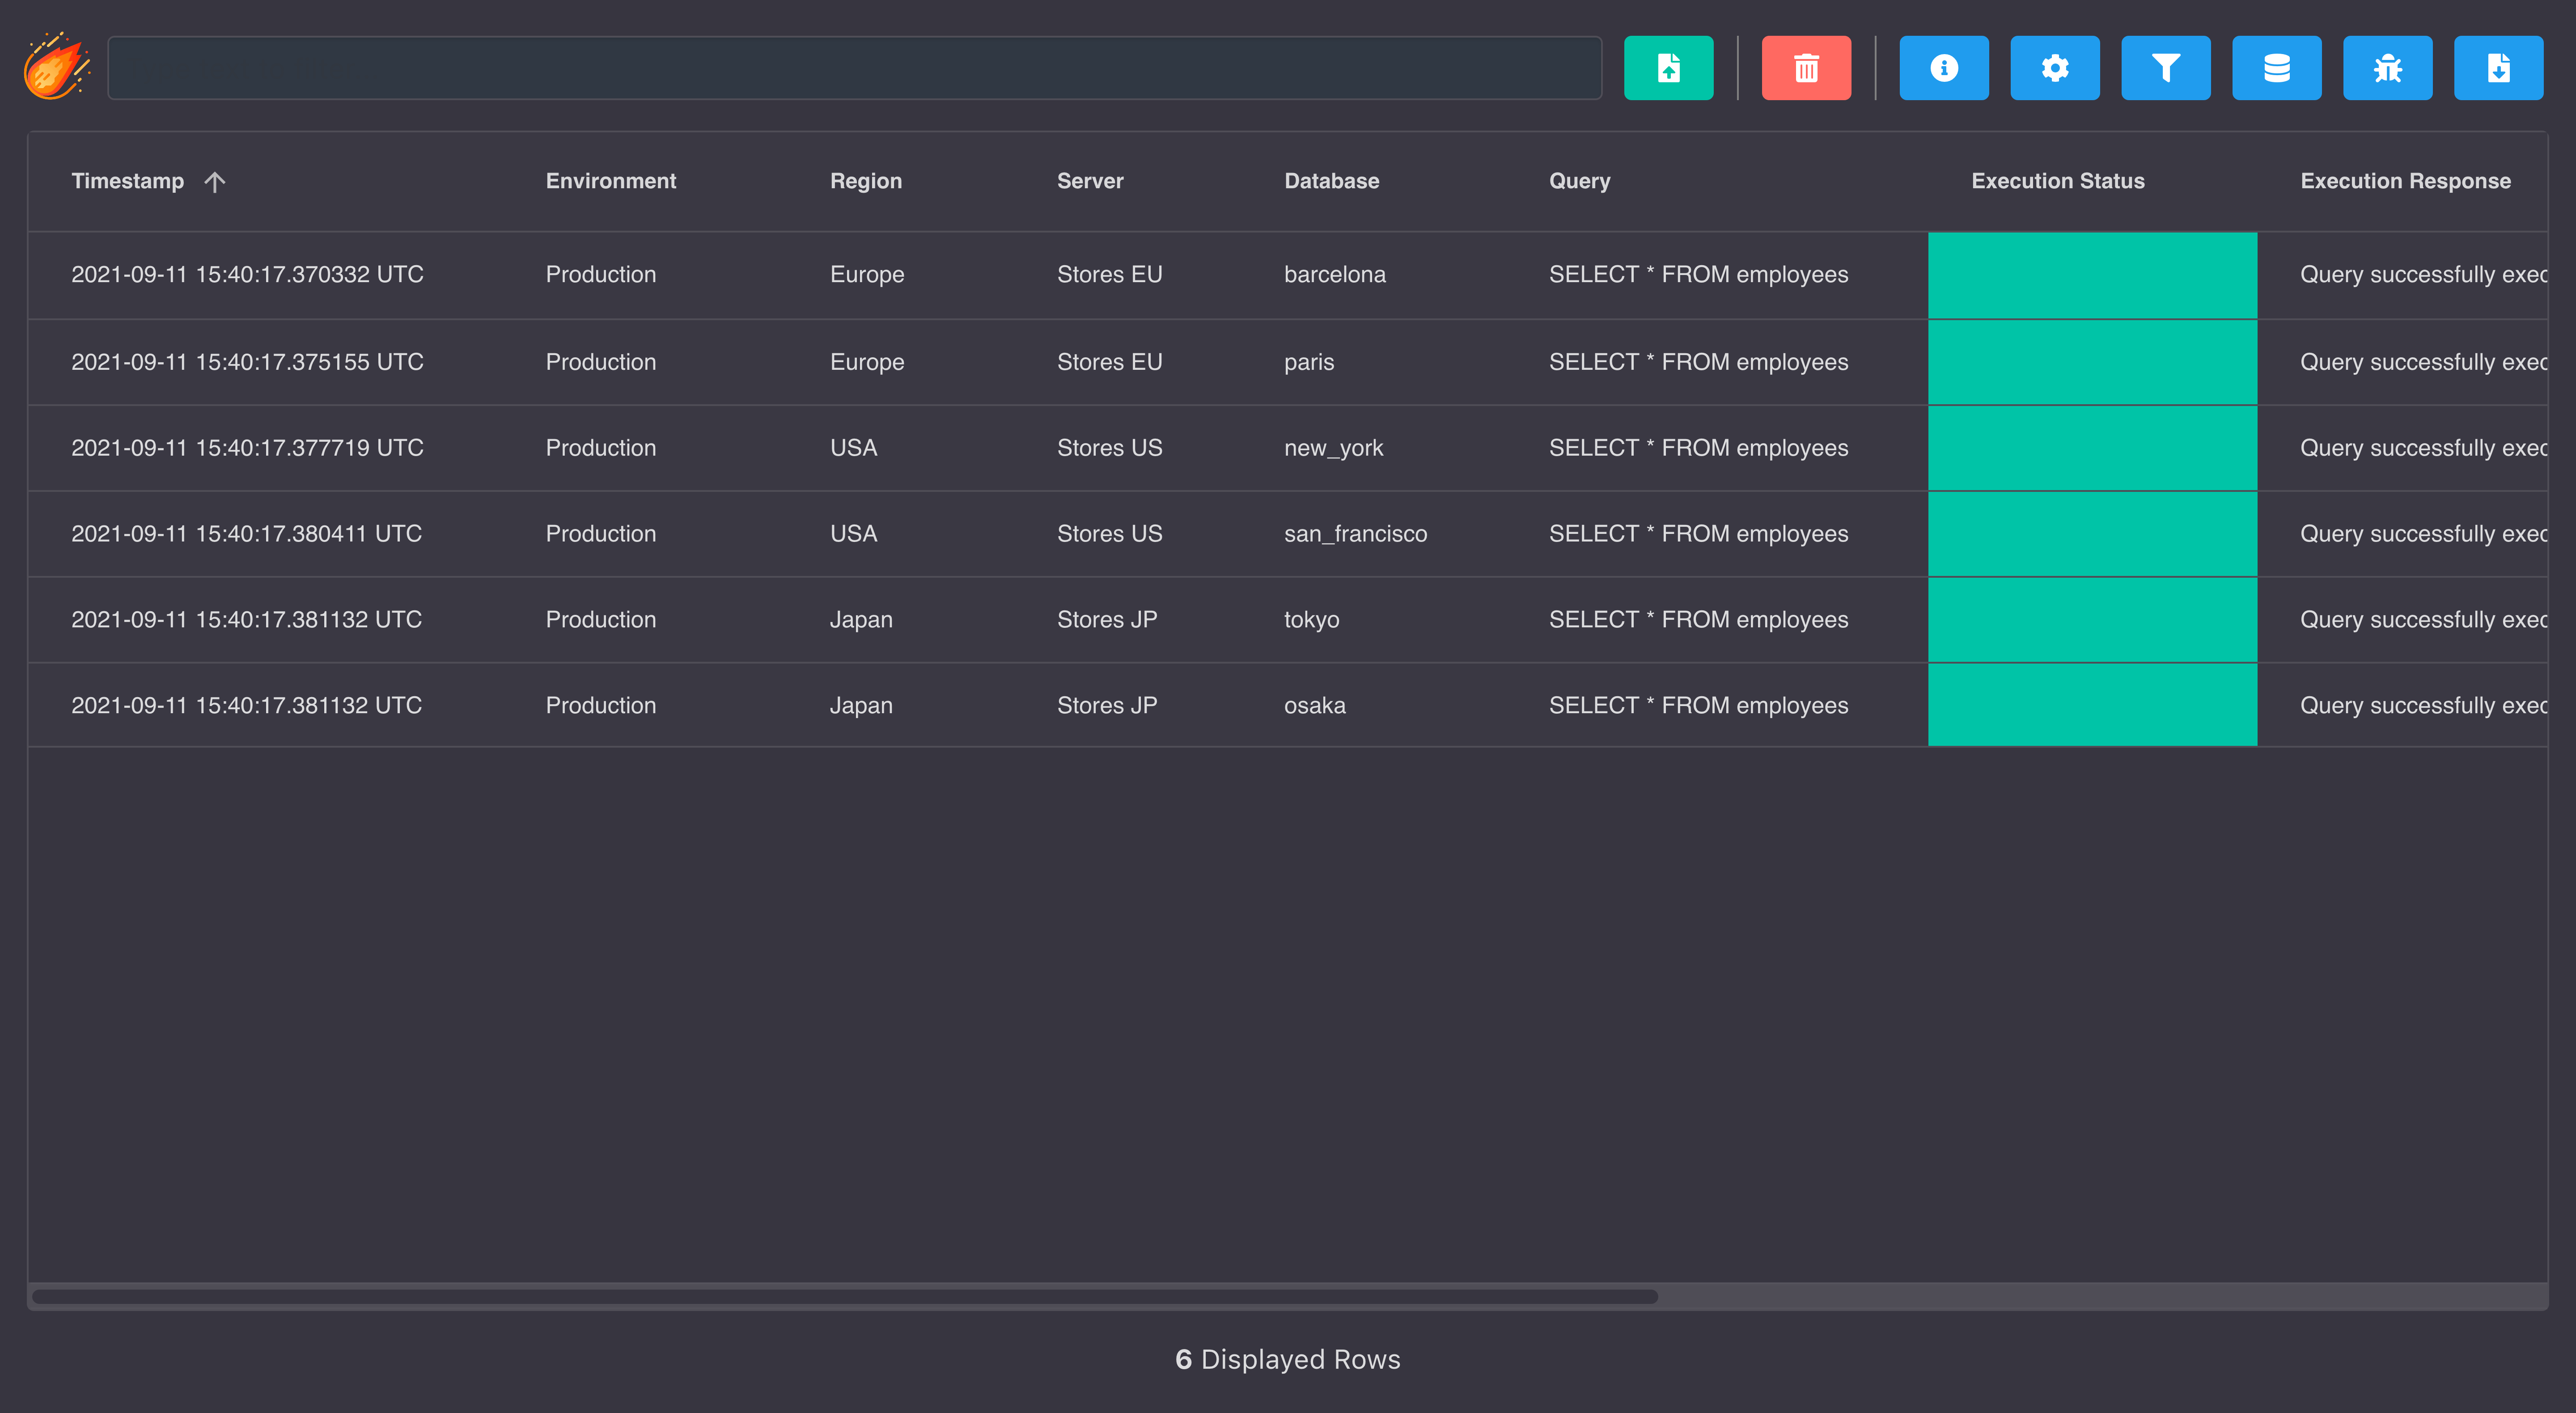
For more information, head to the Data Viewer section.
